Greetings! I hope you all had a very Merry Christmas! I can’t tell you how nice it was to take a few days off to just enjoy this beautiful season with the family. I did things I don’t often do, like sitting still. Ha! Some of you may be taking some well deserved time off this week, and truth be told, it’s going to be a slower week around here too. However, I am very excited for what the New Year brings and I already have a few home improvement project in the works. One is a good friend’s master bath remodel, currently underway. I can’t wait to share the ‘Before’ and ‘After’ with you come January!
While reading some emails yesterday, I came across this question from Andrea:
“I have recently been working on my master bedroom and the last piece of the puzzle is a fabric headboard. My husband wants to just buy this one from West Elm for $449, but I like to do things myself for much less money!
I have been begging him to let me just try to make a fabric headboard with nailhead trim. I saw one on your blog that you’ve already done.Here are my questions: 1) How do you know how wide/tall to have the plywood cut? 2) I am willing to spend more on fabric since I’m doing it myself, so what texture do you think will hold up/look the most expensive? I like the natural fiber look but I also want it to be comfy! 3) Did you mark where the nailheads go before starting them, or did you just follow a straight line as you went along?” ~ Andrea Larson from LoveLifeLarson blog

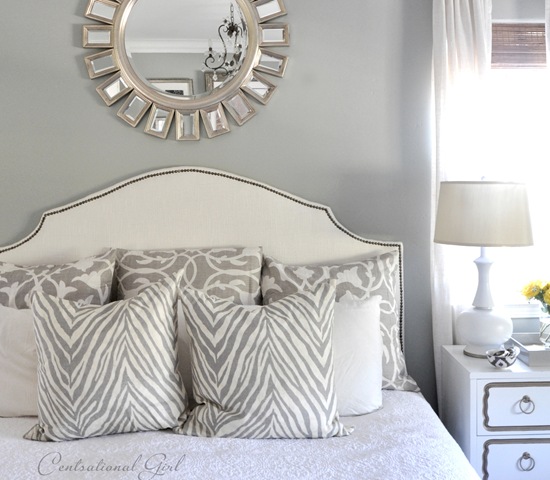
Andrea, I love upholstered headboards with nailhead trim, so much so I had to have one of my own for my master bedroom. I made another version earlier in 2009, but then later tweaked the design and replaced the fabric. I did manage to reuse the same nailhead trim with this newer version by oh-so-carefully removing it from the original.
Making an upholstered headboard for your own room, your child’s room, or a guest room is one of the easiest projects you can tackle, and you can certainly achieve the West Elm ‘Look for Less’ in an afternoon.
You savvy readers and DIYers know there are quite a few tutorials online for this project. Here is my own version and the steps how I made this headboard with nailhead trim for my master bedroom.
1) How do you know how wide/tall to have the plywood cut?
Before you begin, make sure you have the proper supplies for your DIY project. For me, that’s a piece of plywood (½” to 1” plywood cut to size, see below), 2-3 layers of batting, a staple gun and staples, needle nose pliers, a mallet, ‘D’ ring hangers or interlocking brackets, and a nailhead trim kit.
My favorite source for nailhead trim kits is Beacon Fabric, and you can buy either the French Natural or Pewter color for $20.

When it comes to measuring a specific width, there is no magic formula in my book. I simply measured the width of my mattress and added an inch to both sides. Keep in mind your fabric and batting will add maybe ½ inch, but not much more. If you want the simple rectangle shape, have your plywood cut at your local home improvement store.
If you want to add a curve or notch out the sides, that can be done with a jigsaw. The height of your plywood for a rectangular headboard should be at least 36” inches so you allow for room to lay your pillow shams up against your frame, but also have it attached to your wall below the top of your mattress. For curved or detailed headboards, allow for 40 to 48” in height depending on your design.
To create my own shape for my ‘new and improved’ bedroom headboard, I created a template for the curve with a simple piece of paper, then traced it directly onto my plywood. Out came my jiggity jigsaw to make the cuts to form the new shape.

Once you cut your first side you can flip your notched plywood to form the design for the other, just to keep things perfectly balanced. The reason you see staples is because I’m reusing my plywood from the original headboard !

2) What texture will hold up and look the most expensive? I like the natural fiber look but I also want it to be comfy!
Many fabrics run 54” in width, so you can choose any fabric that you love as long as the pattern repeat will work when you lay it horizontally on your frame. If you seek the West Elm look, choose a good quality jute fabric available at a fabric store. Personally, I prefer an upholstery grade fabric for thickness, softness, and durability. For my own headboard, I ordered two yards of a Textured Weave fabric by Robert Allen in the color ‘Snow’ (on sale) because of the neutral color and subtle woven pattern.
For added softness, I layered my plywood with three layers of batting but no foam. Several layers of batting allows for that slight ‘pouf’ surrounding the nailhead trim, and also softens the solid wood frame. Skipping the foam allows for your nailhead to secure to your plywood, but a 1/2” layer of foam would work too. I just didn’t want to spend the extra $$ since my plywood was already 1” thick.

With your staple gun, attach your layers of batting and fabric to your plywood. Start at the top in the middle, and work your way around to the sides, smoothing the fabric as you go.
3) Did you mark where the nailheads go before starting them, or did you just follow a straight line as you went along?”
Working with a trim kit makes it so easy to do this project. To attach the nailhead trim, I simply layered the strips on top of my stapled fabric, starting at the bottom of one side. You only need to hammer a nail in every fifth spot (you can see the holes for the hammered nails below). To stabilize each individual nail, use needle nose pliers then gently hammer it into your plywood. Be sure to use a mallet ~ a standard hammer would destroy the delicate surface of your nailhead.

To turn your corners, clip your trim with your pliers.

To secure your headboard to your wall, use either ‘D’ ring hooks or interlocking hanging brackets secured to wall studs, both found at any home improvement store.

My project cost me a bit more ($70) because I fell in love with a designer fabric (even though the fabric was on sale). Plywood will run you between $15 to $25 depending on your region, and the trim kits retail for $20. If you find quality fabric that you love for a reasonable price, a nailhead trim headboard can be yours for between $50 to $100.
.
.


wow! I didn’t realize how easy it was. I can’t wait to try my hand at a nailhead trim project…maybe after my lil’ one turns 3 mths next week :)
Kate, your headboard is beautiful and very similar to mine (which I bought years ago…no creativity for me, sorry). I recently wrote two posts about upholstered headboards too: http://sasinteriors.blogspot.com/2010/12/dazzling-upholstered-headboards.html
http://sasinteriors.blogspot.com/2010/12/more-headboardswith-twist.html
I hope you’re enjoying the Holidays!!
~Jenna, SAS Interiors
Love the look. Where did you get the chandelier? In search for one for my master bath!
THANKS for sharing!! I have been itching to make a headboard myself and now it will be easy with this tutorial! Happy Holidays, Kate!!
I just finished a headboard myself and took about 2 hours, so easy! I got my nail head trim on ebay for $16.75 shipped. The seller has lots of finishes.
http://myworld.ebay.com/nails-to-you/
Just an FYI, I used 1 inch foam and was worried the nail head wouldn’t be able to penetrate that and the plywood but it worked just fine.
I just finished one too. I bought my nailhead trim on ebay and it was $15.25 (including shipping). I also used 1 inch foam and two layers of quilt batting. I put mdf board around the edges which gave me a place to nail in the trim. I am super happy with the result and it only cost me $52. I love Kate’s headboard, it was my inspiration!
I love this project and hope to make a headboard next year myself. I found these great decorative (and interchangeable!) upholstery tacks at http://www.diamondheadut.com. They are awesome and I love the bling!
Susan Kostelecky
Love this headboard, so simple yet so elegant! I just finished another diamond-tufted headboard for the other daughter. Tried to convince her to let me make one like yours but no she wanted one like her sisters {the one I have featured on my blog)
I am so incredibly sorry to hear about Edie’s loss, how awful! Will be praying for her.
Terrific post! Fabulous blog!…Glad I stumbled upon it..following now…K
♪♪♫♪ ♪♪♫♪ :II ♫ Start spreading ♫ the NEWS ♫♪♪♫♪ ♪♪♫♪ It’s going to be a GREAT year in 2011!! ♪♪♫♪ ♪♪♫♪
All the best to you Kate in the upcoming NEW year!
xo Lynda
I LOVE the wall behind your bed! PLEASE tell me it’s not wallpaper (I don’t do wallpaper). Is it some sort of stencil, and, if so, how did you do it?
Love the headboard! The studded trim really adds to the look. I’ve always wanted to try to make my own headboard…but I don’t have a bed that needs one! Have a wonderful week, Kate!
Oh how I enjoy your blog. Such creativity, style, and ingenuity! Your blog’s banner is just delicious – it’s my inspiration for my new master bedroom, so elegant, crisp and feminine. Thank you for sharing your talents with us.
P.S. I couldn’t help but notice the snarky earlier comment on the “proper” way to observe Christmas. Please ignore her. For every mean-spirited “Christian”, there are 10 other kind, loving believers quietly trying to change the world with love.
Thank you for posting this fantastic tutorial. This is exactly what I was looking to create in my bedroom, and now I have a step by step process to follow. I love your blog, you offer such fantastic DIY projects all at a reasonable budget. Please keep the wonderful ideas coming.
This is such a classy look. I love that you reused the plywood to save some money. Centsational, indeed. :)
What a wonderful tutorial – if I were talented, I would attempt it. My prayers go out to Edie at this time.
THANKS! for the breakdown! My husband and I are planing on diy a headboard like the West Elm one this weekend :) this post is perfect timing
IMPRESSIVE. I bought an upholstered headboard recently (at least on sale from Ballard)…but I DID hammer over sized French nail heads around a little upholstered bench (a project more my speed).
Mary Ann
Ohhh! I was just thinking about doing something similar for the new mattress set we are buying this weekend. I definitely feel like I can attempt it now :) Thanks again lady!
I’m planning on a headboard makeover in 2011. Mine currently has “leather” on it…your posts will come in handy. Thanks! I also love your paint/walls. Your bedroom is beautiful!
That is AMAZING. I am in the market for a new headboard for my master bedroom and this tutorial came just in time!!! Keep up the great work, your blog website is wonderful.
So adorable! And where did you get the wallpaper behind the bed? I’m in love!
This is amazing. The entire room is just perfect. I am using your bed as inspiration for the one I want to make. I posted about it today. http://jandjhome.blogspot.com/2011/01/week-end-finds_10.html
Sorry, wrong link. Oops!!!! http://jandjhome.blogspot.com/2011/01/headboard-inspiration.html
I finally got my bed done. You were a huge inspiration and your tutorial was so perfect. We actually had it open on the screen as we did the nailhead trim. Thank you so much. We love the bed and I am so proud of it.
http://jandjhome.blogspot.com/2011/01/diy-upholstered-headboard-using-ikea.html
LOVE this look! I want to do my own headboard, but love the feminine look of the curved piece rather than the square/rectangle design from West Elm. Do you think you could post or email me your template for the wood? I’m afraid that if I free-hand it, that it will come out looking horrible!
Love the headboard (the first and the second!)
I was wondering if you have any recommendations for fabric if I wanted to do diamond tufts? Do you think the fabric you used would be too heavy?
Love the headboard…. I think you did a fantastic job and this is a project that I would LOVE to try!!! I too am wondering about the wallpaper?????? I love it and the color is very soft. Thanks so much for taking the time to post this.
Oh thank you a million times for sharing your project and for taking the time to give this great tutorial! I am in love with end result! I am sharing this post in my post tonight about my design for our children’s den/guest bedroom. I love your blog and your style. I look forward to more of your posts.
xo,
AK
Hello Centsational Girl. I love the look of your master bedroom, especially the headboard with the nailhead trim. I really like the wall behind the bed. Is that wallpaper or stencil. If it’s a stencil, how did you create the look? In my master bedroom I have a headboard in nailhead trim (The Barcelona from Bassett Furniture) and I would like to put a lattice design wallpaper/stencil design on the wall, whichever is cheaper, the better.
Hi CG–
Thanks for the great tutorial, with your help I made a great headboard for my guest bedroom that I’m in love with. It cost under $100, and compared with my inspiration design price tag of $1700, it was a huge deal! I’m so proud of my little headboard and now I like to just go in the guest bedroom and admire it!
http://sustainingmama.blogspot.com/2011/06/diy-headboard.html
I love this head board! How many yards of fabric would you suggest buying for a queen size bed?
What measurements would u suggest for a square king size headboard. I can’t decide between squared or the feminine look. Can you post template?
How many yards of fabric for a King size bed? P.S. Love your blog! Amazing & very chic. I’m also looking for a gray colour for my master bedroom with the fabric you used for your headboard. Any suggestions?
This is GORGEOUS and so helpful. I am in love with the wall too. Can you please share if that is a wallpaper or stencil and any details. Thank you!
I love how easy and step by step you have made your upholstered headboard posts! I can’t wait to start mine. I have one question though, what would you recommend for someone who does not have a wall to hang the headboard? Have you tried attaching legs from the headboard to the frame or making one large piece on wood extend from the floor up? Please advise!
The wall covering is a STENCIL. She goes over how to create it on this page: http://www.centsationalgirl.com/2011/02/tips-for-modern-stenciled-walls/
LOVE this! My husband and I are buying a home, and I would really love to try and duplicate this! Is there any chance I could get the pattern you used? I know you used a piece of paper, but do you know of a place I could print off a template? I dont think I could duplicate what you did with the shape, and I love it.
I love the headboard and am going to see if my hubby will make it for my daughter’s room. I also love the stencil that you used to paint the wall in the background. Any idea where to get that from? Love it!
Beautiful.
Please make sure you all use formaldehyde-free plywood, especially for a project which is right where you or loved ones sleep.
Conventional plywood contains urea-formaldehyde, a known toxin, which off-gasses into the air for many months or years. Eco-friendly formaldehyde-free plywood, such as PureBond Plywood, eliminates these toxic gases.
I am not trying to sell anything. I am on a mission to raise awareness about creating safer, healthier and more beautiful living environments.
Lisa
ktharpdesign.com
Love the headboard! Also love the stencil on the wall behind. Could you please share where I can get it from?
Thank you,
Alexandra
Love this room. It looks so peaceful and elegant. I already have a headboard, but would like to re-create the wall Did you use a stencil on the wall (did it come from Cutting Edge?) and what color is the wall paint. I see that many others have asked the same question. Could you share the details.
Thanks,
Ann
Hi Ann, I painted the trellis wall myself, it’s my own stencil design, you can read about it here.
http://www.centsationalgirl.com/2010/07/painted-trellis-wall/
The wall color is ‘Nantucket Gray’ by Benjamin Moore!
Kate
This is absolutely fantastic. My husband and I are undertaking this project right now; we were too excited to wait until after all our supplies had arrived; now the bones are sitting in the garage (im)patiently waiting for padding and fabric to get here :)
Check it out when you have a sec! http://thecraftedcure.blogspot.com/2012/01/sneak-peek-project-in-progress.html
We’ve finished our headboard, and while it didn’t turn out as pretty as yours, we’re pretty proud of it! We’ve linked to your post in our final tutorial: http://thecraftedcure.blogspot.com/2012/01/headboard-project-revealed.html
I love the stencil wall design & the color is perfect. I’ve been searching for the perfect gray & I think I’ve found it! Thank you for sharing all of your ideas in such detail! I can’t wait to get started!
I have just begun this project with a piece of plywood my husband happened to have in the garage. It is 1/2″ think, so I am going to use 1/2″ thick foam along with my batting. Which layer goes on first, the foam or the batting?
My husband and I were JUST talking about doing this for our master bedroom”makeover”. These are some of the easiest-to-follow instructions I’ve seen so far! Thank you thank you thank you!!
I absolutely love this headboard! It has inspired me to try and create my own this coming weekend. If you still have it I would LOVE for you to post or email me a template for the wood! You would be my life saver!! I want to get it just right but am not sure if I can free-hand it! Thank you so much! :)
I love the shape of this headboard! I’d like to make my own but I’m also nervous about my freehand not turning out anywhere as nice as yours. Can you please post the template or dimensions? Would be greatly appreciated!!!
Sadly I don’t have the template anymore Rebecca, but I recommend giving it a try with a pencil, you’ll get it right with a little practice, promise!
Kate
Thank you so much! My wife and I had everything to create the headboard, but I was nervous about what to do with the nailhead trim. Thank you very much for your detailed instructions. It made me feel a lot better about it.
So glad to read this Adam, thanks for sharing!
Kate
can you tell me where the stencil is for the wall. the room is just stunning.
thanks
Hi Katie, it was a homemade stencil, the story here:
http://www.centsationalgirl.com/2010/07/painted-trellis-wall/
Kate
Hi, your master bedroom is stunning and I adore this upholstered headboard project! I am fairly new to the DIY project, although my husband is super handy! How do you know how much fabric you will need for a queen size headboard? Thank you for your help, I’m a beginner when it comes to fabric!
Hi Kristen, I just add a few inches beyond the plywood – so if your queen bed is 66″ wide, I’d get at least 72″ or 2 yards of fabric to cover the width of the headboard. Most upholstery grade fabrics come in 54″ width which is the maximum height when you run the fabric vertically instead of horizontally. Make sense? Kind of confusing, but basically you choose a fabric with a pattern you can use “sideways”.
Kate
Love this project. I’m going to try it! One question. What did you do with the backside of the headboard. Did you leave it unfinished since it is against the wall?
Yep, unfinished Bunny!
Kate
You do such wonderful work, I am in love with this headboard! Also, where did you purchase your long bolster white fur pillow? Did you make it yourself or purchase it at a retail store? Thanks so much! :)
Hi Carly, I found that lambswool lumbar at West Elm !
Kate
I love the shape of this headboard and am making one right now! My only problem has been making the fabric look clean and sleek over the two curves on either side of the top of the headboard. Do you have any advice for that? Thanks so much!
Hi Holland, it took a lot of careful pulling and you have to create slits in the back where it curves around so the fabric doesn’t bunch up – take it slow and cut the fabric where it’s necessary to let it turn and you should be fine!
Wow! We made the curved headboard with nailheads and it came out beautifully. Saved us hundreds of dollars over West Elm. We’re so motivated that we’re going to make the tufted headboard for our that you also have instructions on for our daughter’s room. Your instructions are awesome, by the way.
Beautiful budoir! May I ask where you bought your chandelier? Or did you make that as well? I have been wanting to find one for our room and that looks like just what I pictured!
Hi Crystal, we bought that on special order from Home Depot years ago but I ended up replacing it with a larger version from Ballard Designs.
Hey! I was getting all the supplies together to try and attempt to make this exact headboard and I was just curious if you only needed 10 yards of the nailhead trim? I didn’t want to order only 10 and end up not being enough! Thanks!
10 yards should be more than enough Ashley!
Your headboard is gorgeous!!! So glad u shared this! I was contemplating spending $500 for a new bed! So glad I saved so much money. Where did u purchase your bedding? Your room is beautiful!!! :-)