Thank so very much to everyone for your kind words on my closet makeover from yesterday ! Also for anyone who didn’t catch my segment on The Nate Berkus Show, you can watch it here !
If you read a lot of home décor blogs like I do, one thing is clear. Pattern on walls and ceilings is all the rage right now, and rightfully so! Wallpaper is big baby big, but wallpaper is also costly and time consuming to install. (Been there, done that with my grasscloth.)
In the last year, there’s been a resurgence of stenciled walls and ceilings, especially because of the fresher more modern patterns available. (One of my sponsors Cutting Edge Stencils has some fabulous choices!) Stenciling is the inexpensive and stylish alternative to wallpaper. With time, patience, and good techniques, a stenciled wall makes a stunning backdrop.
Sooooo . . . I invited a few of the fabulous bloggers behind some of amazing projects I’ve seen to share a few of their tips on successful stenciling.
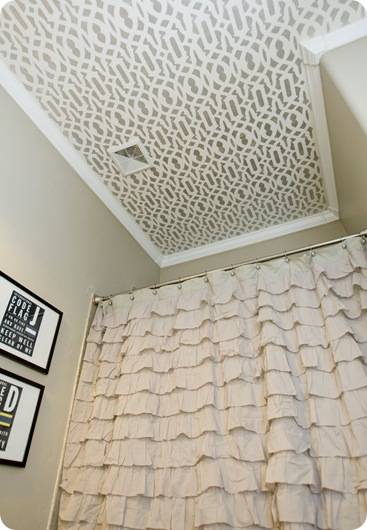
Michelle from Three Men and a Lady created this amazing statement on her bathroom ceiling with a stencil:
Stenciling tips from Three Men and a Lady:
1. Use a laser leveler to ensure the placement the first time is straight and even. You will base every other placement off your first measurement.
2. Don’t use re-positionable spray adhesive on the back of your stencil unless it is an EXTREMELY light coat and low tack treatment. I used spray adhesive on my first placement. Although it worked great, when I went to pull the stencil off, not only did it pull the paint off the wall with it but it also left glue tack on the wall so I had to repair, clean and re-paint the wall then start over.
3. Use a low tack tape (I like Frog tape) sparingly on the edges of the stencil to adhere to the wall. I recommend using a sea sponge instead of a paint roller so not to bleed under the edges of the stencil. Dab lightly in the paint then dab all over the stencil. Once semi-dry you can go back and do another coat dabbing lightly. The key is light coats to avoid bleeding.
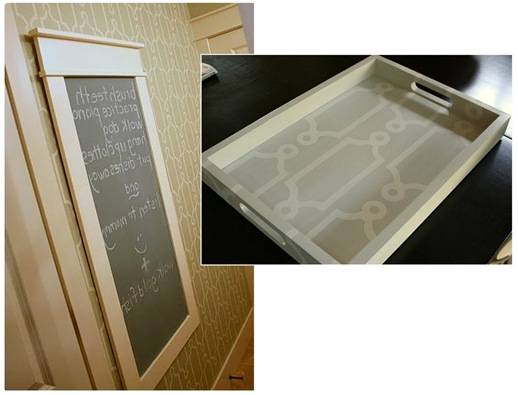
Janell from Isabella and Max Rooms is a stenciling queen! Janell has tackled both walls and small decorative objects too (like this tray).
Hear what Janell has to say:
1. If this is the first time you will stencil a wall, select a smaller area to cover and use a larger motif style stencil that doesn’t require a lot of cutting in to wall edges, baseboards and ceilings.
2. Apply the paint with a dry brush method. To do this simply tap the stencil brush, which has been dipped in paint, onto a paper towel before stippling on the wall. This will greatly diminish the amount of paint that seeps underneath the stencil.
3. Use a color to paint the stencil that is not a great deal lighter or darker than the wall color. This will assist in getting good coverage and a more evening painted stencil design.
Courtney from Living Life Out Loud stenciled this trellis wall in his living room:
Courtney recommends this:
1) Use the right tools: I use small high density foam rollers for an all over repeating pattern. They are the perfect size they roll a uniform and even layer of paint, something that is important if you are trying to achieve a "painted wallpaper" look.
2) Less is More: One of the areas that people trip themselves up with is using too much paint. I roll my foam roller in paint, then promptly roll off the excess paint onto a mound of paper towels. You want the roller dry. It seems counter intuitive but a "dry brush" or "dry roller" technique greatly minimizes drips and other mishaps. You can always reapply the paint if you want a deeper finish to your stencil but it’s A LOT harder to remove paint once you started a stencil.
3) Measure. Plan. Repeat: Math will prove to be your friend when stenciling. Look at the design in relation to the wall and map out how you want the design displayed. I measure from the center to see how the design will fall, then mark off where my stencil will be placed. It helps me see if I need to adjust my starting point especially if I am taking a design around a corner. It helps to plan your design in advance!4) Test: I keep an old canvas in the garage. When it comes time for a paint project, I pull it out; prime it and use it as a test board. This process has saved me countless times when determining color combinations and paint schemes.
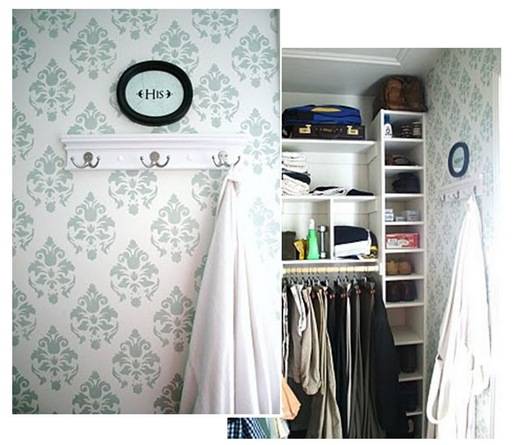
Ronda of Batchelors Way stenciled the walls of her shared master closet:
Ronda’s best tip is “use a small amount of paint and a little goes a long way!” You can read Ronda’s full tutorial here.
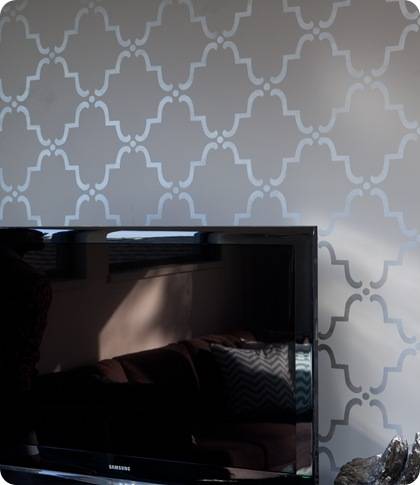
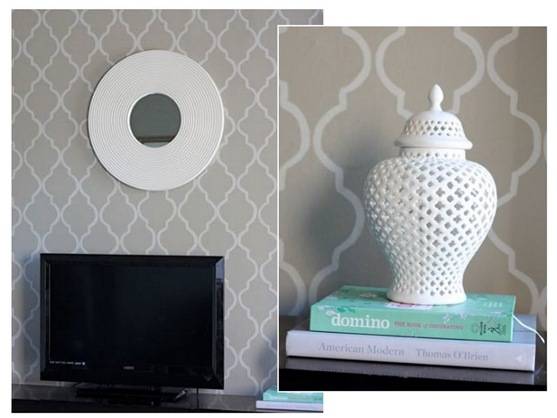
Jesse from Good Girl Gone Glad created this beautiful pattern behind her media center.
Jesse says:
1. Start in the center of the wall and go from ceiling to floor, then worked from one side to the next. This made it easy to keep my pattern straight.
2. I used a flat paint on the wall color and then a gloss for the stencil pattern. It creates more interest and provides a great sheen in the evening when we turn on the lamps !
Stacy from Not JUST a Housewife stenciled her entire master bedroom ceiling. Wow!

Stacy recommends the following:
#1. If your stencil doesn’t line up perfectly, don’t stress! As long as it isn’t too far off it won’t show in the end. Just don’t re-roll over the markers that don’t line up.
#2. Don’t apply too much pressure to your stencil. It is tempting to do this to get paint into all the nooks and crannies but I found that rolling in all different directions will eventually get all the places with out pushing too hard.
#3. Use spray adhesive. You can stencil 4 or 5 times before you have to spray again. It really helps make it crisp and clean. Spray lightly and you won’t have a problem with residue on your wall (or ceiling).
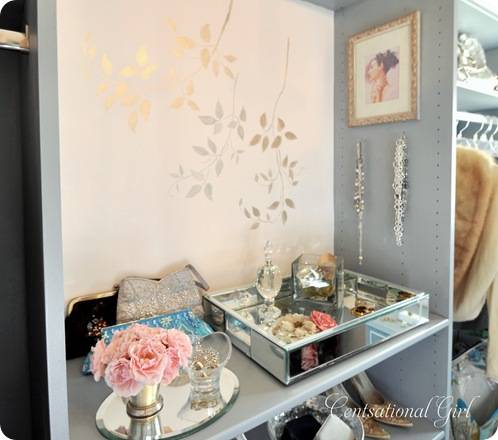
Most recently, I stenciled the walls of my personal closet space with this clematis stencil from Cutting Edge Stencils and two shades of metallic craft paint.
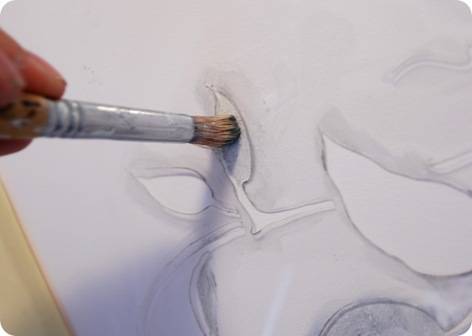
My best tips for using a free form stencil? 1) Use painter’s tape to hold your stencil in place. 2) Use a dry stippling brush (‘dry’ meaning dab most of your paint off). 3. Apply your paint from the outside edges in to avoid paint pooling in the ridges.
Works for me!
Thank you Michelle, Janell, Courtney, Ronda, Jesse, and Stacy for sharing your best tips today! Are you inspired to add a stenciled wall treatment to your home anytime soon?
Have a lovely weekend friends!
.
.

First, I LOVED your segment on the NB show yesterday and immediately googled you to “follow” your blog.
Second, a question: What do you recommend to someone who LOVES the stenciled look but has only textured walls and ceilings?
Love the blog,
Holly
Thanks for the tips!! :)
I am SO doing a stencil on my master bedroom media wall thanks to these tutorials here. I’m so inspired! Thank you.
These spaces are all so beautiful! And such wonderful tips you’ve included here. Thank ya!
Good info…I just bought a stencil yesterday. Now I just need to decide which wall to stencil.
Thanks so much for pooling together tips and images of the finished results. This is so helpful and I have bookmarked it in case I want to tackle this in the future. I have to admit, it looks a little daunting and doesn’t seem to be much room for error but the finished result looks fantastic in every single blogger’s photo.
I just stenciled my closet office wall, check it out here: http://lovefrommykitchen.blogspot.com/2011/02/cloffice-reveal.html
Holy cow! These are the best tips… just working on doing this in a powder room.
Also, I wish I linked my giveaway to this post {cutting edge stencils!}… perhaps I will link when I announce the winner next week!
I am off to see your Nate Show visit!
xo,
cristin
I just did my laundryroom allover with one of the Cutting Edge Stencils. I am not going to lie, it was hard, but so worth it! I am actually going to be doing the Iron Gate one this weekend. Mine was even more difficult because I have a heavy knockdown texture on the walls. I actually put up my experience and tutorials with it on the link below:
http://themangoarchives.blogspot.com/2011/01/cutting-edge-stencil-review-and-how-i.html
By the way, I think this is the first time I comment, but I have been following you and before that just plain site stalking you for about a year I think? Love the blog!
Such great tips! I am tickled to be get to share my space. =) Great segment on the show too! You have a beautiful home.
Thanks for the tip! I am just waiting for the Air Force to tell us we can stay in our house for another five years. As soon as they give me the word, I’m stenciling the big wall behind my loveseat in my office! I’m so excited!
Thanks for asking me to be part of this post, it was great to read the other tips as well, I think I learned a few new tricks myself! :)
Janell
Wow.. Good tips! I would love to tackle stenciling a wall one of these days. That ceiling is incredible.
Love stenciled walls. I used to do this for a living and I have to say, it is not that hard. i can’t wait to stencil my dining room.
This is SO helpful! I think I’ll start small – like a tray.
Thanks so much!
Sheri
Those are some inspiring projects. Now you’ve got me thinking where I can do this…:)
Congratulations ! How exciting for you!. You are very talented and have created many very pretty spaces. Lots of inspiration – Thanks.
Enjoy your weekend.
Kate,
Wonderful tips!! I realy want to try some of these ideas!
Don’t forget to enter my amazing Giveaway from Splenderosa!
xoxo
Karena
Art by Karena
I love the look, but I know I don’t have the patience to do it!!! Anyone want to come practice on my bathroom ceiling???
I watched the Nate segment. :) My 10 year old daughter said you are fascinating.
I love the look of stenciling. I think I will start small. I have a tray just like you’ve shown that needs to be redone.
I love your master closet, my closet is on my list of things to accomplish, has been over the last two years. Your post has inspired me to tackle my closet and turn it into a space that will motivate me to start my day
What an absolutely fabulous post!
Thank you for compiling all this helpful information in one handy dandy place, girlfriend!
:-)
In perfect timing! Considering stenciling my powder room. Just needed that additional push!
I LOVE the ceiling treatments but I must admit my neck gets sore thinking about doing it!
It makes my arms ache just thinking about doing a ceiling! I like this idea so much better than wallpaper. I’ve removed too much wallpaper in my day to ever want to do it again!
Thanks for the tweet! :) I’m in love with your ceiling, I can’t even imagine doing a ceiling, my small closet wall was enough for me!
Inspired is an understatement! I have wanted to do this anyway, and the tips are incredibly helpful. Thank goodness for those who go before us, right? Thank you!
My God this is amazing! The first image with the stenciled ceiling just blew me away..I only wish I had the patience to pull this off..maybe I can start small.
I loved your segment on the Nate Berkus show. It was so fun watching it and knowing all the background from when you blogged about it. I totally get the whole skirt dilemma now. You were great and all of your projects were presented so well. Stenciling is a great alternative to wallpaper. I’m super impressed with the stencils on the ceiling in the photos. That has to be tough. I did the one wall in my daughter’s room and that took over four hours. I can’t even imagine a ceiling. My neck would be done.
I love stencils and I found the greatest book on Amazon.com that I am dying to try out. Its called Stencil 101 Decor and it comes with 10 stencil and instructions. I bought the book for $10 including shipping and the stencils are great. It includes a houndstooth stencil, butterflies, polka dots, honeycomb hexagons, chain links, birds and lattice.
Beautiful stencil work on all these,, wow
Have a great weekend!
xo
Edyta
http://edytaandco.blogspot.com/
Wish I had the patience to stencil!
I just awarded you with the Stylish Blogger Award!
I listed you as one of 13 of the coolest blogs I follow!
You can go to my blog for details!
http://mymobilehomelife.blogspot.com
Thanks for having such a cool blog!
Krystal
To Accept The Award you must:
1.)Thank and Link Back to the Blogger Who Awarded You With
2.)Share 7 Things About Yourself
3.)Award 12 Recently Discovered Great Bloggers
4.)Contact The Bloggers Inform Them of The Award
I was out of town for a few days and was just catching up on my DVR and caught your segment on NB- so cool!! Congrats!!
Thanks for all the stenciling info- I’ve been meaning to try it out and now it seems really doable!
Wow! What an amazing post! I am considering to stencil my wall as well. this is sooooooooo helpful! I just found your blog and am a new follower! I LOVE WHAT I SEE!!!
Thank you so much!
xoxo
oh my goodness these are are all so beautiful. I am so tempted to stencil the bedroom ceiling… but I know that my neck will wimp out and I don’t think hubby will want to finish it all by himself :)
~ Emily N. from “too Blessed to Stress”
I TIVO’d the Nate show so I could catch your segment – fantastic job!
Thanks so much for this post! I have been thinking about stenciling my foyer for a while now, but I have always been a bit hesitant. This has given me the confidence to do it!
So glad to meet you at Blissdom and congrats on Nate!
This is so timely! I am planning to stencil my daughter’s room wall within the next week. Thanks for all the great tips! I wish I had the patience (and arm strength) to do the ceiling…maybe some day I will.
Thanks so much for gathering all these tips Kate. This would be a perfect project for my water closet in my master bath.
BTW, saw your Nate appearance. You did a fantastic job and looked really beautiful.
Thank you for sharing the link to your segment with Nate. I have never seen the show, since it is not aired in England, but have been a huge fan of his since the Oprah show. Such an exciting opportunity for you! Yea! XoL
I am working on stenciling a clear glass vase- this post has helped me so much.Thank you.
Wow! I hope I can use these tips real soon. Love them;)
totally inspired! Hopefully I can do something like this in our big Queen Anne someday!
Kate, thanks for this post! I have loved the idea of doing a wall stencil for a while now, but I have just one problem–I live in an apartment. Do you have any ideas on how I could get the same look without actually painting my wall? I’d hate to do all that work to just have to paint over it :(
Your blog is fantastic and I love your creative process! Thanks for all you do!
I was so inspired by your master bedroom stencil I did mine and I absolutely LOVE it! You are full of beautiful ideas. Thanks for sharing them.
If you want to see how my wall turned out it is here http://littlenannygoat.blogspot.com/2011/02/master-bedroom.html
:) Kathryn
I saw your segment on Nate’s show!! How exciting! The wall in your master made me wonder just how you did it, thank you for posting this detailed how-to! I am excited to try it!
@ Kesha, I’ve “heard” that you can take a fabric you like, soak it in starch and then brush it on the wall, like you’re applying wallpaper. The starch is supposed to make it stick after it dries. Then you can take it down later by re-wetting it with no damage to your walls.
I love the idea of the different sheen for the stencil. I’ve been wanting to wallpaper my half bath down stairs but the wallpaper IS so expensive. Stenceling looks really hard and super time consuming. Is it for a novice?
I love the stenciled walls so much, but I am dying to know where you got that beautiful shower curtain?
Funny thing, Beth from Stories From A2Z told me to come check out this post! I did a trend alert mentioning stenciling in home decor and crafting yesterday!
I love how you share all of the how-to’s and fabulous tips to follow! Super cool!!
Lovin’ this trend!
Love all these tips!! And yet another CG post that I am bookmarking in my “how to” file!! Keep it coming girl!
Fantastic tips….your dressing room is absolutely beautiful…Love it…xv
I love your blog and I have to say, this post in particular was so TIMELY!!! I’ve been dying to stencil one wall in my entryway. This post was just the thing to give me all the inspiration and information that I needed to get started! Thank you!!! :)
Thanks for this post. I’ve also noticed the resurgence of stenciling and it’s come a long way since I first stenciled my kitchen in 1991. I must say it’s definitely an improvement! I appreciate all the tips because I was thinking of doing this on my bathroom ceiling. All the projects shown are so gorgeous!
I have a textured wall…would stenciling work? Or do i have to have a flat wall?
I love all the tips. I’m getting ready to stencil my dining room ceiling. This post was really helpful!
What great photos. I love how these patterns look so classic and classy. More importantly, they will never peel or show their seems like wallpaper would, which is especially important in a bathroom ceiling where moisture can really do some damage. There also won’t be any removal costs when it comes time to change the look. This is a great DIY project.
Love the stenciled ceiling! Very sharp!
Great examples! It’s amazing how far stenciling has come. Remember when it was splotchy borders of chickens and vines and other dumb stuff?
Where is the ruffled shower curtain from?
Thanks for this post! I’d love to try this sometime.
This is a fantastic post and I love all the projects here on stenciling! I linked this to my stenciling project post too so you’ll have more visitors over here having a look!
I have learned so much from your blog! I really like the Casablanca All Over stencil. It’s simple and classic looking and would look great in our master bath and possibly as an accent wall in the bedroom.
WOW! I am an old-school stenciler (read small brass stencils back in the 70’s?!) and I think these new wall stencils are fabulous! I already have a spot for the Georgian ceiling medallion and have definate plans for the Hanging Tree Branch A Stencil wall mural for my powder room and the Tree Peony and the Anna Damask and…and..you get my point. Thanks for introducing me to “Cutting Edge Stencils”.
These stencils are great! I did my foyer a few months ago (see link), but seeing these pictures makes me want to do another room!
http://westhamptondiy.blogspot.com/2011/01/entry-hall.html
THANK YOU FOR THIS!!! I came from janell’s page, and really enjoyed reading this! I’m ready to tackle a stencil!
Thanks for sharing this post. I like very much and getting ready to stencil. This post is very helpful. Which paints i need to use. Shall i use normal paints for stencil work?
Any suggestions, I want to stencil the risers only only on my staircase to living area and am keen to go with something like white cargo stencil numbers of a black background. If you’re wondering where to get the alphabet print art in Michelle bathroom at the top of the post, they’re from http://www.bexpert.etsy.com and http://www.empressionista.com. Thanks.