One thing that makes me happy is a great second hand find and the opportunity to revamp the new treasure. Today I’m sharing the basic steps for how to paint furniture.
This makeover project was for a good friend of mine who recently had a baby girl. She’s been a little preoccupied with her little one, so her hub and I conspired to makeover this piece for her nursery, currently a work in progress, but sure to beautiful when the space is finished.
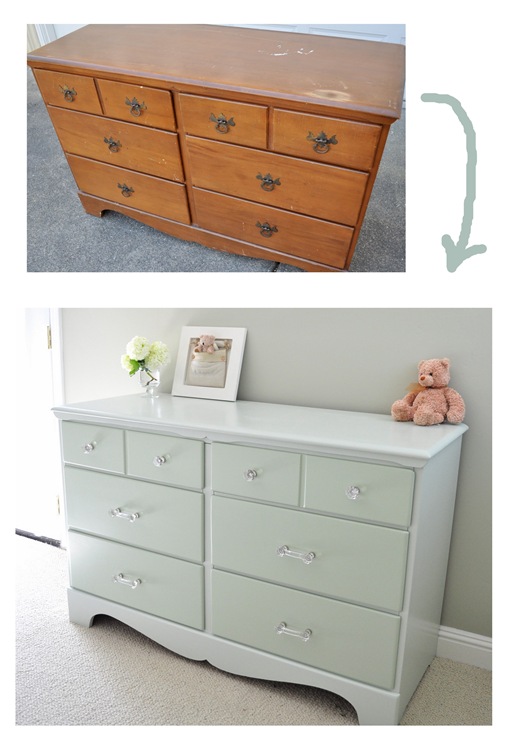
I’ve been looking for the perfect dresser for her for a while and finally scored this one at a local thrift store last week, I was so excited! I brought it home so I could paint it for her as a surprise.


With all the pieces I’ve painted over the years, I realized I should write up a full step by step for how to paint furniture, and repainting an old treasure like this one is easy. Here are the steps on how to paint furniture, including cosmetic repair, priming and painting.
Supplies to Have Before You Start: Power screwdriver (+ drill bits if replacing hardware), medium (80 – 120 grit) sanding wedge, primer, latex paint color of choice, Floetrol, 2” angled quality paintbrush, water based polyurethane protectant.
How to Paint Furniture:
(July 2017 Update, I still follow these steps!)
Necessary to Sand? If your piece is in pretty good condition, you can skip the sanding step or the use of a power sander and go straight to priming. Bonding primers don’t require sanding, even if your piece is heavily varnished, but I do find giving the furniture a good scuffing with a medium (80 grit) sanding wedge not only helps clean off any debris, but gives your primer a great surface to cling too. There is no need to sand away all the varnish and get down to the raw wood, just give it a good 5 to 10 minute scuffing with a sanding wedge, then wipe away any debris with a soft cloth.
Repairing Scratches, Dents & Holes. I bought this particular piece because of its classic lines and solid wood construction, but many would pass it up due to the surface damage. On the top of this dresser, there were deep scratches and a sticky residue, so the first thing I did was sand the scratches on the top with my power orbital sander to smooth out the surface.

There was also a deep unsightly welt in the front corner.

No worries, this is a cosmetic problem easily addressed with wood filler, which allows you to repair scratches, dents, welts and fill holes in your wood furniture before you go about painting it. I’ve tried other products, but to date Elmer’s is the best I’ve found. It’s moist and moldable and washes off your fingers and tools easily, dries quickly, and is also sandable and paintable.

Gently sanding the top with my power sander combined with the proper use of wood filler (two applications for the deepest welt), led to this perfectly smooth surface.

Filling Holes for New Knobs or Pulls. If you’ve opted for new knobs, often they will fit right in the old holes, but many modern pulls are sized differently than the old hardware. Wood filler is also your best bet for starting over.


These glass pulls can be found at Restoration Hardware, but you can find similar ones at a hardware store like Home Depot.
Do You Really Need to Prime? With wood furniture, the answer is yes and no. Yes, if you want a smooth even finish and a paint job that will last for years. No if you want a distressed look and don’t care about the paint peeling off over time, if you’re using chalk paint, or if you are using oil based spray paints, which I have found often work really well without primer.
Nevertheless, I always advise if you’re seeking a straight up smooth evenly painted piece and a paint job that will last, using a good bonding primer is key. If you’re going to take the time and energy to paint a piece, take the time to prime it too.
My go to favorite has always been Zinsser. You can use the water based formula with the blue label but it takes several days to fully cure and I haven’t the patience. I prefer to use either the spray or brush on oil based Zinsser Cover Stain with the brown label, it has yet to fail me. For this dresser, I used spray on Zinsser for the drawers for a super smooth finish – it goes on quickly and dries in about 20 minutes. (If using the spray version, be sure to work in a well ventilated area and dispose of your cans according to your local waste regulations.)

For the top I brushed on a thicker coat of Zinsser because it will get the most wear and tear. It’s a personal preference to use the brush on formula, but for tabletops, desktops or other surfaces which will have lots o’ stuff sliding back and forth, a thick coat (even two!) of brush on Zinsser is a miracle worker, plus you can sand it smooth once it dries (in less than an hour per coat) making it easy to get really good bonding coverage in an afternoon. (You can also use a sponge roller to apply it, see other projects below where I’ve done that.) In my opinion, this is the very best primer for laminate surfaces as well.
Always Two Coats of Paint. Once you’re primer is fully dry, sand any drips, brush marks, or paint residue and wipe down with a soft cloth. I never skimp with just one coat, two is always best for uniformity and even coverage, allowing 4 to 6 hours of drying time between coats. There are two tools I won’t paint without.
1) Floetrol. This product in the orange bottle is a paint conditioner exclusively for latex paint (use Penetrol for oil based paints). It’s a product I have used time and again to extend the wet edge (or slow down the drying time) and also to minimize roller marks and brush strokes. The most frustrating part about applying paint to furniture by hand is the drag that occurs when paint starts to dry too quickly, so the Floetrol helps avoid that drag. I follow the directions on the back of the bottle, but I also let the paint’s workability act as a guide as to how much Floetrol is necessary.
Floetrol is not a paint thinner, it’s a conditioner sold at all the specialty paint stores, and it won’t change the color of your paint. It was recommended to me by a professional years ago, and ever since I’ve always used it. Floetrol is great investment if you’re also painting trim or doors around your house, it’s not expensive ($7 to $10 per bottle) and a little goes a long way.

2) A high quality angled paint brush is essential. If you don’t have the luxury of a sprayer, you’ll be using a paintbrush. The last thing you want to be doing is picking loose paintbrush hairs out of your paint, which happens with cheaper brushes so don’t bother with them. You can apply your paint quicker with a foam roller, but you still will end up with edge marks, so I always follow up a roller with a brush. An angled brush also helps get into grooves and crevices better, plus with a steady hand it cuts in straight lines extremely well. If you take good care of it, a good angled brush like Purdy will last you for years.
This dresser got two tones of paint for subtle but beautiful contrast. The drawers are painted with Benjamin Moore’s ‘Prescott Green’ and the top, sides, and frame are painted with ‘Prescott Green’ cut in half with white paint.

This dresser is for a baby girl’s nursery and soft green is the favorite color choice for the space, which is why I chose this particular shade for her.
Should You Paint the Inside the Furniture? I typically don’t because layers of paint can cause stickiness or prevent your drawers from sliding in and out, but it depends on the piece. In this case, I painted just inside the frame, and nothing more. With doors I usually paint the back too so there is uniform color when doors are opened, but that is a personal preference.

Adding New Hardware. If you’ve filled holes from your old hardware and are drilling new ones, here are the steps I follow. Precisely measure the location of your new hardware, then use the proper size drill bit to create new holes for your screws. I do this before the protective coat, just in case there are any slip ups or mistakes that need to be patched or painted over.

A Note on Paint Sheen. You can choose anything from flat to semi gloss to refinish your furniture, I typically go with eggshell or satin. But it is the final protectant you use that determines the ultimate sheen.
Protecting Your Paint Job. These are the two brands I use: Minwax and Varathane, both in water based formulas.

You also have the option of using glazes and/or paste waxes for a more matte finish. See below for links to other projects using paste waxes.
Both Minwax and Varathane’s formulas are available in either satin or gloss clear finishes. When your paint has dried for at least 24 hours, apply a water based polyurethane to protect your surface. Do not use an oil based polyurethane, it will amber or yellow over time.
Minwax Polycrylic comes in both a spray or brush on formula. Varathane in spray, brush on, or my latest discovery, a rub on formula in a tube. This version is quick, easy, and dries the fastest.

Once the protectant is dry, you are free to bring the piece inside your home and make it work for your space!


There you have it, my step by step for how to paint furniture and a paint job that will last. These same steps also apply to wood cabinetry or laminate pieces as well.
Hope you’ve enjoyed this step by step on how to paint furniture. It may seem time consuming but remember a quick spray primer and a rub on protectant are the fastest steps, it’s the repair and painting processes that take the most time. With a little patience, you’ll achieve a perfectly painted piece with smooth even coverage that will last for years to come.
More recent step-by-step projects featuring how to paint furniture:
- White and Wood Chest (working with paint & stain, using paste wax protectant)
- Turquoise Campaign Dresser (using chalk paint)
- Blue Dresser (using polyurethane over chalk paint)
- Blue Bureau (my favorite enamel paints)
- How to Spray Paint Furniture (step-by-step)
- How to Paint Bathroom Cabinets (step-by-step)
- .


Amazing! It’s so perfect now! Thanks for hosting the Paint Party! I had so many visitors and I know it’s because of your blog! I really appreciate being seen through you!
Sincerely,
Debbie
Hi Kate,
Thanks for the very thorough tutorial indeed. You’ve covered so many important topics in this post, they are excellent tips!
I have yet to try Floetrol but am looking forward to what it can do on some pieces I have in the works.
The dresser looks lovely :-)
While I don’t think this (or many of your re-do’s) are easy enough for me to tackle (I’m NOT handy or crafty at all), I’m always impressed with the finished product. I would never look at an old piece of furniture and see the potential. You definitely make me want to try it someday! Awesome job!
Fantastic tutorial…………I LOVE the colours you chose and that hardware is AMAZING!!!!!
Thanks for hosting a great party, it was nice to see all the great things people were doing with paint.
GREAT tutorial! Thanks for sharing!!!
Thanks so much for this! I have a nightstand I’ve been wanting to paint and this really will come in handy when I do it!!
How do you apply Polycrylic? I’ve used it on our dining table, and it became so streaky. I used both a brush and a roller with similar results. (The roller caused bubbles).
Try a good quality soft brush.
great post! just one question.. i’ve used poly before and the surface always looks shiny and smooth but it is sometimes rough to the touch. do you have any suggestions to applying it in a way that avoids the roughness?
thanks!
kimberly
Thanks for this in depth look at your project!! I always get drag mark…time to try that conditioner. I was all set to paint my coffee table today but with so much rain it was too humid. Now instead of curding the weather I an thankful for the interruption since I learned something new today that will help my project tomorrow. Thanks again!!
LOVE the knobs and pulls!
Can’t thank you enough for posting your How To’s. I want to redo the furniture in my daughter’s room to make it more grown up for her but have been too afraid to start.
Thank you thank you for this tutorial! I have a free dresser find sitting in my garage awaiting warm enough weather to get started on the stripping/refinishing process. This is a first attempt for me, so your step-by-step directions will come in very handy!
I LOVED this post. Thank you, thank you, thank you for taking the time to not only explain the process but also share the brand names and other details. I saved the link and will be referring back to it often!
Thank you for sharing this valuable information – I appreciate it BIG TIME!!
LOVE IT!!! You rock!!
Thanks for spending the time to write up this detailed painting guide. I really appreciate it!
Great post Kate! I have always used your tutorials for painting things around my house and this is just another i will bookmark for future use! :)
Great tips, Kate! I needed the one on the sealant!
absolutely stunning!
Thanks for the great tutorial!! I’m contemplating painting my bedroom furniture, this helps a bunch! The dresser turned out darling, I’m sure your friend loved it! :)
Great how to! Very well written with lots of great references!!! Thanks! My fav. Assoc. Pastor at my church is an ex lawyer turned Pastor and her Bible classes are my fav……just like you, she presents the material so well!!!
That looks lovely!
Thank you for the how-to, it was really well written and easy to follow!
Awesome, awesome information, Kate! I’ve got a handful of pieces lined up to paint this summer, and your post will be my go-to guide! Thanks a bunch ~ I know your friend is THRILLED with her new treasure!
Hi Kate! Awesome tips! You have compiled a comprehensive list of all the things necessary to get a nice, smooth LASTING finish. I’ll just refer people to you from now on when I get questions about the refinishing process! ;)
Kacey
P.S. You need to start your own furniture refinishing business! Seriously!
Such a great reference, thanks for taking the time to do this!
XO
Kristin
Thanks for this, just in time for me to paint an old Ikea bed (bought for free!!) this week! It’s an upgrade for my daughter from her toddler bed and my first big DIY project. I also had questions about the polyurethane and I’m thinking you’ve answered them… thank you!
This is an AMAZING tutorial!! Thanks for sharing this!!!
http://www.iheartmygluegun.com
thank you so so much! you are so kind to take the time and do this excellent tutorial! i’m going to print it out and save it. thank you for all of the wonderful posts too!
Thanks for this fantastic tutorial! I’ll be bookmarking this page and referring back millions of times, memorizing every word and praying for results like yours! :)
“Excellent.” (said in best Mr. Burns voice) What a fabulous step by step post! I’ve always used foam rollers for everything, mostly b/c I am lazy and don’t think I’d care much for cleaning brushes…but I think you made some excellent points. I’m going to give an angled brush a try. Thanks for taking the time to document the process to share. :)
What a great tutorial! I love your blog for all the how-to’s on DIY projects :)
Kate ~ thank you so much for this great tutorial! It sure helps us “paint-delinquent” gals out here! lol! Beautiful job on that dresser! Quite the transformation! :) And thanks for the tip on Floetrol. I’ve never heard of it, but will certainly use it on my next project!
xoxo laurie
Thanks for breaking this process down step by step and keeping it very practical! Wonderful tips… that I wish I had when I painted some of my furniture years ago! I finally did hear about Floetrol, and I used that with my kitchen cabinets.
Love the two tones and the ‘bling’… they are perfect details!
Wow. Love the step by step. Your color combo is excellent too.
xo
cristin
I have painted furniture for years and you have done a really good job explaining it to people that need to know. You also took a ugly tired piece and really made it sing again.
Thank you for today’s post. I bought a nightstand to makeover for my daughter’s bedroom (purchase inspired by your blog, of course) and it’s been sitting in my garage for two weeks. I’ve been stressing and combing through your project pages trying to decide where to start…should I sand it? Should I not sand it? Should I paint it or should I spray paint it? And, Voila!…you saved me with today’s post! I’ll be starting that project now…
Excellent info in this tutorial; thanks so much! What a lovely thing to do for your friend and her daughter… a treasure for sure
I will definitely be purchasing some Floetrol! Thanks for a great tutorial.
Excellent post! Thanks so much for the excellent instructions and the beautiful pictures. I love how you blog is so easy to read.
If only I’d had this guide a month or two ago! I am happy overall with a couple of painting projects I completed this spring, but your tips would have made the jobs much easier, and more perfect. Bookmarking this now!
Thanks for the tutorial Kate. I have a lot of furniture painting to do over the next few weeks and this tutorial will help immensely. The dresser looks beautiful!
This seriously looks soo good!! What a good find. I wish I could redo my whole house in just refinished thrift store furniture! So bummed I spent so much money on crap that’s already falling apart.
Thank you for always having tons of pics! Love that..
-Lindsay
Delighted Momma
Oh, you mind reader, you! I recently came into 2 nightstands I’ve been quite distressed over how to paint them effectively. This couldn’t have come at a better time. And for the record, I’m thinking matte dark gray.
Hi Kate,
This was perfect-to the last detail. I so appreciate the way you present the projects, and your personal comments on each product through your own experience. You have become my “Lewis and Clark”…there isn’t a thrifting adventure you don’t like, is there??? You go girl!!
I repainted furniture for my baby girls nursery and one of the dressers had doors but I wasn’t sure what to do about the hinges! I thought painting them would make them stick and not open. What do you do about the hinges on your finds?
It looks fabulous, Kate. I love the fresh colors, and the knobs are perfect. :)
xoxo
I love the two-tone – beautiful!
WOW!!! A few years ago I took an old ugly brown dresser my hubby had from his mom’s childhood and I painted it white with the same glass knobs! I didn’t prime it, I merely painted 3 coats of white and filled in the holes to create the new knob areas. I may or may not have sanded-can’t remember. LOL. I have a lot of other furniture to paint so I”ll be bookmarking this page. I’m trying to use eco-friendly options so I’ll try to incorporate those products with your tutorial. Thanks! :)
So you can use latex paint over an oil primer? I’d always thought that you couldn’t. My grandparents painted their kitchen with latex paint over the previous oil paint and you could just walk up to the wall & peel the paint of it. So I’d been sticking with latex primers if I was going to use latex paint. Hmmm… I have a ton of furniture that I’d like to paint.
Love, love, love this post!! You have a fantastic blog great projects and awesome information!
Katie Flynn
A Creative Interior
Great tutorial! I’ve painted about one million things in my lifetime and I’ve never used Floetrol. What an brilliant invention. Brush marks are the bane of my existence. I’d love to try anything that gives better flow. Thanks Kate! I’ve gotta to get some immediately and try to paint something. My cat perhaps. ~ karen
I’m in love with floetrol thanks to you! Totally rocked my world- wish I had known about his product when I painted my kitchen table and chairs. I’ll never paint without it again!
Hey Michelle, yes that’s right, you can use either latex or oil based paints over oil based primer, but you can’t paint latex paint directly over oil based paint, there needs to be a primer in between or what happened to your grandparents kitchen cabinets will also happen to your paint job. Also you shouldn’t use latex primer as a base for oil based paint either as a general rule.
That’s why I always use a good oil based bonding primer in either a spray or brush formula before I paint most anything, including cabinets, trim or furniture.
Hope this helps!
Kate
Great post – so helpful AND full of inspiration! I hope the same brands you’ve recommended are carried in Australia! I’ve already recommended your site to a friend I had tea with this afternoon whose about to begin her first furniture makeover project!
– Catherine at The Spring
truly you are one of my biggest insipirations! love reading your “how tos” they have taught me so much when it comes to this furniture love :) love the pics and the easy step by step process. and i love how you let us know which product you use!!! cause there is like 50 mil wood fillers out there! thanks for everything!!
p.s. just in case you were looking into getting rid of the old drawer pulls from this piece. just let this girl know ;) fell in love with the old pulls! too cute! (just thought i would ask :) hehe
My dresser is longer but it looks just like that, except its a darker Cherry Wood. I got the set free from a friend that was remodeling. I have the long dresser, the mirror (I’m not using) and headboard and 2 night stands. They are all huge so I don’t have the mirror and headboard. I often think I should paint it all white, but I still like the dark wood. The make over you did is amazing and I love all the makeovers you do. Thanks for the tutorial for other furniture that I want to redo.
Thanks for the step by step. Two tone cabinet came out very nice. You got such a smooth finish. You put two coats of primer. Did you also put two coats of paint on the dresser?
When would you choose oil over latex to paint furniture or would you?
Kate! Thank you so much for sharing all your tips and tricks. I will be coming back to this post next time I am painting a new treasure. All of my treasures that I have painted to date are not aloud to have anything on them because they are so sticky. :( Once something is put on top of them it has to stay or when removed it has the color below in the shape of the object after removed. So I knew I was doing something or somethings wrong. Thanks so much. :)
Thanks for this great tutorial. This is going to be a print out for me. Putting link on Facebook page!!
Thank you for this centsational tutorial! I will be painting some furniture to go into my daughters house at college this fall. This is EXACTLY the kind of guidance I have been looking for to give me more confidence to do it myself!
What a great transformation! I really love how it turned out! This is a great tutorial. I am having an all natural organic giveaway and I would love for you to enter.
Thank you for this! I’ve been following your blog for awhile now, and ramping up to attempt a handful of refinishing projects. In fact, I just picked up a nightstand from the local Goodwill that matches the shape of an old dresser I own, and this is exactly what I needed to get me through painting both of them!
Fingers crossed… I’m priming today!
The dresser is gorgeous – the glass knobs just really *make it*. I sooo wish I’d had that tutorial ages ago, but now that I do, I am slightly less nervous about the idea of painting our dining room furniture this summer.
Beautiful finish, Kate!! Thanks for the shout out.
:-)
xo
shaunna
Great tutorial, Kate! I was so glad to see another post about Floetrol. I’ve used it for years. I started using it with faux finishes when there were no glazes available yet. Even though I don’t ‘do’ faux anymore, I still use Floetrol all the time. Especially with murals. It helps ‘work’ the paint into knockdown texture, which is still so popular (ugh) in Northern California.
Totally amazing tutorial Kate! I’m going to link to this one when I find a post that it will work in. You are a treasure to us all with your amazing info!
xo
Maria
Kate: I’m about to start painting a chair so these tips really helped. Thanks for the time and effort you put into this so others can learn.
Ruthie
Wow. Thank you so much for the tutorial. Bug Hugs.
Whaaaaat paint laminate!? I have to try this! i have a printer cart that i’ve imagined an incredibly bright yellow… but dang cheap laminate! I will definitely give er a go!
Hi Monique, I used one coat of primer and two coats of paint. I’ve used oil based paints on kitchen cabinets and also on a buffet/hutch, they are very difficult to clean up and require a long drying time (24 hours between coats) but you achieve a hard shell gloss finish that is very appealing. As much as I adore a great oil based primer, I rarely work with oil based paints anymore.
:)
oh snap!! i was wondering why my zinsser was peeling off! um, i obviously don’t read labels but it’s definitely blue in color! soooooo disappointed in myself because even after more than a week of sitting there waiting for me to paint it, it’s still really easy to peel it off. . . poor crappy-ikea-esque-beech-veneer-blah bookshelf! i’m kicking myself in the pants, but i also know it’s cheap plywood trying to come off as wood and will probably end up getting painted again when we move into a house a year or so from now.
Loved your step by step. Only wish you had posted it a week ago! Just finished a $30 craiglist headboard find for my sons room. That Floetrol stuff sounds like a dream!
I have one question…must you use a protectant in all cases?
I ask because when I was picking the brains of the Home Depot staff no one ever mentioned applying a protectant. I guess I’m wondering what this step does or prevents so I know whether I really need to go back and apply it.
Oh and by the way, they suggested using the all in one primer and paint product. What’s your thoughts on that?
Hi Kate – The timing of this post was perfect! I just started refinishing a buffet this weekend, and I’m about ready for the painting stage. I actually just wrote a post about my project last night and mentioned your very timely entry. I have several questions still looming, but I’m trying to take it all one step at a time. If you get a chance to check out my entry from today, I’d love to hear your thoughts. Thanks!! Susan
Hi Kate! Love your tutorials, this one especially. One question for you: how do you avoid brush marks when using the primer? I recently painted a small buffet and it still very cold outside and I don’t have a garage, so couldn’t spray paint. I followed your instructions from previous posts and used the right Zinsser primer and a good brush (Purdy), but I still had deep brush grooves and I was doing my best to avoid them! Clearly that wasn’t good enough. I ended up painting over them, but the whole job looks bad so I’m planning to do it over again now that the weather’s nicer and I can spray paint if needed (also: faster!). For future reference though, I’d love to know your secret! ps-the Floetrol was a great tip for the paint! Works like a dream.
I am amazed at how something as simple as wood putty repairs things! I got a dresser for my sister’s guest room at Goodwill for $60 (and it was HUGE!) but it had a huge gash on the top from someone dragging the matching mirror over it. We wood puttied it and you cannot even tell after a coat of paint. Your dresser is lovely by the way! So clean and spa-like. :o)
We’ve been thinking of redoing our kitchen table and this has some great advice for us in it. I emailed a copy to my husband to look at. Thanks!
Hi Bonnie, primer can always be sanded, you don’t have to live with those brush marks! In the future, if using oil based primer, try Penetrol, it’s the same as Floetrol just meant for oil based products, and it will help eliminate that condition.
I love your tutorials! Do you use the same brush for everything? could you make a breakdown of what type of brush you use for each step; priming, painting, and poly?
thanks!
so, just so I understand… you also use Floetrol in the primer also?
One more question… how do you avoid marks from the sealer if not using the spray kind? I used a wax on my last project but worry about its longevity.
Can you tell I want/like a smooth finish? I am painting white these days and don’t want to antique it. So, I want a smooth finish but not a full on lacquer look either
Thanks!
ooohhhh…so that’s why my boys white dresser turned yellow. Dang it!!!
Is there a primer brand you prefer? Thanks!
An easier trick I learned online (I dont remember exactly where), for drilling holes for hardware is to first place a piece of painters tape to the back of the new knob. Stick a pencil through the tape into the knobs holes and then remove the tape from the hardware and place it gently where you want the hardware to go on the wood. You then mark your holes onto the wood and drill. You get perfect placement of hardware everytime! I only learned this after mismeasuring a million times.
Thanks for the tutorial! I am a little intimidated at the thought of painting a large furniture pice. I think I will now give it a try!
I left a comment a few days ago wondering what you do with the hinges and such on pieces you paint. I painted my sons old baby furniture for our daughter and it was originally cherry colored and I painted it black but the hinges are still brown because I didn’t know if I should paint them.
Oh wow, your furniture looks so beautiful!!! Thank you so much for these tips. I´m planning to paint some of my daughters furniture. So your tutorial will be a great help for me!
Hug´s,
Verena
Great tutorial. I found a great little dresser at a yard sale I plan to paint. It has a strong smell of smoke. I’ve left it in the garage for several weeks to air out, but it still has the odor. Do you have any suggestions to rid it of the smoke.
What a fabulous tutorial!
Hello.
I just wanted to say THANK YOU! I’m so glad I found your blog. I wanted to make distressed looking furniture for ages and thank you to your tutorials I was able to do so.
I love your tip about Floetrol, I will definitely check into this product, I paint a lot in general. I’m looking into flipping an old bench so it will be very useful, I’m sure.
Hani
wow! thank-you so much for this! I’ve spent about 3 hours going through your posts since I found you last night (via Ann, the furniture-building gal, maybe? I forget…) I found an awesome dresser today for $20 bucks & was wondering how I was going to ‘assemble’ all that I’ve learned from you and then I found THIS post ~ perfect.
One thing I haven’t figured out yet (but I may have just missed it in my rush to learn EVERYTHING…) What is your preferred brand of paint? (I guess I’m sorta also asking – how do you feel about Valspar premium paint? We’ve used it for walls and have been happy with it, but I recently was told it’s really poor quality – say compared to Behr – which I have never tried…)
again – thank-you, thank-you!! YOU are fabulous!
ThIs is so helpful! I do have a question … can you use Floetrol with the minwax protective coat? I just used this as a protective coat on a dining room table, but I now see the brushstrokes. I’m thinking about trying another coat (if that would help) and would appreciate any tips you have.
This is beautiful and just the tips I need for two items of furniture I have :)
Thank you so much for sharing x
I have a question…are you really saying that you are using oil-based primer, followed by latex paint, and then sealed? The latex doesn’t peel off, or stick to stuff? I’m just fighting my inner voice (okay, my Dad’s voice, who did a LOT of carpentry back in the day) which insists that you need oil-based paint on any kind of structure (e.g., built-ins) or shelves or desks/dressers/etc. Or are you painting it and assuming that you’ll need/want to re-paint anyhow in a few years so it doesn’t matter if it’s durable for years and years.
We just did built-ins which I used oil-based paint for, and boy, was it hard to find, and cost a pretty penny for as much as I needed. But it’s for a playroom, and kids are going to be dragging and shoving stuff on and off the shelves.
I’m thinking of repainting my childhood furniture though, which is in my daughter’s room, and I’d LOVE to be able to use latex on it.
I don’t comment often (10 month old, LOL) but I star at least 1/2 of your posts in Google Reader to keep for project ideas later. You are one of my top ten ‘must-read’ blogs (usually on my cell phone while I’m feeding the baby in the middle of the night, sadly).
Hi Cecily, yep that’s what I’m saying. I love to use a great bonding primer like Zinsser (oil based) and follow it up with latex paint. You can use either oil or latex paint over oil based primer. You can’t paint latex paint directly over oil based paint, it will peel right off. You need a primer in between. I typically refinish most pieces with an oil based primer followed up with latex paint and sometimes a water based protectant. I used an oil based primer followed up by latex paint on my kid’s playroom storage center and no scratches to date, and they are pulling books, toys, and bins off of it all the time. Post is here:
http://www.centsationalgirl.com/2010/04/go-right-ahead-and-paint-that-laminate/
And go right ahead with latex paint over oil based primer, it works! Hope this helps!
You have posted many DIY for painting laminate furniture. My question for you is, does it matter the color of paint you use? I was told by some people that really dark colors will not hold. I have looked through all your stuff to see if i could find something that you might have painted dark, but didnt see anything. Any advise? I am trying to paint my bedroom furniture and it is an oak color. Thanks!
PS… I am in love with your site! :)
This is perfect. Thanks for not only sharing this beautiful project but the how to too. I love this dresser, the subtlety of the two tone is a nice touch.
I’m a dreamer who wishes for time to unleash my creative frugalness. I really like your step by step which I haven’t seen. The craze for a while was spray painting furniture and I didn’t get the results I would’ve liked. I’m bookmarking your site to folllow you up. I caught you through oneprettything.com
Kate,
Thanks so much for the tutorial, I followed the steps to paint two side tables and they look great!
Hey Kate! LOVE LOVE LOVE your blog! I actually painted my kitchen cabinets last summer and still to this date they are sticking!!! :( I sanded, primed with an oil base paint and painted 2 coats of latex paint. What did I do wrong? Should I have used a protectant? I started to take down the my cabinets again and re-primed and paint with a kitchen enamel paint, but honestly the thought of it makes me SICK!!!! Should I use this same procedure for my cabinets and use the conditioner and protectant? Will this tutorial work for cabinets just like furniture?? HELP!!!
Thank-you so much for that tutorial! I’m so excited to refinish a dresser my husband saved from the dumpster… it will be my first attempt at refinishing furniture and this tutorial helped a ton!
Hi Kate, I’m just starting my very first repainting project. You are a huge inspiration! I am painting a dresser, is it ok to use an oil based primer (zinsser oil based primer) and then use water based acrylic or latex paint over that (Ive heard that water based paints are easier to work with) Or should I stick with oil based the whole way through.
Thank you so much for your instructions. So excited to get my project underway!
Great tips thanks Kate ! Do you have any tips for refreshing the inside of the draws? I have tried to liner them but they still look and smell thrifty mmmm yum !
Have you ever had a problem with the latex paint peeling?
We have a TV armoire we are in the process of painting. We’ve followed your suggestion of an oil-based primer followed by a latex paint. In the process we discovered it was mostly laminate. We ended up purchasing a paint gun, since we will be using it to paint our fence every year. We’ve applied primer and paint with the gun, and because of the smooth finish, did not usually need sand in between coats, aside from drip marks.
While sanding a drip mark, the paint began to easily peel off one side.
Any thoughts or suggestions?
Hi Kate! I love following your sight. I am refinishing furniture in my soon to be nursery, and I would love to try the varathane rub on poly like you used. I can’t find it at home depot or lowes and just searched amazon too. No luck there. Can you tell me where you found the product? Thanks so much!
I have very similar dresser sitting in my basement in desperate need of a face lift. Thanks for the tutorial. We had never refinished anything before and were scared to try. Looks like I have a 4th of July holiday project.
Beth I found Varathane at Menards (after I tried Home Depot – who btw way said they did carry it but no longer do, Lowes and Ace), it was about $7 and I also an not sure about the rubbing in of it. The directions advise spreading it out with a bristle or sponge brush which I did and it worked fast and easy.
Love it! Thank you for the tutorial…my master bedroom furniture is a hand me down, 35+ year old set…it definitely needs some help!
Beautiful piece that has been redone. I did my bathroom cabinets over and I found that if you use a coat of Johnson Paste wax( like you use on hardwoods) works beautifully for repelling water.
FABULOUS!! Love to see your work and creations!!
I don’t have a “shop” to do my painting in….do these products have a lot of fumes? Is it possible to do them in the house?
Thanks!
Thanks for all the good tips. I’ve been painting furniture for years and am starting a few new projects. I will definitely use what I’ve learned here.
This is one of the best written how to’s on painting furniture I’ve ever come across. Your instructions are clear and concise and your recommended product choices (based on your experience) gives me confidence I can do this! Thanks for this helpful information.
Thanks for this article. I just got a mid-century dresser off Craigslist and your step-by-step tips have given me more confidence about refinishing it!
Thanks for this step-by-step. It has saved my life! I am almost done with my piece thanks to your help. One question, the top coat directions on the can suggests more than one coat, I’m wondering how many top coats you apply?
W.O.W you are such an inspiration!
Awesome!!!!! thanks for sharing
I have a wood dresser with a beautiful shape that I am talking myself into painting… I’ve read all of your extremely good tutorials for painting, and wonder if you have a preference between spray paint and regular brushed painting? I have done quite a bit of spray painting, but only smaller pieces… I’m a little nervous to try spraying the dresser I have in mind.
This was by far the most helpful site I found on painting wood furniture! THANK YOU!
You are great. Thank you so much for the helpful information. I’ll keep this bookmarked for my future projects!
Thanks so much for this step-by-step pictorial on painting wood furniture. It inspired me to paint a friend bedroom and all her furniture, which she has wanted to do for years, but has been too busy taking care of other people. It turned out beautifully!
What sheen did you use for your top coat in this project? I love your blog btw, I stumbled on it this weekend on a rainy day and think I read every project you’ve done. It will now serve as my “user’s manual” for the many projects I have planned! Thanks so much for sharing.
Hi! I love how this turned out and thank you so much for the step by step. I have a dresser that I scored at the local thrift store earlier this week that I’m thinking of painting. SHE’S GORGEOUS but shows some neglect. Any ideas on how/what to do with her would be much appreciated! Posted here: http://www.dwelllovely.com/?p=295
Thanks for the great post! This is the most helpful how to paint furniture I’ve read online! Your dresser came out beautiful! Thanks for the great tips!
Awesome transformation! Its very stylish! I like the glass pull.
What a great blog! Thanks for the tutorials. Can’t wait to try one someday!
Do you have any tips for painting furniture that smells of cigarette smoke? I bought a hutch off Craigslist that’s a bit (well, a lot) roughed up and intend to paint it, but after I got it home I realized that it definitely had a smoke smell. I’ve been using a lot of tricks mentioned to reduce the smell (vinegar, baking soda, etc), but I think I’m going to end up needing to paint every inch of it (which was also recommended to fix the smell). Do you know if this will work? Would an oil primer be better than a latex one (I already have latex primer left over, but I could spend the extra if I needed to).
Hi Kate,
I’m following your instructions painting my daughter’s old bedroom set. I have already sanded, primed and sanded again. My question is do you sand in-between coats of paint? I’m planning on painting two coats of paint. I then wanted to sand some of the edges to distress it a tad. I’m then planning on applying a rub on poly. Thanks for your tutorial. So far my project looks great!
Lori
I am repainting some furniture for my baby’s room (I am due Feb. 5, 2012) and your site has been INVALUABLE! Thanks so much for the posts and advice :) I love your blog!
Hello!
I’ve been having some bad experience with the oil based Zinsser primer — I purchased it following your advice and have painted a set of nightstands. Unfortunately, instead of drying in about 1-2 hours it seems to require to cure overnight (I am still waiting 6 hours post painting)! After 2 hours, I tried sanding and the paint was still tacky to the touch and not cooperative at all. This is somewhat frustrating as now I feel I should have bought the latex version…
Any suggestions or reasons why this might be happening?
I cannot say enough how much I appreciate this informative post! It has been my go-to reference for too many paint projects to count. I just posted a dresser transformation on my blog this morning, and I linked my readers here so they can benefit from your experience, as well. Keep up the great work! http://www.positivelysplendid.com/2011/09/antique-dresser-transformation.html
I heart you!! This is the exact hand me down dresser in my kids playroom taking up space. It was my parents when I was a baby and some how ended up with me. You have just given it new life!!! Thank you thank you thank you!!
This article was so helpful. It took time to write exactly what you did, but it made all the difference.
One question. What happens when you find a piece and it is already painted? Specifically I was concerned about the never use oil over latex.
Do you assume that it was painted in latex and use all latex or water-based products?
Do you take a chance and use an oil primer?
Do you strip it and start all over?
And what about chalk paint? Can that be used on any surface?
Thanks so much for your help.
How can you repair a damage drawer? Can wood filler be used??
Love your projects and this website. I am learning so much from your tips. I am about to start repainting my dining table, dining chairs and breakfast counter stools. Those are wood furnitures and doesnt match the rest of my apartment furnitures. I plan on painting them black and am very excited. I was googling tips on how to paint wood furnitures and saw this site. Very inspired on getting started. Thank you and your awesome.
Just found your blog – love it! Great step by step furniture refinishing tutorial. Thanks!
I am about to start my first “furniture make over” project. I must adm it, your post scares me. Is it necessary to use the big sander like that? Your finished product looks GREAT. I absolutely adore those handles/pulls!!
Thanks for the great blog. You mention that you use the oil based Zinsser primer because the water based Zinsser primer takes a week to fully cure….what does this mean and how does that affect your process? I am using the water based Zinsser primer (because I already had it), and it says that a second coat can be reapplied after an hour. Presumably I can go ahead and paint without waiting a week. After painting, do you have to wait a week to put on the water based protectant?
Thanks!!
Hi Cindy, you can go ahead and apply another layer of primer if you like, I do believe it says on the can it can take up to a week to cure, so it’s best to wait at least a few days for it to harden sufficiently. Whether that’s a week or just a few is up to you, I’ve used that primer before and only waiited 2 or 3 days and it’s been just fine. Hope this helps.
Kate
This is a fantastic tutorial! Just one question, if using the Zinsser primes that is oil based, can I paint on top with a latex paint? I saw that someone else posted this question as well but didn’t see an answer to it yet. Thanks so much!
Laura
Yep Laura, you can use either latex or oil based paint on top of oil based primer, but the opposite is not advised. Oil based paint (in my experience) doesn’t work well over a latex primer.
Kate
Hi! I love your website and this post. I bought 2 large ( very inexpensive ) pieces , and after doing exactly what you re suggesting here, they look like a million bucks in my home! Thanks! I keep going back to your web for more diy advices. Next/ a headboard!
I have discovered a new painting system called Caromel Colours. It requires no sanding, priming or stripping. The paint can be used on any surface from laminates to metal and of course, woods. Pretty neat…there are youtube videos demonstrating it and a good blog about it also.
Furntiure refinishing will never be the same…can’t wait to try it out.
We followed your instructions but the poly is drying too quickly on the top of the dresser and thus leaving marks…so added another coat. That didn’t help much…so we sanded down, painted, and started again. We wanted to put down 2 coats of poly since it’s the top surface and will get significant wear…but now paint is bubbling and looks terrible. Any ideas? As we did a lot of work and are very stressed about the outcome.
Hi Colleen, tell me the kind of paint and poly you used. Better yet, email me some pics!
[email protected]
Kate
I just found this tutorial through MomAdvice.com and am very excited. I bought a dresser/armoire at a church thrift sale. It’s pretty “rough” but I want to paint it white and distress it a bit for use in my craft room/office.
I’m going to print out your tutorial and follow it step by step. Don’t know when I’ll get around to it but hey…
Excellent tutorial with great tips and photos! I paint cabinetry for many of my customers and do many old furnitur makeovers and have never seen any better instructions and advice. Thank you! I am also enjoying the “Growing Your Blog Series” and can’t wait for each part! Blessings!, Linda
I am so excited that I found your site. I have about 5 pieces that are varnished that I was dreading sanding so I’m thrilled to hear about this product you use. With the last protective coating, do you paint everything, or just the top? I don’t know if you’re replying to anymore of these posts seeing as you posted this a while ago, but if so, I’d love to know. Thanks! And thanks for taking the time to explain the step by step!!!
Loved your post! I have a pull down desk with almost identical wood as your dresser. My question is how do I handle the hinges of the pull down part? Do I dismantle the door? Do I paint or not paint the metal? I thought about using a tiny brush to just paint the visible parts but not where the metal actually rubs together. This piece is only going to be used in a craft room so i am not sure how much extra time I want to put into it due to many other projects but if you have any suggestions that would be awesome. Thanks again for helping all us newbies!
Hi Mary Ann, it depends on the piece, I try not to add to many layers of paint around hinges, it can prohibit their ability to rotate back and forth. You can always treat hinges with a little Rub n’ Buff to spruce them up instead of painting them!
Kate
That is Brilliant! I love the two tone colors and the glass pulls! Those really made the piece so elegant and nice!
I have the exact same dresser that I am attempting for my first project. I am having a problem with the paint peeling, any suggestions? I sanded the entire piece down, then painted it with Olympic latex paint, and then tried to distress it with a sanding block but now it is peeling. I want to fix the peeling before I polycoat it.
Hi Marsha, did you prime it first? That certainly helps. Latex paint without primer can peel… let me know!
Kate
Have you used paint and primer combos for painting furniture eg) Behrs Premium Plus Ultra Paint and Primer in one? I find them too thick and difficult to get a smooth finish, just looking for a second opinion. I have also heard Floetrol is a good product to use when spray painting with latex paints.
Hi Jackie, I have not used the primer paint combon on furniture, only walls, and like you I find it very thick and it doesn’t cover as many square feet. Yes, Floetrol is great for conditioning latex paint in sprayers and via brush!
Kate
I am working on refinishing a china cabinet at the moment and the Varathane rub-on sealer looks great. I checked Lowes and Home Depot and I couldn’t find it. Where did you purchase yours?
Hey Elizabeth, a common question! It has limited distribution, I find mine at CA based Orchard Supply & Hardware, and can’t find it online, but I wrote to my contact at RustOleum (the parent of Varathane) and she told me they will make best efforts to make it more available both online and in stores like Home Depot and Lowes, yay there’s hope! Meanwhile you’re choices are the brush on (or I prefer to use a sponge brush) OR have you tried waxes? They are great too, for more of a hand rubbed finish. Try SC Johnson, Minwax, Fiddes & Sons, or Briwax.
I just found your site recently and love it! I have a question for you. I just found the varathane rub on poly (at Menards, by the way!), and it says to apply with a brush. I wanted to rub it on to avoid brushstrokes. How did you apply yours?
Hi Stephanie, nope I didn’t use a brush for the rub on, just a soft cotton rag, worked great!
Kate
My husband and I just repainted a dresser white, following all of these steps meticulously. The Zinsser cover stain did not cover smoothly at all (we rolled with a smooth foam roller) and left a lot of stippling/dimpling. In spite of the bottle-recommended amount of Floetrol and a nice angled Purdy brush, we have very obvious brush marks. And the water-based polyurethane yellowed in 2 days.
WTF did we do wrong? We do live in Phoenix, so it’s very dry. Could the dryness and superfast time in which all these things dried be to blame? It’s a dresser for our new baby’s room, so being a kid’s dresser, we’re not too heartbroken since the kid will inevitably mess it up anyway. But it definitely didn’t come out looking even close to as flawless as yours.
Hi Colleen, I’m so sorry for your frustration! I always follow up a rolled on primer with a good brush to smooth it out, and I also recommend Penetrol conditioner for oil based brush/roll on primers, they help condition the paint and increase your open working time to minimize brush strokes. I suspect the heat and dry desert climate does contribute to a faster drying time, especially with latex paint, so I’m terribly sorry you’re frustrated with your result! A little more Floetrol than recommended on the bottle might have helped. When all else fails and you’re not satisfied with the lack of a smooth surface with primer or paint, you can always gently sand it smooth before you add your final coat of paint. Hope this helps. Kate
I have always wanted to try this. I have paid someone else to do the work, but now I want to do a piece myself. Thanks for the great step by step!
Great blog!
So is the finish on this piece of furniture you refinished factory smooth? I mean is it completely free of brush strokes and looks like you picked it up from Pottery Barn? :)
I’m just trying to get a realistic gauge of what to expect from my DIY efforts on a black Pottery Barn piece of furniture I am getting ready to paint an off white color for our nursery. I have 6 months to get the nursery done and need all the help I can get!
To do list-
1. A dresser repaint.
2. Built in bookshelves and sitting bench with paint
3. Crown molding and room paint. (she wants some custom stenciling on the walls too of course)
Hi Adam, it’s never perfectly smooth with a brush, but it’s pretty darn close. The better quality brush and paint you use, the better off you are. Also look into enamel paints by Ben Moore (Advance formula) and Sherwin Williams, their water based formulas will give you a harder finish.
Hi there! I recently painted a dresser and I love it….I sanded it all the way down and after painting there was a huge welt mark right on the top of the dresser? Now what? I haven’t done a second coat and this is suppose to be a shabby-chic vintage dresser I’m turning into a bar. Do you think a second coat of the antique white paint I’m using will cover it? Or do I need to go back and sand that spot all over again…or the entire top again? And I did a no-no and did not use a primer…..will that help?? HELP.
Hi Phebe, it just depends on what you mean by welt. Paint helps but rarely fills visible imperfections. How long your paint will last without primer depends on the surface underneath and the paint itself, but eventually it will chip or peel off over time without a layer of primer, but if that’s a look you may be comfortable with. If it was me, I’d at a minimum go back to the spot where there’s a welt, sand it down, fill it with wood filler, then sand it again to make it smooth, and paint over it.
Kate
Question:
I have an old dresser that has been painted but it doesn’t have a protective coat over the paint so it is sticky to the touch. Can I prime over this and re-paint it, or should I sand it down, prime then paint? I am new to restoration and this is my very first project. Any suggestions?
HI Kelli, if it’s sticky then it’s latex paint – you have two options, if the paint is thick, then you’re better off stripping it down because layers and layers of paint can actually prevent drawers from opening properly. If not, then you can use latex paint directly over latex paint as long as there’s no protective coat in between and it sounds like with that stickiness there isn’t. Try a deglosser first then give it another fresh coat or two of latex or water based enamel paint – you should be fine. Enamel paints don’t have that sticky after effect, but some latex paints do so be sure to give it a protective coat like Polycrylic or Varathane, or you can use furniture waxes for more matte finish.
Kate
Hello, I’m glad to find this how-to! I have been trying (unsuccessfully) to paint a vanity and stool. I sanded, used a primer and benjamin moore satin paint but can’t keep it from chipping! The primer is the same primer I have used on my walls. Could this be the problem? So frustrating.
Hi Pam, do you recall which primer it was? I use different primers for walls (typically water based) than I do for furniture (typically oil based) – do share, I’ll try to help.
Kate
Thanks for going into such depth/detail. We all know where the devil lives!
I am contemplating an overhaul of a piece from my Mom’s that was
originally a 2piece hutch. Both of us used the bottom as an extra dresser
in our b’rooms. She used to prop her butts on the edge so there are little
reminders of her scattered about. To eliminate or not….that is what has kept me
from a complete overhaul.
Thanks so much for your information! Your dresser is beautiful. I am currently painting a bathroom cabinet using your instructions. I sanded, primed and appllied my first coat of paint with floetrol. I used all of your recommended products. I was wondering, should I add the floetrol to the Minwax water based polycrylic? This is my first of many projects, as I just purchased a home that needs a lot of work, next time, I will use penetrol for the primer, I just saw your response to someone else, although, I didn’t really have a problem with the primer, I did have brush strokes, hopefully they won’t show through the paint. Do you know anything about the Rustoleum cabinet transformation kit?
Hi Christina, the Floetrol is just for paint, not for protectants, so don’t mix it in with the Minwax Polycrylic. You do have the option of using waxes too, which I’ve been using a lot lately, for more of a hand rubbed matte finish. Yes, I’ve used the Rustoleum product – wrote about it here:
http://www.centsationalgirl.com/2011/07/mini-kitchen-makeover/
Kate
Hi,
I just read your post. You gave a really great explanation of technique and tools required. I’m off right now to find some oil based primer ! Thanks for the inspiration and the expert direction !
It is Super Spec latex enamel primer. Thanks!
THANK YOU THANK YOU! I have recently found myself very fond of crafts. From tufted headboards to repainting old vanitys. I wasn’t really sure where or how to start. You have said it all for me in a nutshell! I appreciate the time it took for you to explain every detail. I most definitely will be coming to this blog often. Its amazing what beautiful furniture you can find in flee markets, goodwill’s, thrift stores and auctions. :) I Look forward to learning more!
Love your site!!!!!…we just bought a thrifted dresser and attempted to follow your directions…but we have brush strokes.. :( …we live in Pennsylvania and since it is so cold outside we used the brush on primer to stop it from smelling so much in our home with the kids…..can we spray outside in cold temps? Do you find the paint will not cure in a cold garage say 40 degrees or below? Any advice for being able to spray our projects outside in the cold would be awesome!
Hey Jewel! Are there brush stokes in the primer? You can sand them down – try a medium sanding wedge – and yes you can spray prime but it must be in a well ventilated area over 70 degrees according the can of primer… so sorry… the spray has to wait until warmer weather, but definitely try sanding the brush on, I’ve done that a lot!
Kate
Whoops…also is there anything we can do now that the piece is showing brush strokes?
You mean in the paint Jewel? If so, then it’s tough to remove them completely but a light sanding should help.
Can you use the oil based zinnser as primer with water based latex paint?
Thanks for any help.
Yes Lucy you can! You can always use the Zinsser oil based primer under any latex or enamel paint.
I love this dresser you did for your friend. I am working on painting my granddaughters nursery furniture black. (her Mom chose Black, Hot Pink & white for baby bedding). I used Zinser Bullseye water based primer – 3 coats for full coverage. 3 coats of Valspar Black Satin waterbased paint (New Black). And I special ordered the tube varathane water based. (hard to find) I tried a small area to rub on – just didn’t work – I used a foam brush but it left every stroke showing on the black when it dried. I finally got advice from the local hardware to use Cabot oil based poly. Now I am concerned about putting oil over the waterbased products and that have I ruined the project. I hate the odor and the long drying time. I wanted it baby safe and now I just don’t know. Everything says it’s safe when it has dried. Can you calm my worries over safety? Signed Concerned
Hi Bonnie, I don’t advise used oil based poly over water based paint, it’s designed for wood stain, not paint. The water based products are much better, so sorry to hear you had bad luck with the Varathane, they’re all sensitive to temperature and can dry too fast if over 70 degrees. I know little about the Cabot poly, I only use Minwax wipe on Poly and it’s pretty strong stuff. It’s hard to call it “baby safe” because everyone has a different definition of that, personally in a nursery I’d use low or no VOC products, and the Cabot is not as far as I know. Over time (I’d say at least a month) the VOCs are minimized and practically eliminated but in the future, stick to the water based and low or NO VOC stuff around kids.
Kate
Thank you for your response….can you also tell me how much floetrol you used per gallon of paint? One quart? We tried our second piece of furniture and still brush strokes? Do you reccommend using a roller to apply paint or the angled brush?
So I’ve been wanting to repaint my old furniture for a while. Only thing is I have a thick hard almost lacquered type surface to the top of the dresser and desk. They both have deep scratches that I’d love to fix and repair. How on earth do I refinish the tops of these pieces? These pieces are currently antique white and I plan to repaint them the same color so if there’s a great product to use in white I’d love to know about it.
Hey Stephanie, it depends on what kind of laquered surface it is, wood, laminate, veneer? Let me know!
Kate
What store did you find the Varathane Rub on Poly? I’m having trouble finding it.
You’ve inspired me with this article!!!!
Hi Kim, it’s not readily available yet, I found it at California based Orchard Supply & Hardware, but I’ve been told my the folks at RustOleum they’re going to try to get it on the shelves of HD and Lowes, good news!
hi,
love your step by step how to. i have a dining room table that has been in my husbands family since he was a kid. we would love a new dining set but its not in the cards just yet. i was thinking of painting the table. it is wood but the top has a laquer of some sort on it. am i able to paint it?
Yes Ashley, you can, the trick is to prime it properly with a good bonding primer, and for tabletops it’s best to use low VOC paints IMHO – I’m redoing a pedestal table now, will post all about it soon!
Kate
Thank you for this wonderful tutorial. I am going to paint my daughter’s white furniture and
your website is most helpful to me as I have never painted furniture before.
Hi, I have inherited my mother’s early 1920’s ornate wood bedroom furniture. It is beautiful but her hopes were that I would use it for my daughter’s room. I am nervous about repainting it as it is the brown wood. I am starting with the headboard which has very intricate groves and details. Does that require perfect sanding with a dremel tool sander?
No Lacy, with that primer there is no ned to sand the grooves and details, you might even damage it, so don’t worry about it. That primer will bond to the wood surface but consider the spray version to get into the detail work and be sure to do it in a well ventilated area.
Kate
I was just browsing around on your site, and I have to say you are AMAZING at what you do!! :)
Thank you so much for this step by step! I have been looking around for some “plain English” tutorials that are easy to follow along with and I found yours on Pinterest.
How many coats of polycrilic do you recommend?
One coat of polycrylic should be just fine Corin.
Kate
Thank you for the wonderful instructions. I happen to have the same dresser w/mirror and chest. I have just painted them with the similar colors that you used. It’s for our spare bedroom. I just got the glass drawer pulls and knobs. Tomorrow I’ll be doing the poly. I’m so excited. This was my first furniture painting experience. Thanks again.
Thank you for talking about drying times. I have utterly ruined my first (and probably last) piece of furniture ‘re-do’ by not knowing how important this step is. Now, after the fact, I’ve done quite a bit of research on this online and what you say here is more helpful than even the product website instructions! Again, thank you so much!
Your step by step instructions is very helpful. Now I am ready to start my kitchen cabinets repainting job and I had bought all the products you listed in your article. Before I start, I have one more question Floetrol: should I add it to each coat of latex paint or just first or final coat? And should I add Penetrol into Zinsser oil based primer as well? Or it is unnecessary? Thank you very much!
I love your tips and ideas on painting! I have several projects that I’ve been waiting to due until warmer summer months. I noticed you love spray paint as much as I do :) and was wondering why you chose to use latex paint on this project and not spray paint? I have a similar dresser I’ll be painting soon and was debating between the two methods. Thank you!!
I sanded, primed, and painted like stated above then polyed but I am still getting chipping paint. I usually use the oops paint from Lowe’s or Home Depot (Olympic or Valspar usually), I just can’y figure out what I am doinh wrong??? Any help would be appreciated!! Also how do you keep from getting tiny “hairs, dirt, etc” from your pieces? I am always finding them when it’s too late and they have dried on the piece. Thanks so much!!!
Thanks for this. I’m working on my first project right now!
I am wondering where I can buy the rub on varathane? I’ve been searching online and can’t find it.
Hi Heather, I talked with the folks at RustOleum (the parent company) and while it’s only available in California right now, they’re pushing HD and Lowe’s to carry it, hopefully soon~
Kate
Kate, this is by far the best furniture painting tutorial I’ve found! Thank you!
What do you think is the best paint remover for getting the oil-based primer out of your brushes?
Hi Jessica, I still use paint thinner or mineral spirits to clean oil based paint from brushes, but regular vegetable oil will take it off your hands!
Kate
Hi Kate!
I just applied a coat of Zinsser Cover Stain with a Purdy Brush on bare wood and I have brush strokes from hell!! Have you ever had to deal with that?? It is so demoralizing to think I now have to re-sand the whole thing after I just spent 2 weeks sanding it down to wood until it felt like a baby’s bum!! Any idea what I might have done wrong?
Thanks so much! Love your blog!!
Hey Genevieve, yep it can happen if it dries fast. Penetrol will help condition and minimize those brush strokes. You shouldn’t have to resand the whole thing, just enough to get it smooth. Do you have an orbital or power sander? That will help! Then I’d go over it again, but try the Penetrol additive, I think you’ll find with a few capfuls mixed into your primer in a separate container that you’ll end up with a smoother primer coat.
Kate
Great ideas on how to finish wooden dressers or even bookcases, for that matter. I’ve got a small 5 drawer wooden brown dresser that I bought for about $20 years ago at a thrift store. It’s presently sitting in my dining room area holding all my extra bottles of craft paints & craft instruction sheets. I’ve got a mobile home that I’m renovating room by room and not sure what room this dresser will eventually end up in. I love the southwest colors and will probably eventually paint this dresser a shade of sage green.
I also have a wooden bookcase that I rescued from a drive-in theater many years ago which only needs to have the back replaced ~ I guess that’s why it was dumped. To me, it was a diamond in the rough! It’s presently painted white, but this will also get a different color too. When I first found it, I had thought of using it as a “template” to make bookcases for all my grandkids’ rooms. Looks like it will be fairly simple to “reproduce” this kind of bookcase. The more I look around at things I want to “reinvent” ~ the longer my “to do list” gets! I guess that’s the life of a DIYer! I’ve ‘pinned’ this article to my Pinterest site so I can easily find it when the time comes. Thanks for being so thorough in your instructions on your projects! Thanks Kate!!!
Hi Kate,
Thanks so much for your great blog. I followed your instructions for my first project–two upholstered chairs with caned sides. I did end up having a friend spray on the paint because I just couldn’t handle the light brush strokes, but the end result is soooo beautiful. Even my husband ( don’t paint wood stuff) is a convert.
Where did you get the glass pulls and knobs?
Those pulls and knobs are from Restoration Hardware, but there are more inexpensive sources, like Hobby Lobby or even Lowes.
Kate
I found a great solid wood dresser that I am re doing and am going to be using this post, so very helpful and easy to follow. One question? I am wanting to do a flat and semi gloss tone on tone pattern on a media console, would the protectant in the last step ruin the combination in the shine and the matte?
Yes Justina I think it would, especially if you want a flat finish. You could try the enamel paints I talk about here:
http://www.centsationalgirl.com/2012/03/a-blue-bureau-my-favorite-paints-for-furniture/
Try buying satin and only using a high gloss protectant where you want it to get the look you mentioned.
I wish I had found this before I started doing a dresser. At least I started with just 1 drawer. I bought the Rust-o-lium spray paint, it said you don’t need a primer – big mistake…I thought I had sanded it enough but the paint is not going into the grain of the wood.
Now I have to pull the paint off, resand, prime and repaint. Ugh.
This is beautiful! I am so glad that you are so detailed with your write ups. I know that when I go to buy a new home, the cost of the home is going to be expensive enough that it will be difficult to decorate and furnish it will pieces that I love. Your entries really show me that you can take a piece of furniture and turn it into something that you really love buy truly customizing it. I love your work!
Beautiful and I love the step by step instructions! I am hoping to find a old sturdy desk to refinish this summer . . . with this info I am sure it will be a success!
I painted a bookcase and followed your tips (except we didn’t put any protectant on) – the bookcase came out a bit sticky…the books stick to the shelves a bit. It’s not awful, but not the best. Would a protectant solve this problem?
Thanks for your great tutorial. I am finishing up my first project — painted a hutch and buffet black, and it worked great. I added the Floetrol to my paint and it went on smooth and streak-free. But my polycrylic coat is not faring so well. I’ve tried rubbing it on with nylon pantyhose (another tip I found online), brushing it on and rolling it on. IT DRIES SO QUICKLY and then gums up. I’ve had to sand the polycrylic off twice! I’m wondering if floetrol can be added to the polycrylic to slow the drying time????
Hi Jaymie, the Floetrol isn’t designed for Polycrylic, but if you’re having trouble it could be due to temperature and I’m so sorry you’re getting a gummy look! Have you tried the Varathane instead? And there is always the option of clear furniture wax, they won’t give you the shiny finish but you’ll at least get a nice protective coat.
Thank you so very much for this tutorial! My husband and I just started repainting his old dresser yesterday and I can’t wait to see the finished look (and have a new dresser). I love your style and I hope ours looks just as great as yours!
Thanks again!
I did not use floetrol, and have brush strokes on the top of a table. Will it work if I use it with a final coat of latex paint?
Another coat won’t get rid of the underlying brush strokes. I think it would be better to wait until the latex is cured (two to three weeks) then lightly sand it down with a medium grit sanding wedge to remove the brush strokes, then add another layer with Floetrol after that.
Awesome instructions! Just bought a pedestal mirror I need to repair & repaint. All the information I need is right here!!! Thanks ;)
I bought a dresser to r-do for my kids’ room and it has something like 6 inches of varnish on
it. I started sanding and have completely sanded down to the wood one drawer, plus the flat front of 2 more drawers (there are 7 drawers). I used some of that stupid stuff that you smear on and it takes the varnish off…only it doesn’t work worth a crap and it took about 6 coats to get the varnish off of about 1/3 of the top.
My intention was to paint it white, with the drawers different brighter colors…is it too late to skip sanding off the varnish? Can I possibly get away with just roughing it up and the priming? Or is it likely to show through the prime and paint job?
Hi Jennifer, use a good stain blocking adhesion primer (I love Zinsser Cover Stain) and you should be fine, forget all that sanding!
Kate
What paint finish did you use on the dresser? Semi-gloss or satin? I am refurbishing my old bedroom suit for my daughter & painting it white. Also, what shade of white do you recommend? I didn’t realize how many there were until I went to buy some last night!
Hi Meridith, I think I used eggshell, but it’s the protecctive coat that determines the sheen, whether it’s Satin polycrylic or a soft wax which gives you a hand rubbed matte finish.
Awesome tutorial! We have 2 dressers & an antique armoire that need some serious updating. Your instructions are gonna make this a MUCH easier process!
Thank you!
getting ready to do a dresser for our firstborn’s (a boy) nursery. This is going to come in quite handy! Thanks so much!
These were awesome step by step instructions, thank you so much!
I love Zinsser! Only discovered it last year but love not having to sand anything ever again! My only problem is that I hate to clean the brushes after using it, but a friend who refinishes furniture for a living gave me a great tip: brush as much of the paint out of the brush as you can then put the wet brush into a ziploc baggie and store it in the freezer. I’ve done this and the brush is flexible and ready to go the next time I’m ready to use the primer again. I just finished repainting my mom’s 55 year old china cabinet and it looks great!
Totally great tip Kimberly! I use the refrigerator in between coats, such a great idea to use cold storage to avoid cleanup !
Kate
Hi. I stumbled across this post from pinterest. Great work! I have a question for you… I am redoing my parent’s old table and chairs. I painted it in a flat paint. I am wondering if the poly sealer will make it glossy and easier to clean? If not do you have any tips on how to achieve this finish?
Hi Katie, yes it’s true, the glossier the surface, the easier to wipe down!
Kate
Thanks! I applied the water based minwax today, but it seems that it has darkened my paint color. It was off white and now looks tan. What have I done wrong?
Hi Katie, it shouldn’t have turned your paint color that dramatically, but with white paints you do have to be more careful. You can use clear furniture waxes with white paint, they won’t change the hue, they might deepen it *slightly* but they won’t change the color. See this post:
http://www.centsationalgirl.com/2012/03/a-blue-bureau-my-favorite-paints-for-furniture/
Kate
Hi Kate! Thanks so much for this tutorial! I used it to paint a L-shaped desk for my craft room. I posted the project on my blog and included a link for your site. Thanks again! :) :)
Oh this is soooo inspiring! thank you for taking the time to write up the best post ever on how to paint furniture. Especially loved your tip on using Floetrol for slowing down the drying time and reducing brush strokes.
I love painting furniture but do not like seeing my brushstrokes.
PS: Love your blog !!
Kate,
Thanks so much for taking the time to write down instructions on how to paint wood furniture. I plan to follow these instructions and re-paint a desk for my daughter. Any advice on removing paint from wood furniture?
Waleska
Hi Waleska, I wrote about using paint strippers here:
http://www.centsationalgirl.com/2010/03/a-tale-of-two-strippers/
I use Citrustrip, it’s great!
Kate
Wow, how silly am I. My mom’s got at least 3 or 4 old dressers downstairs in her basement that I need to get out and paint. I already did one old dresser that I got from a resale store several years ago so I know it’s not hard and it turned out so cute. Silly me!
We’re looking at refinishing our old furniture set and I want to know how much time I’ll be without the use of our dressers. Can you estimate how long you spent on this dresser?
Thanks,
Stacy
Hi Stacy, hard to give you an exact time, but I’d say half hour to spray prime, or an hour to brush prime. An hour for each coat of paint then half hour or hour for protectant – so I’d allow four to five hours of labor per piece if you’re using a brush – but it varies on the detail and size of your piece.
Kate
Do you also have any recommendations on a reliable brand of sander? Along with an idea to safely remove paint that is already peeling?
Hi Stacy, I use Citrustrip to remove paint from furniture!
Kate
Thank you for showing this. I have this EXACT dresser but it is the chest of drawers!!! I couldn’t believe my eyes b/c I’ve never seen it anywhere! It is a solid piece but dated and wanted paint it. I have a question. It has a door that pops down to make a desk in the center. Would it be better to spray paint in the desk area inside, then to try to fit a brush in the small spaces? That’s been my only thing holding me back is how to make the inside compartment match the rest of it. Thanks!
Hi Candice, it’s tricky to spray paint inside a small space, the overspray and fumes make it very challenging, so I’d take the time to roll or brush that out. Or maybe just leave it wood inside? Might be a cool contrast!
Kate
Thank you so much for posting this. I have 7 pieces that I have been wanting to paint.
I have been searching for some good online tutorials for painting furniture. This was by far the best!!! This one here was great but it did not address options other than what method was being used: http://www.pinspire.com/pin/show/10335514
Thanks so much for the suggestions on sanding to the grain v not. It was nice to have someone comment on the variations in methods!!
Wow – Incredible looking dresser and an amazing color combination!!
Just curious about the water based protectants. Can you use water based products on top of oil based paints, or do you need to used oil based protectants?
Thank you so much for the tutorial – your step by step intructions are awesome and so easy to follow.
Hi Kelly, I haven’t had any issues using a water based protectant on top of an oil based paint, just like you can use a water based paint on top of an oil based primer. The one to avoid is applying water based paint on top of oil based paint, it won’t adhere well without a layer of primer in between. These days, the water based paints are really good, I stick with an oil based primer for adhesion and durability and add water based enamel paint on top, like I mention here:
http://www.centsationalgirl.com/2012/03/a-blue-bureau-my-favorite-paints-for-furniture/
Kate
I’ve followed your instructions to a tee but I’m still getting HORRIBLE brush strokes – even with the Floetrol. I even added more Floetrol than the directions say (because I live in Texas and it’s 100 degrees here) and the brush strokes are just awful. Plus, half of the piece has dried white (Latex paint) and half of the piece has a yellowish tint to it. Any ideas?? I’ve sanded, primed, sanded again. Now I’m at the painting stage and things are not looking good…
Suggestions are extremely welcome! Thank you!!
Hi Pam, I think temperature may be a real issue for you – now I only paint in 55 – 70 degree weather which is more difficult for Texans I know! I’d sand down the primer to remove any of those brush strokes. Not sure wy your paint has a yellow tint to it if it’s a water based paint – perhaps it wasn’t stirred up enough before you began painting. My best advice is to paint in cooler temperatures to avoid the drag that creates those brush strokes.
Also, here’s an update on painting furniture, it talks about enamel paints which have better flow and don’t need Floetrol:
http://www.centsationalgirl.com/2012/03/a-blue-bureau-my-favorite-paints-for-furniture/
Kate
Hi, I just did a little research trying to find out why my Valspar latex paint is yellowing. I didn’t find any answers on that specific question, but I did come across a few posts that said that Minwax Polycrylic (what I bought) will turn white paint yellow. Have you encountered that?
Hi Pam, I haven’t experience it yet, but I know some others have. With white paint, I use waxes now, I mention it more in this updated article on paiting furniture:
http://www.centsationalgirl.com/2012/03/a-blue-bureau-my-favorite-paints-for-furniture/
Kate
I painted a dresser and desk for my daughter last year, but they have developed problems that I need to fix. I sanded both down and used wood filler for some spots. I then brushed on two coats of satin finish Valspar paint in black. The problem is that the paint has seemed to remain tacky. If my daughter sets things on top of her dresser, they stick, and in a few little spots the paint has come off. I did not use a clear coat over the top. I am thinking about lightly sanding down the top, then putting on another light coat of paint, and then a clear coat. Do you think this will work?
Hi Jennifer, using a clear coat like the ones I mentioned will help to hardent the surface and remove the tackiness that can come from latex paints, but they do take a while to cure, be prepared for a few weeks!
Kate
I have a question regarding primer. I am attempting my first refinishing project (a small bookshelf) and realized after I tried applying the first coat of primer that I had purchased shellac (sp?) based primer Zinsser and not oil based. Will this make a big difference? I used the spray can and ran out way too early so must purchase more. Thought I’d ask before I go back and just buy a gallon since I’m enjoying it so much I also found a cheap wood dresser I am going to tackle next!
Thanks!
Hi Rachel, they’re similar, but the shellac formula is thinner. I think you’d be fine switching to the Zinsser Cover Stain in brown, it literally clings to everything.
Kate
Does this dresser have real wood sides? I’ve come across a number of inexpensive and similar looking dressers but they all seem to have laminate sides and /or paper board back. The finished product looks great and I too am looking to revamp a bureau for a nursery. Thanks for your great tips!!!
Thanks to your blog, I have successfully turned a drab night stand to a gorgeous piece! This was my first time painting a piece and it turned out great. Thanks again :)
Fantastic news Michelle!
Do you mix the Floetrol in both the primer and the paint?
Thanks =)
Hi Andrea, Floetrol is for latex paint, Penetrol is for oil based primers and paints.
Kate
Hi
I’ve been following your directions on painting furniture and I’m testing it out on a dresser I found at a thrift store. After priming the whole thing what kind of sander should I be using to sand down all the brush strokes left behind? Thank you for all tips and tricks!! :)
Just a medium grit sanding wedge should do!
Hi,
First i love your blog! I decided to repaint my dresser after discovering it.
I went to the home hardware to find the products you mentioned but the guy there said that i should use a all in one paint + primer stain blocking, he said it sticks to anything. I thought i’d give it a try but i wanted to ask you if you ever tried this and what you thought about it. The one i bought is Behr premium plus ultra stain blocking paint and primer in one. It’s enamel acrylic.
Thanks.
Hi Olivia, I haven’t tried the Behr paint and primer on furniture, I was unaware they had an enamel combo version. I’ve tried the combo formulas before on walls, they work great there, but when it comes to furniture, I’m old school, I let the primer do it’s job of adhesion and stain blocking and use enamel paints to add pigment and give the piece a good finish.
Kate
Great post! How did you get the old pulls off I unscrewed but it’s still hanging on by what appears to be little pins but no way of unscrewing. How did you pry off without damaging furniture?
Hi Krysta, that’s tricky! I recommend a lot of TLC and using a tiny flathead screwdriver to help pry them off.
Kate
Thank you so much! I just bought a huge entertainment center for an awesome price and knew that there must be an easier way of painting. I am going out right now to purchase some Zinsser!
I’m curious where you get the tube of Varathane, I can’t seem to locate any and would much prefer that method over spray or brush!!
Thanks
Hi Jamie, so far I’ve only been able to find it at my local CA based Orchard Supply, but I hear that it will be avail at HD and Lowes soon. Yes!
Kate
OMG thank you so much for this post I will use it as the Instructions to re-vamping my old school sewing table. I cant just buy a new one because my sewing machine fits precisely inside of the table’s cut out. My brother sanded it down and stained and varnished the table and its been like that ever since. I just wanted to ask should we sand it down a lot to take away all the finish that he added? I want to paint it white to match with all my other furniture in my sewing room. thank you so much! <3
I’ve learned so much! I have recently redone a dresses in black the way you suggest. I think I messed up with the top coat I used which was a clear matte. It doesn’t seem the be drying completely clear, and it isn’t very smooth. Do I need to start over? Or will a light sanding with another coat of black be necessary? Thanks for the help, you are very inspiring!!
Hi Jen, if your clear coat doesn’t look right to you, I’d lightly sand it, then add another coat of black paint. Have you seen this more updated article? It recommends enamel paints (although latex works too) and clear furniture waxes as an alternative.
http://www.centsationalgirl.com/2012/03/a-blue-bureau-my-favorite-paints-for-furniture/
How do you clean your brushes after using oil based primer/paint? I just finished priming a dresser and now I have no idea what to do with the brush.
Help please
Hi Lucy, you need to use mineral spirits or paint thinner to clean brushes after using oil based paint.
Kate
Genius! I love this tutorial. I’ll have to try it out. :-)
I just recently bought Annie Sloan Chalk Paint from my local vintage store. I would check their website for local stores that carry it. Its great for a vintage look!
I love this website and, as a first time painter (of anything) I followed it exactly to paint an old dresser. I bought exactly the products you suggested and it looked fabulous until I put the water based minwax that you recommend on it. What was white is now streaked with yellowish. It is not all that bad looking, still – mostly looks a little more rustic but I would sure like to know what went wrong so I don’t repeat the mistake!
Hi Pam, I’m so sorry that happened! With white paints, I’ve started using clear furniture wax to avoid that problem. Here’s another post on painting furniture where I talk about waxes.
http://www.centsationalgirl.com/2012/03/a-blue-bureau-my-favorite-paints-for-furniture/
You could sand it lightly and give it another coat of paint, then try the furniture wax, I think you’ll be more pleased. The Minwax is good but I find it’s best for colored or dark paints as a protectant.
Kate
Thanks! That’s what I was going to try.
Holy cow. I found your post when I was looking for a good tutorial on the “proper way” to refinish a crap piece of furniture. I was really delighted by how specific you were but I still had my doubts. I am AMAZED at how perfectly this addresses everything you need to know about refinishing an old piece. I’ve written a post on my blog about how if anyone wants to know how to attempt a project like this, this post is absolutely the THE authority.
Thanks so much!!
http://anothercraftyday.blogspot.com/2013/02/adventures-in-thrifting-dresser.html
How nice Meghan, so glad it was useful! And thanks for the mention!
Kate
Thank you so much for this post! I found it very helpful!
THANK YOU!!! I just have to say what an incredible blog post this is! I have been DIY-ing (mostly furniture) for over 5 years now and I have to say this is the lost helpful and well written piece of information about painting that I have read to date! I just tried Flotetrol and Zinnser for the firdt time and was VERY impressed. I have to laugh because the “paint lady” at Home Depot was giving me flack for not buying the paint and primer in one but i truly saw a difference with the Zinnser. (Shut it paint lady) If I have learned anything after my 5 years of trial and error… and if you want a piece to last – do it right! Be patient and use quality paint and brushes. Thanks again!!!
You are so inspiring and this detailed instruction is the complete guide! Bravo to you and your craft! I’m refinishing my first piece due to your awesome work! Any questions I had are completely answered!! Thank you so much!!
Hi,
Thanks for the Floetrol tip. It’s making a huge difference. Question: is it okay to add Floetrol to a large container of paint that I do not intend use up right away? In other words, will it negatively impact the paint storage? (I am about to open a new gallon of paint and it will probably take me about a week to get through it, and I’d like to add all the Floetrol at the beginning so i can be more accurate with the proportions). thank you!
No the Floetrol won’t break down the paint Kayla.
Finally@ Someone posting the proper,durable way to refinish furniture. I have painted for 15 yrs & will not take any of the other ‘easy way’ to refinish. Good job! Looks Awesome!
Just an fyi…I was finishing up a dresser today that I painted white with chalk paint and I applied the poly in the tube shown above and it yellowed after drying. Very disappointing. I had to add another coat of paint over it. Not sure if it was because chalk paint is a different recipe than latex. I did also purchase the no odor water based varathane in satin and used it over Behr zero voc acrylic paint and it worked fine. Both pieces were done in Behr “polar bear”. Does this usually happen when you use chalk paint?
Hi Mona, I’ve used Minwax Poly on chalk paint but not the Varathane. I’m sorry that didn’t work but try the Minwax (you can see it on the PB Inspired Blue dresser in the Furniture Makeovers project gallery)
How long does it take for the MinWax polycrylic to fully dry (for example, how long before a table would be usable without the finish getting dents or marks etc.)? Thank you for the great tutorial!
24 to 48 hours Rachel.
My husband just bought a paint sprayer. Is it better to paint a dresser with a good ol’ fashioned brush and your materials above or would a paint sprayer provide better uniformity? I’m going to stain the top of the dresser and paint the rest white…. These are excellent tips and I’ve printed out this tutorial for my follow-along :)
Also, should I add floetrol to the paint sprayer?! Whats your experience with that? Maybe not necessary since there would be no brush marks?
Kate! I just bought some of the Varathane Poly in the tube and am having trouble with the application. This is my first time using it and it’s going on streaky. I used a rag at first but it got so sticky so I switched to a foam brush. Any idea on why this is happening and how to fix it? Thanks!!
It might be due to temperature Breanna, that stuff dries pretty quickly. So sorry you’re having problems. If the foam brush is working keep using it!
So do you apply a latex paint over an oil based primer? I am re-doing a dresser for our son’s nursery and I’d always heard you can’t put a latex paint over an oil based primer.
Yes you can always layer water based (or latex) paints over oil based primers, it’s the opposite you want to avoid, I wouldn’t layer an oil based paint over a water based primer.
In your post it says you should wait 24 hours before applying the water based varathane over your latex enamel surface. I know that it takes latex enamel several weeks to completely cure, and I’m nervous about applying the sealer before the paint is cured. I’ve worked so hard on this project I am afraid of wrecking it. Can you assure me that you’ve had no problems applying the sealer before the paint has completely cured?
no problems, but if you’re worried give it a few days! I’ve done other projects where I applied the protectant coat just as soon and they’re still looking good. this is an example: http://centsationalgirl.com/2012/07/pb-kids-inspired-dresser/
Thanks, this will be my first big DYI project! I retired 5 months ago and have painted the inside and out of my front double doors, painted a sign on the door in the bar room, painted the knee hole in my bathroom and my husbands.
Now I feel ready to do something BIG, my old bedroom furniture! Wish me well…….
Kate,
Thank you SO much for this post. Your step by step information is wonderful. I have googled how to paint furniture several times now and your info. is by far the best and most detailed. Until now I have not found any info. I felt comfortable with to paint a piece of furniture. I will be saving this info.
I have also wondered about using porch and floor paint to paint furniture with. I did a small area where the washer and dryer are with this and it is holding up well. The only problem I see is you have to buy it by the gallon and this may be too much unless doing several pieces the same color.
Again Thanks So Much !!
I love your style! Your work is amazing. I am in the middle of painting a dresser and you’ve inspired me to finish it, haha.
Hi! Love this post. Thank you for all the great info. I just painted a dresser with the oil-based Zinsser Primer with my fancy new paint brush. Now I can’t seem to get the primer off of the brush to use it for the paint. Any suggestions? Thank you!