We’ve made a lot of progress on the Work Clothes Closet project I wrote about last month and the team is so excited to see this space transforming before our eyes with the help of volunteers and donations. Read all the details behind the purpose for this non-profit space here.
Sheetrock, sawdust, paint, these are some of my favorite scents (it’s true!) and every time I walk in here that’s what fills the air, the smell of progress! Two weekends ago, the local high school football team showed up to paint 2,200 square feet of walls and the ceiling in the space (paint donated by Glidden) and last week a local contractor stepped forward to build partitions since we raised just enough money to pay for lumber and sheetrock.

The two new changing rooms and storage room for clothes that come into the Work Clothes Closet are in progress, we can’t go all the way up to the ceiling due to existing pipes that run throughout the space but they’re tall enough for privacy. Over the weekend we built garment racks on each side of the space to hold the clothing for the men and women in our community going through the Work Ready program and preparing to renter the workforce and interview for jobs.
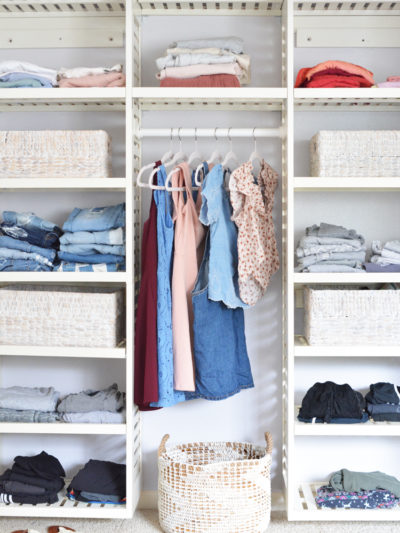
We had a need for tall garment racks to maximize the vertical space on each of the long walls. The black pipe garment rack idea has been floating around the internet for years, I was inspired to use the same materials in this space too. Instead of including shelves in the rack design (several shelving units have been donated and will be used elsewhere), I came up with a more basic plan for hanging washed and pressed professional and trade clothing. We assembled four of these, two for the women’s side and two for the men’s side of the Work Clothes Closet.

Each rack is 8’4” wide and 8’8” tall but this same design can be modified to be used in residences, commercial boutique spaces, garages, basements, anywhere where you wish to hang coats or clothing. Here’s the simple formula shown:

Supply list for each garment rack shown above, all ½ inch pipes and fittings: 6 flanges (spray painted with oil rubbed bronze spray paint); six tees; four nipple fittings; two elbows; four 18” pipes (extend & anchor to wall); two 4 ft pipes for bottom; four more 4 ft pipes across; two couplings (only if connecting four 4 ft center garment pipes like we did); two 3 ft pipes for top; screws (we attached these to the studs but buy drywall anchors for if you don’t).
Note, the black pipes are oily and dirty when you purchase them so you’ll need to wipe them down, we used some Lysol wipes to remove the oil then quickly removed that cleanser with a rag. Be sure to measure your space and sketch out a plan first and be flexible! Originally I thought the design would work with two four foot sections for the top and bottom but that turned out to be too tall so we swapped the top pipe for a 3 foot version (see picture and supply list).
You can modify the width to fit with your project or space, we combined two four foot pipes with a coupling to create racks that were slightly wider than 8 feet when you include the coupling and tees. Pipes are available in widths from 2 feet to 6 feet.
Here is a close-up of how the tees come together in the middle, the 3’ pipe extends above to the top. Below is the tee that connects the 18” pipe to the wall, there is a nipple connector in between, then a tee to connect the pipes below, one stretches across for hanging garments, one connects down to the floor.

Here’s a look at the upper portion, the flange supports the extender pipe which connects to an elbow, a nipple connecter attaches to a tee that connects to the long pipe that holds clothing.

This space has a cement floor which we plan to paint soon so to stabilize the pipe racks, we used wedge anchors designed for concrete.

We have several more projects to tackle in the upcoming weeks: building shoe racks, building a tie/belt rack, completing the accessories station (jewelry, scarves, handbags), hanging curtains and mirrors in the dressing rooms, adding lighting, and painting the cement floors. We’ve had a great team of volunteers so far, thanks so much to David, Isai, Jenna, and Kim of the KimSixFix for helping build these great racks!
Sending a big thank you to Lowe’s who donated $500 toward the project so we could build these four huge garment racks!

It’s exciting to see the space transform with the help of so many volunteers and generous donations. I’ll share more about the Work Clothes Closet project next month when it’s finally ready for the Open House! …
…


Is this a particular type of piping?
Black iron industrial pipe avail at home improvement stores!
what a wonderful space! and this rack project looks amazing, great job! cleaning the oil: we recently built an industrial rolling garment rack, and I found that using GoJo to clean the pipes was super easy and effective. it has a slightly gritty texture so it does a great job scrubbing the oil off.
can’t wait to see this finished space!
Thanks Cynthia, great tip!
The more closet space, the better! So impressed with this project!
x Lily
http://whilemyboyfriendsaway.blogspot.com/
I really love the garment racks and just may have to consider for my laundry room. I think they would be perfect. Thanks for sharing everything.
There’s no need for a central support pipe? The existing system will support the weight of all the clothes that get hung? Can you tell I’m a nervous Nelly when it comes to projects like this? hahaha
I was thinking the same thing too Kim, but we pulled on it and it seems stable, if you’re worried you can always use a T in the middle and another extender from the wall for really heavy winter coats with such long racks.
Kate
I think it’s technically conduit and is in the electrical section not plumbing. I have generally seen it not threaded, but they have the capability to do so in the stores.
Also because I’m a structural engineer and this is my pet peeve, cement is an ingredient in concrete and is powder. The hard stuff you walk on (like the floor of your closet) is concrete. It’s kind of like referring to a cake as flour.
The pipe we used is in the plumbing section of Lowes pre-threaded, but they do offer the option to cut and rethread for you. Thanks for the clarification on concrete v. cement :)
Oh Kate, I love all that you do to give back! You are so inspiring! The pipe garment racks are super stylish too. :)
So happy to see you giving back. I think it is a person’s way of showing their gratefulness :)
You are so inspiring! Thank you!
Thank you.
I share Kim’s concerns. Pulling on the pipe is not quite the same as the continued weight of hanging clothing. Even though the pipe is very strong I think you may find that over time the constant weight of that much clothing will bow it in the middle. It it looks as if you already have a join there, which makes it potentially weaker. Just something to consider now while it’s easier to change it.
Kate, what a wonderful project that helps bring dignity to those reentering the work force…a supportive environment…cudos to you and your volunteers!
Your instructionals are so easy and clear to follow, much appreciated. In the shop I sell in, my friend, the owner at Inspired, also used the pipe sections for hanging clothing, but attached to a palette on wheels that could be moved easily from place to place so didn’t have to be on a wall. Works really well :-)
Your posts are wonderful and look forward to reading them!
I still like The Beverly Hillbillies “cee-ment pond.” I suppose it really was concrete, but we in Chicagoland say “cement” too.”
I’m so excited to see this come together! And the best part is how many lives this will touch when it is finished. Thanks so much to your sponsors, donors (and to you and the whole COTS team) for everything they are contributing! I’m proud to be involved!
Thanks, Kate! I don’t think I’ve ever seen the metal pipe in the plumbing section (usually I only note the PVC), so I’ll have to pay attention next time!!
What was the total cost of this project?
Hi I was just wondering, I’m wanting to do this on top of carpeting in a bedroom. I’m not sure where wood or concrete meets underneath…should it be fine and stable for regular clothing to be hung and rehung without connecting to the floor as long as its in studs?
Thanks a bunch Kate! I designed my own to hang down from the ceiling joists, but this was really inspirational and confirmed my choice of materials. Note to Canadians: black pipe is at your local Lowes too, e.g.
https://www.lowes.ca/black-iron-pipe-fittings/southland-pipe-204-12-in-dia-150-psi-black-iron-pipe_g2576254.html
I’ve been planning this for my hubby’s new closet, BUT worried the black will rub off. Does it?
You have to clean them VERY well, but if you do they will be fine.
Do I need to paint the black pipes? I love the look but hate the black oil it is leaving on everything. Also thank you so much for providing this blog and tutorial. You ROCK!