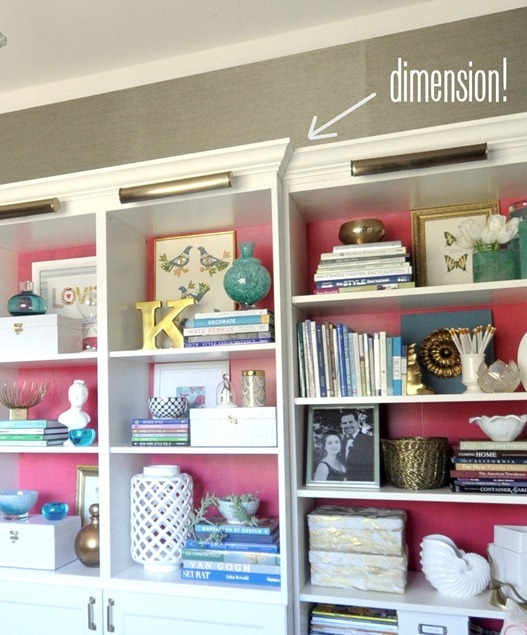
Greetings all, thanks for the sweet words on the office upgrades from yesterday! As promised, here’s more information on the library bookcase unit we put together with IKEA pieces – we added trim, hardware, and lights to customize it for my office.
I know the pink isn’t for everyone, but I was feeling the love this month but I may get a wild hair and paint the back something completely different soon – it happens, it’s just paint! My point is the unit would look great with the back painted any color you love – or a stencil or wallpaper or fabric, the sky’s the limit!
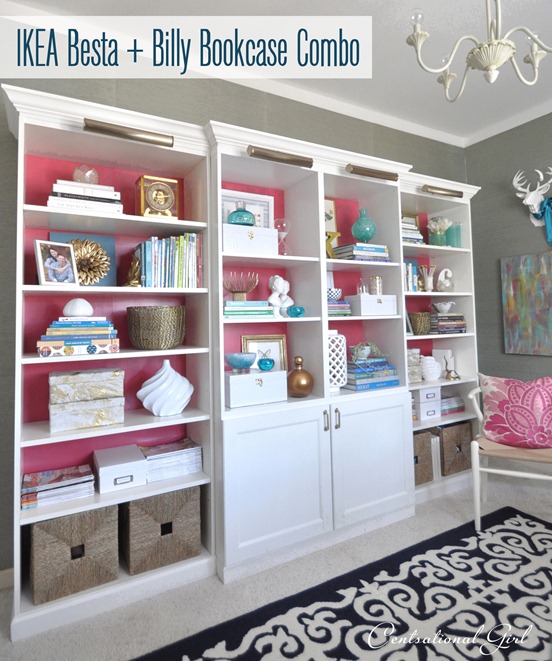
We all know how expensive bookcases are from most retailers, and wall units like this add up quick to $1,000 or more but I didn’t want to pay that much for shelving. We considered something more like the Billys to built ins project from 2011 but I wanted something that looked more like a freestanding three piece unit.
So I started hunting around on the IKEA website and I realized that some of the Besta pieces could be used and then I realized that three of their pieces added up to the same exact height as a 15” Billy bookcase, and an idea was born to combine them!
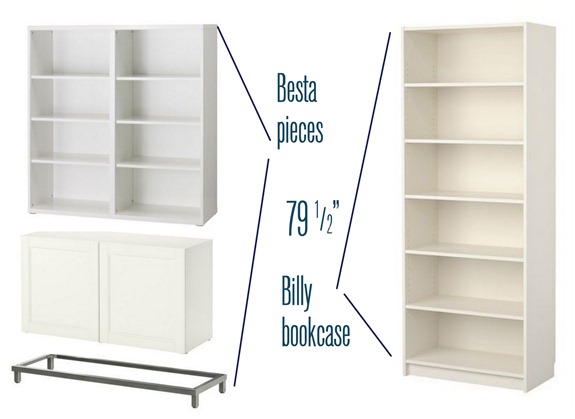
So here’s what we used, a Besta underframe + Besta cabinet + Besta shelf unit and we combined the trio with two 15” deep Billy bookcases on each side.
The Besta trio retails for $284, but the weekend we bought them they were having a “family discount” – not sure what that is but we paid $260 for our Besta pieces. Anyway right now they cost $284 for the three pieces together. You could save yourself the $50 on the frame by building one yourself but we decided to save time and since it fits the Besta base so perfectly, we bought the underframe. The 15” deep Billys are $70 each so the cost for the Besta pieces plus two Billys was $424.
First thing you do is assemble all the pieces then place them next to each other. A caveat when putting these pieces together: I learned after they were assembled that “Besta white” is not “Billy white”. And here I thought all IKEA pieces were the same white! Billy white has a slightly more cream undertone, Besta is a brighter white. We knew we were going to add base to the bottom to disguise the difference but what about the slight color difference?
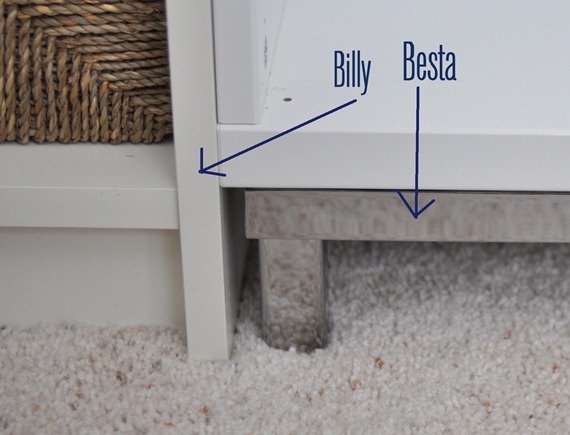
The solution was to push out the Besta a few inches to give the wider Besta unit more dimension and detract from the subtle color difference. It worked! Side by side, the color difference is noticeable but when they’re staggered, it’s not.
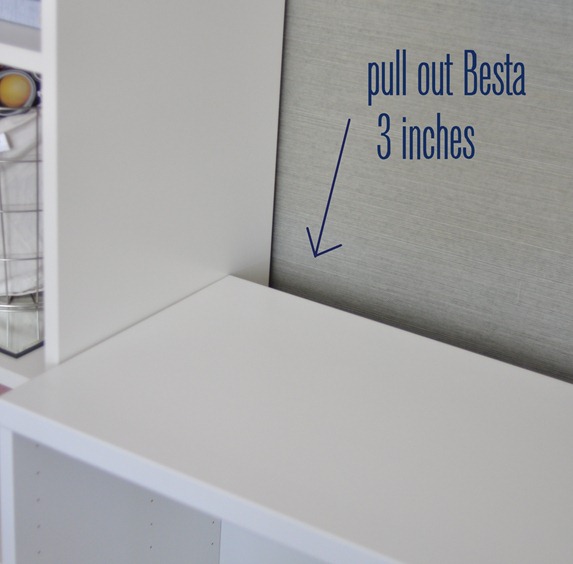
As it turns out, we actually prefer the look of the Besta pulled out, it gives the entire unit more dimension than if they were all flush to each other.
One you have the units in place, screw them together so that the seams are tight!
Next came the lights. I really really really wanted library lights for this piece and unfortunately my favorites were outside my budget. 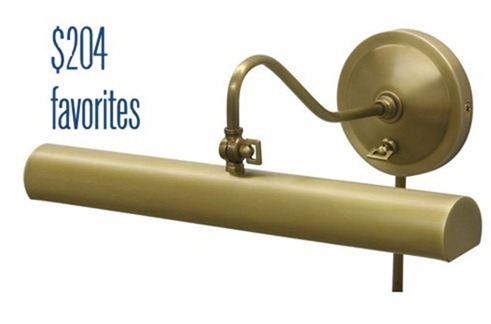
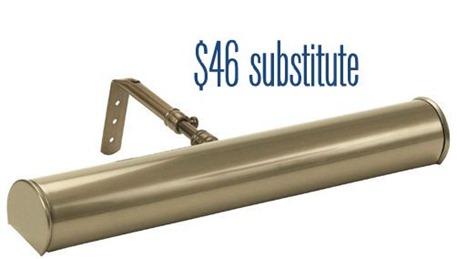
So I kept looking around and settled on these picture lights as a substitute.
To add crown molding and lights we needed to add an extra piece of ¾” x 2” trim on top (trim, crown and base all purchased from Lowes). Before you attach the trim to the top, you have to drill the holes where the lights will go. In anticipation of the lights, Matt drilled four “mouse holes” with a drill bit but don’t fasten the trim to the bookcases yet, fastening the lights comes first.
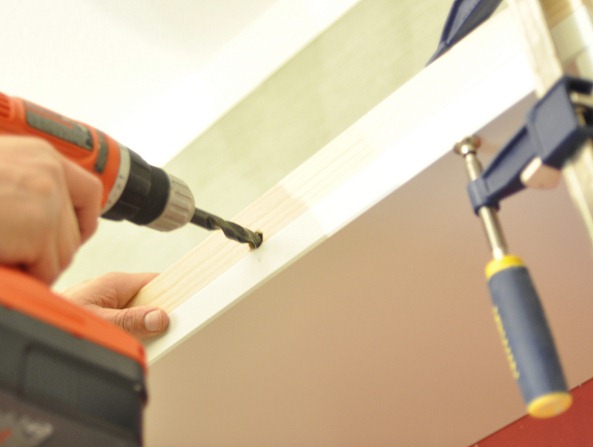
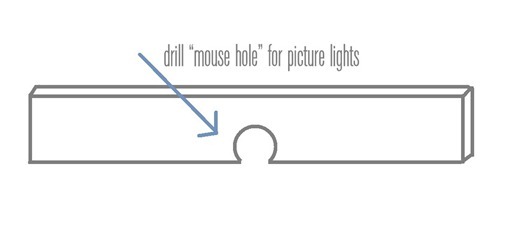
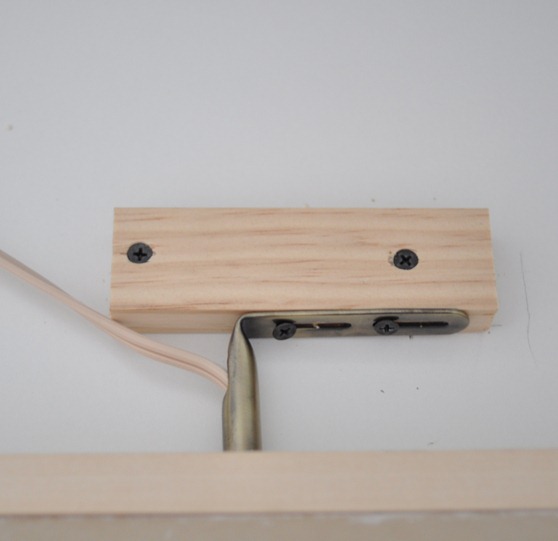
Next, secure the picture lights to a small piece of trim screwed into the top of the cabinet – make sure all the wires are pulled down behind the cabinets into one spot together.
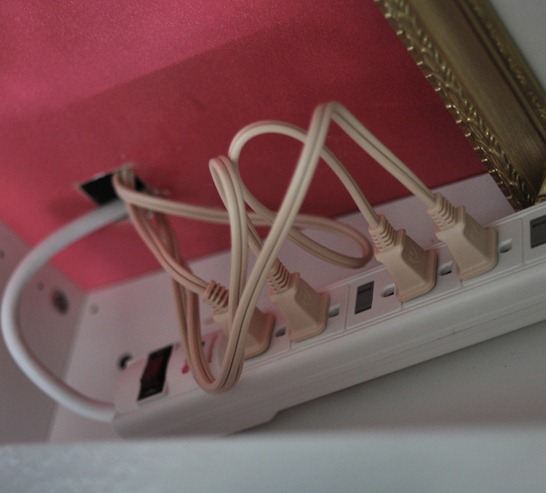
Our four lights are all on a power strip which is plugged into the wall behind the unit. I cut a hole in the back of the bookcase to make room for the power strip and to turn the lights on and off, all we do is flip the switch! It’s hidden behind one of the decorative boxes so it’s an easy flip each night, and a power strip is ten million times cheaper than hardwiring sconces to a wall.
At night they cast a glow on all the objects inside which I love – and I’m a big fan of multiple sources of lighting in any space.
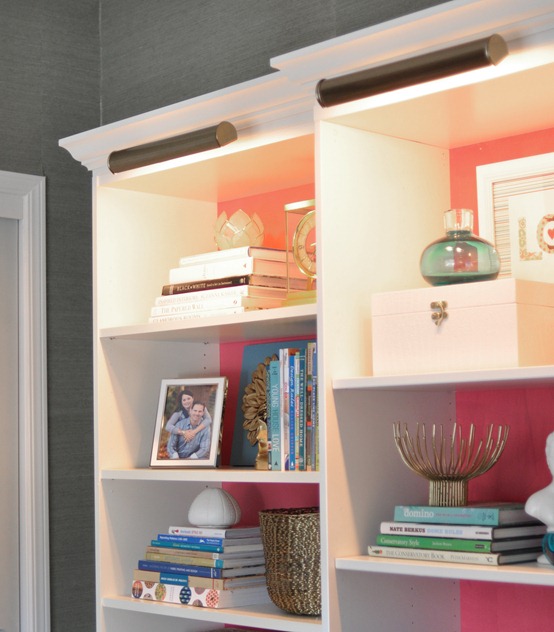
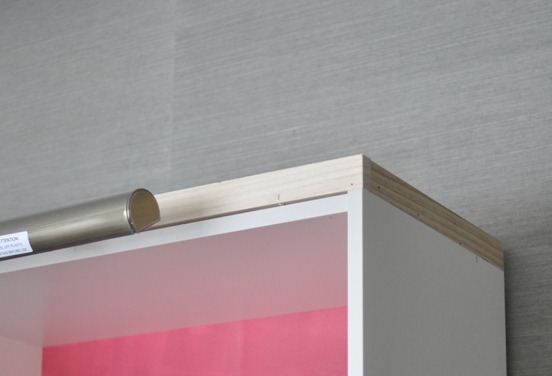
Attach the ¾” x 2” trim to the tops of the bookcases after the picture lights are fastened – the picture light comes through the mouse hole like you see below.
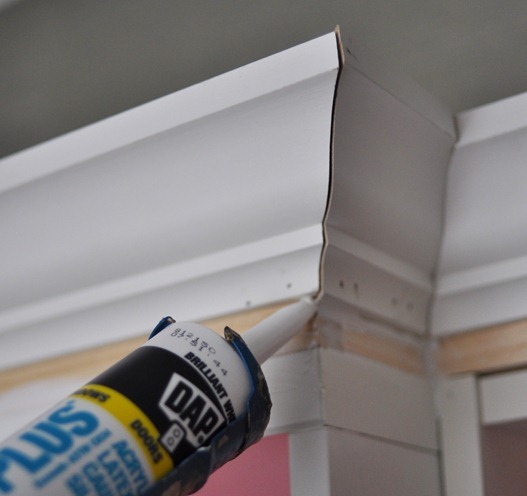
Next Matt cut some crown molding and 3 ¼” baseboard with the miter saw for the unit and attached them with our brad nailer. One note on the base – it doesn’t attach to the metal Besta frame so you need to create a faux frame that’s nailed together to slide in front and disguise the Besta base.
In hindsight, we should have built a wood base out of 2 x 4s like we did with this window seat project, and attached the baseboard to disguise it. And we would have saved ourselves $50! All gaps in the crown and and between the trim were filled with paintable caulking.
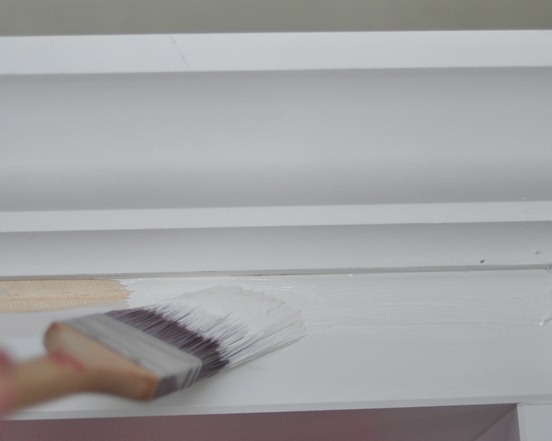
I painted all the crown, trim, and base with Valspar’s ‘Cream Delight’.
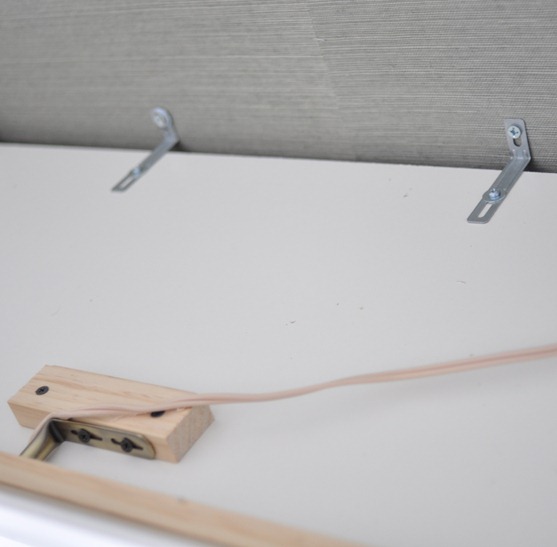
Finally, for safety, we screwed the unit into the wall studs with the “L” brackets that come with the Billys (we live in earthquake country) plus it’s just a good thing to do with tall furniture and children in the house.
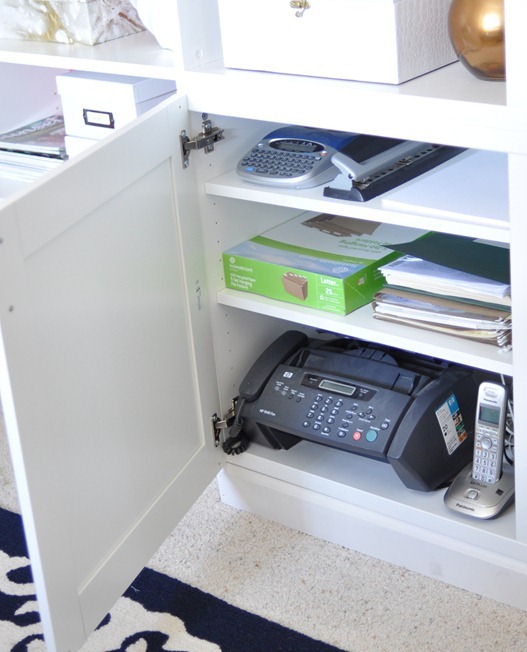
I love the Besta unit because it provides some hidden storage for office equipment.
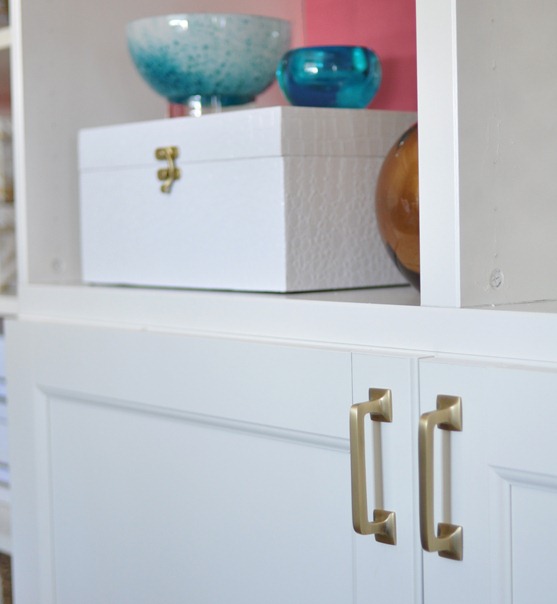
To finish it off, I added some antique brass pulls to the doors to complement the picture lights.
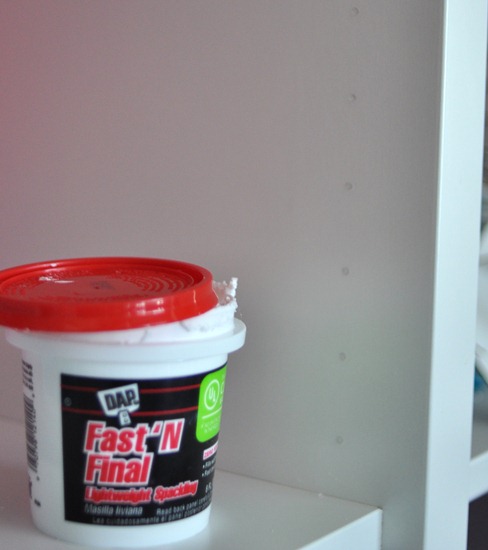
One final tip – once you have all your shelves in place, you’ll notice there are holes inside the units for where you make the shelf peg adjustments – usually that doesn’t bother me but this unit is seen from an angle when you look into my office so it’s more noticeable.
I filled mine with lightweight spackling to minimize the holes – they don’t completely disappear but they’re far less visible and since it’s lightweight spackling it can be drilled out in the future if I wanted to bump shelves up or down.
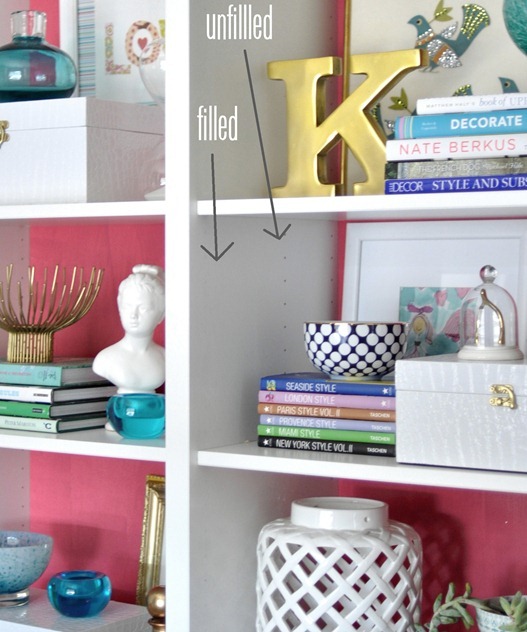
That little trick of minimizing the shelf peg holes with spackling looks cleaner than if I’d left them alone. You can see the difference below.
So that’s the story on how IKEA parts turned into this multifunctional unit that gives me storage and lighting at night!
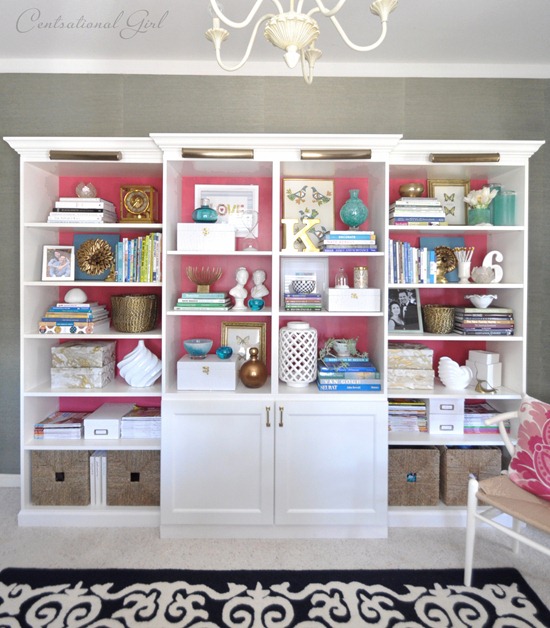
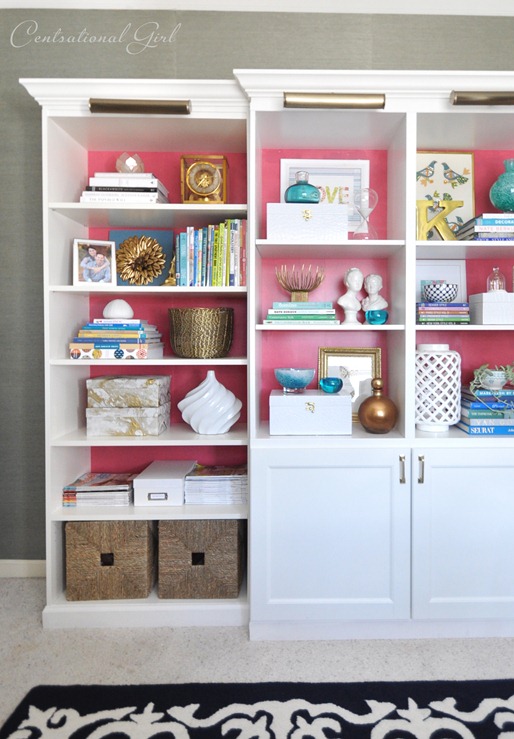
This freestanding unit is really versatile and would fit in anywhere in any space with a long wall, be it a bedroom, office, family room, etc., and with the addition of crown, base, and hardware, it still costs less than $500 (excluding the lights). Nice!
.

Wow! This project has me inspired…now I need to get my husband on board! The finished project looks great (and I love the pink)!
amazing! did you paint the pink before assembly or afterwards. How i wish we were this handy!
Love love love this! It really is the details that make a piece great! I love how you added the dimension by bringing the middle out! And the pink backdrop with a gold K! Incredible!
WOW! You put in work girl! I would love to do things like that. I need to start on small projects first.
What perfect timing! I have 2 Billy bookcases and was trying to figure out how to give them more presence in my family room. Your styling is lovely as well!
Lovely! Can you tell me where you got the antique brass pulls?
Hi Robin, I should have linked! The solid brass pulls are from here:
http://www.lookintheattic.com/hwdp238us5.html
Kate
Hi Kate! This is SOOOO awesome! My dream would be to find a combo of IKEA pieces to build a wall unit for our living room that fits our TV. I love the Pottery Barn Logan suite, but it’s so expensive! You’ve inspired me to do more searching on the IKEA site. I don’t know if I have ever looked at the Besta pieces! Thanks!
Your shelf styling is ridiculous!!! seriously — did it take you 100 hours and give you a mini-meltdown…or is that just how I work?? :)
Gorgeous! I am dying to do something like this in my living room – thanks for sharing how you pulled it off!
Its really fantastic! (and I LOVE the pink!)
This is a wonderful project; thank you so much for sharing it. The whole room is lovely! I especially love your solution to the slight color difference of the units. What might be seen as a problem became an advantage. Brilliant!
My eye keeps going to the two boxes on the left, fourth shelf down. Were these a project or a purchase? Would you mind sharing the details?
I am so impressed! I am especially impressed with the combination of Besta/Billy units for this great look.
It looks great! I like the touch of pink. It is a lovely accent.
So amazing. Love the crown molding and light install – what a difference. I just pinned the pants off of this post.
Gorgeous! I love the pink! Thanks for the great tutorial!
Leslie
Love, love, LOVE this!! I’m buying a new townhouse (my first home) and will be needing some storage solutions for my living room. This is RIGHT up my alley! Thanks for sharing such great ideas – your whole blog is fabulous! :)
I love everything about this project! Gorgeous, gorgeous gorgeous! And what a great tip about filling the peg holes with spackle! I so need to do this to the bookcases on our mantel! Thanks for the inspiration!
LOVE how you styled those shelves! Timing couldn’t be more perfect! My husband works for a company in Michigan that makes custom organization systems (www.thestowcompany.com) and we just got a very similar bookshelf and I’ve been struggling with how to style all the shelves. I’m so inspired!
Wow, those do look like the $1000 plus units! I can’t believe it! Fantastic! Your arrangement of all the items on the shelves is wonderful eye candy.
Thanks Jimmy, and everyone!
Jeannette, the boxes you mention were just a simple DIY project, I had some gold marbled paper left over from my fall mantel (http://www.centsationalgirl.com/2012/09/autumn-mantels-link-party/) art project so I wrapped up some basic photo boxes – like you would a gift or present – and they become beautiful and functional!
Kate
Lovely, I’m working on a similar project. Check it out so far. I still need to style it and add a few finishing touches to the room.
Fabulous job Kate and I think the pink is fun! You’ve made a beautiful office for yourself and your attention to detail is stunning. Can I ask where you found the aqua bag/ tote sitting on the floor by your desk? Thanks.
Clever idea! I admire you for being so creative. I want to try that.
Love what you’ve done but wonder why go to the expense of purchasing the metal Besta base if it was to be concealed. If its function is merely to raise the Besta unit several inches, why not use fiberboard blocks or furniture “feet” or pieces of scrap wood…?
You are so smart! I was trying to get the same look out of ikea units with three units of open shelving and closed base cabinets on the center piece and I couldn’t figure out a way to do it. Never thought about combining the Besta and Billy. I’m a big fan of the library lights too!!
More than nice, just astoundingly awesome!!!!!!!
Love the 3D look to the pieces – and the molding and lighting are genius.
Pinning this for down the road renovation….. no way will hubbie go for custom shelves but who needs that when you can CG the Ikea pieces…. I’d get out of bed extra early in the morning just to come down and turn on those beautiful lights and admire what you’ve created.
Wowzer…what an awesome looking wall unit…..well of course it is…..you did it!! Hey what is the gray wall behind it? Is that paper?
Oh….love the added lights too.
Very nice job…looks beautiful!
Very pretty, and I’m all for the pink! This really gave me the idea to paint my own Billys in my office, which is a royal mess and definitely in need of some DIY & decoration love. Too bad you can’t really buy crown molding in Germany, I might have to create something like it myself.
Kate, this is wonderful! IKEA could learn a thing or two from you! What a great storage solution for your office! Thanks for sharing how you did it…outstanding!
I just loved it! Congratulations on such a beautiful job!
Kate, these look wonderful, I love the pink backs and the lighting is a great touch.
Cynthia
Your planning paid off! This is great! I love your attention to the details and the picture lights look great! Even if the Besta were taller than the Billyes, it wold still look good. I can’t imagine how you had time to have a Christmas party, photo shoot, all the usual holiday activities, go to Yosemite, AND have time to build a fab bookcase?!!! Please tell me there are elves involved!!! I’m feeling a little inadequate right now!
Love the office and your bookcase! Do you like the Billy bookcases over the Hemnes bookcases or is it just the width difference? Hemnes is 14 5/8 inch width. Just discovered your website and I am in awe of your talent and your hardwork!
Love it…pretty and functional!
You should google your fax machine, I think it was recalled. It looks like the one we had at work and it was recalled.
Its a great pieces, we are thinking of using besta for our a built in that we are installing!
THIS IS AWESOME. You are so clever, and so lucky to be handy with a mitre saw! What a fantastic idea!
Fabulous! Love the pink backs and LOVE the money savings. Now I just need to find a place to put one in my house, and I need to find ways to encourage my husband to help!! Thanks for your inspiration! You constantly keep me looking around my house at things that could use improving!
Hi Kate! Another Centsational project as usual! Just so you know, Ikea Family is basically ikeas version of a members program. Every month and on certain weekends ikea will offer their Ikea family members special pricing on certain items. If you are part of the “family” you get the discount. It’s kinda like their version if the World Market Explorer program. You just sign up for it at the kiosk and you get orange cards. Every time you shop, you swipe your card which activates whatever specials they have going on at that time.
This is so frickin’ awesome! I’ve totally been crushing on your Billy built-in’s but love this one just as much. Pinning it!
This is fabulous! You just gave me a solution to my billy bookcase built in problem… wow say that 5 times fast! I needed a solution for space under a window to connect built ins on either side… the Besta storage cabinet will be perfect and the underframe will allow me to allow the furnace register to have space! YES! Thank you!
It’s heavenly! You did a great job! I even like the pink, and I’m not a pink girl.
What material are the backs? I’d love to do this to existing shelves but dread the idea of painting white shiny melamine.
Pat, it’s a cardboard material – you can paint it! If you’re painting melamine or laminate piece of furniture, you need to prime first with a primer designed for glossy surfaces (I prefer Zinsser Cover Stain) but I used a primer/paint combo by Glidden and it worked fine for the cardboard backs of an IKEA bookcase.
Kate
Wow! This is tremendous! I love the color combination, too! Excellent! Tell IKEA that you should get a full refund, if you haven’t already, for such a great post!
Kate – it turned out SO gorgeous!!! Pulling the middle section forward to disguise the slight color difference was genius.
xo,
Shannon
Gorgeous job!! LOVING the pink!!
Wow that turned out beautiful! I’m so impressed.
Awesome !!!!
To be honest when I saw your post yesterday I didn’t like it… I’m so used to your use of grays and blues that I’m always copying in my own home. New day- I’m loving the hot pink and navy. What a refreshing change. It’s really nice to see you go a little outside the box. Who knows, maybe some pink will appear in my house:)
This is why I LOVE Ikea so much. You easily saved yourselves $500-$1,000 if you had to buy something like this at another store. I love that you pulled the Besta out a little….very classy looking and the trim just finished everything off perfectly. I love how this project turned out Kate! Thanks for the inspiration. :)
My goodness that is gorgeous!
Awesome! Always making great projects!
Big Hugs
Charo
Kate, I love this one! Wow, did that turn out great. You are so good at hacking and figuring out how to make all of these Ikea pieces work together. I’ve got a spot in my den that I want to fill with bookshelves, so I’m taking notes and hope to get something together that is functional pretty too. Bravo, girl!
Wow, Kate! I’m just going to echo all the other comments – it’s amazing! Gorgeous! Creative! All those things. Great, great job!
Hey i love this soo much…i was actually looking into buying a Billy Bookcase for a shoe organizer and i wanted to paint the inside pink or a dark purple but i realized that the back piece is cardboard….how did you paint yours pink?!?!
Drissy, be sure to use a primer + paint combo or you need to prime it first! I just rolled it on with a foam roller in two coats.
Kate
Looks fantastic – great job
Thanks for sharing the tip on filling the holes, that is my only pet peeve about ikea furniture and you just offered an easy solution!
This is beautiful! It’s just the solution I’ve been looking for in my office–don’t mind if I copy do you? Thanks for sharing!
Gorgeous! I love the pink painted back – I don’t think you will get tired of that anytime soon :-) You tied all the pieces together perfectly – I’d never guess it was from IKEA. Thanks for sharing.
Could you tell me what paint you used on the walls, I have been looking for greay paint but can’t find the right shade. Thank you :)
Hi Bernice, that’s a grasscloth wallpaper behind the unit in a shade of blue gray – very close to ‘Seafoam Storm’ that I used on the window wall – if you’re looking for great grays here are some of my favorites!
http://www.centsationalgirl.com/2012/10/favorite-gray-paint-colors/
Kate
I absolutely love this. It is similar to something that I did with 2 old shelving units and Ikea open shelving. My question is, I have tried and tried to do the trim to finish it off and have been having trouble. Do you have an online tutorial on how to use a mitre saw to make the trim?
They look great and affordable too. Thanks for sharing the tips and for reminding folks to anchor them to the wall. Those little l brackets can prevent injury.
Your bookcase looks great and you make it look so easy!
Kate, this.is. AWESOME!!!!!! Love all your choices in the room!
You are simply amazing. Talent galore!
Love the room!! Bookcase looks beautiful! Also love the accessories! Can you tell me where you found your throw pillow on your chair? Have been looking for just the right pop of pink for my room!
Love! Love! Love! The end result is so beautiful — but more than that, I love the way you thought outside the box and came up with innovative ways to get the look you were wanting without spending a boatload of money. Everyone is on a budget and this is a great example of what a little creative thinking can accomplish (ok…a LOT of creative thinking…ha.) Thanks for sharing!
Thanks so much Carolyn, and everyone!
Kate
Looks fabulous! I think what keeps me from buying anything at IKEA is that it never looks OK on its own, assembled, out of the box. It’s hard for me to envision a bunch of plain white bookcases looking like an expensive wall until. But in this instance, a little sprucing up completely changed the overall look and design. Well done!
I love this. I need something like this for my bedroom, but I wanted drawers below and bookcases above. I keep looking, but even Ikea doesn’t seem to do exactly what I want. I think someone put together Malm and Billy, but I love the look of yours.
gorgeous. & i love the gold accents.
Absolutely love!! The pink is gorgeous — don’t think I would ever get sick of it. I just had a closet system installed which also has peg holes. Although it is just a closet and the only ones seeing it will be my husband and me, I was still bothered by all those holes. My solution was to put a dab of hot glue on the underside of a decorative nailhead and insert into the hole. A little time consuming, but now I have a beautiful nailhead trim that gives the closet a more finished look.
Kate, what an awesome looking bookshelf system! I love the accessories you dressed your shelves with as well, especially the white and gold marbled boxes. Whereever did you find those?
Hello Rochelle, thanks so much!
Those are simple $2 photo boxes from Michaels wrapped in gold marbled paper – I found the paper here:
http://www.hollanders.com/papers/ViewProduct.aspx?ProductID=3d3d96ee-02f8-43e1-9664-1d1aedaa4168&CategoryID=3fa8d9f7-8721-4aaa-8189-f0499193d5f9
Kate
These do not look like Ikea bookcases. You have really transformed them into bookcases that look high-end. I need these in my home.
This looks SO nice! My office shelves could not be uglier so thank you for the inspiration and cost saving ideas! Love, LOVE your blog!
I love the pink and gold accents! Looks fabulous!
This is amazing!!! Kate, I am in awe of your talents on a daily basis. I am interested in doing this exact set up with a television mounted in the middle! I think it could be done with a little ingenuity? Quick question about the Besta shelf unit. Is the vertical, middle part of that unit able to be left out during assembly as to leave room for a TV?? It is very difficult to tell by pictures.
Thank you so much for all the creative projects you share with us.
Hi Shannon, I wish the middle of the Besta shelf could be removed, unfortunately it’s part of the structure and required in the assembly. Only the horizontal shelves are adjustable.
Kate
I just cannot say enough about this project and really your office as a whole. Beautiful!!!!!! I am so inspired!
Can I just say, that you are amazing, and that I wish I had 10% of the skills you have??? So jealous!!! Gourgeous job as usual!!!
I have finally managed to put down the paper bag that I had to breathe into after seeing your new home office and bookcases. Hands down the most perfect home office I’ve ever seen – I’d pay you to be able to work in there! The pink backer, the styling, the scarf on the antlers – it’s all pure genius.
xoxo,
mk & Gwyneth
Love it! (I have your blog bookmarked in my DIY All-Stars folder ;-) I did the same thing and ended up on this page because I’m looking for a way to fill/cover/or somehow disguise all the peg holes. I tried the Dap spackle and the same white caulk I used on the seams, but neither really disappears in the holes. (Perhaps I’m, just super sensitive to it.) I’m thinking of trying either the peg whole plugs from Widget or the round stickers from FastCap (hmmm…perhaps Avery labels cut with a hole punch would accomplish the same thing…)
But back to the reason I’m writing: would you please share the name of the pink paint color you used on the backs? Mine are still white and I need need need to dress it up.
Thanks, babe – you’re awesome!
Sarah
Hi, nice job on customizing your bookcases. I have one question about your lights.
Why did you cut a hole into the pink backing of the bookcase to bring the cords back in? Wouldn’t the light cords already be on the outside of the bookcase? (Up on the top, then could run down the outside back of the bookcases then down to an electrical outlet). Was it just to gain easier access to the power bar to turn on & off?? Or is there some other reason?? Just wondering why you’d cut a hole in the pink back if you didn’t need to?
Thanks,
Alison
ps. I’ve had that raspberry pink color in my office for a few years now & I love it! Gives off a warm glow at night.
Hi Alison, the reason I cut a hole in the back is because the power strip is actually inside the bookcase not outside. The cords were’nt long enough to run them all the way over to one side or the other only long enough to run down the back and meet in the middle.
Kate,
I love the bookcase styling and colors! The art piece in the last picture – the gold dahlia on a blue background caught my eye months ago and I keep thinking about it :) What exactly is it? Do you know where I might find something similar?
Thanks,
Sam
Hi Sam, I found those plaques at Joanns Fabrics last summer and painted the backs that were wood blue. Such a pretty little piece of sculptural art!
I’m yet another girl inspired by your Billy hacks. These are SO beautiful. I am loving the pink/gold with the white. I have a question. We are setting up some Billy’s in our new ‘tween hangout’ (the room formerally known as ‘the playgroom’). They are on carpet so really need to be screwed together. When you say to “just screw them together”, how did you do that exactly? I know you built a platform for your other billy wall, but we’re not going to get that crazy down there. I am just looking to keep them together so I can add a piece of trim along the top (and maybe the bottom if i’m feeling crazy). Could you share with this DIY-girl in training what type of screw you used to keep them togther? How did you make sure it was a good hold and make sure the screw didn’t go through to the other side?
Thank you!
Hi Amy – great question, it was Matt who screwed them together, and he did so at the top, mid section and base of the Besta cabinets, two on each side at those points, then I spackled over the tops so they’re less visible.
Hi,
I’ve embarked upon my own Billy hack, and have got my shelf backs sanded and primed, and (hopefully) ready for painting tonight. I’m just wondering about the durability of the paint on the backs. Did you coat them with any sort of clear coat? Have they lasted well with things coming on and off the shelf?
Hi Jen, it’s best to use a primer/paint combo on the backs of the Billys and Besta units or you can use the Bullseye 123 primer and paint latex over that.
Kate
Amazing Job!!! I love it. What a great idea! I love how you bought pieces that were inexpensive & made the look so fabulous!!!
Hi Kate,
Can you please link to the exact pink paint you used for back of cabinets? It would be a great help and I’m sure others are curious as well!
That’s ‘Canterbury Lane’ by Glidden Mike!
love this idea.
did you remove the base baseboards to make it flush with wall?
There is a cutout for baseboards at the bottom of Billy Bookcases Alma, great question!
Just want to say that my boyfriend and I just completed our bookshelves hack after reading this post. It looks perfect in our office! We have high ceilings though so we also bought the Billy extenders and a besta one to make ours taller. Thanks for the amazing post, we love our new bookshelf! Wish I had a way to post a picture to share with you. :)
These are wonderful Kate; you were born to do what you do! :)
GENIUS! (I can’t help myself)
For many years I’ve been thinking about doing built in bookcases but could not fine my way around the high price tag for custom cabinetry.
Then I found you. WOW!
I’m totally doing this and I shared you on FB today as well.
I agree that you are born to do what you are doing.
I want these so bad. they are gorgeous. A custom look for a much less. Now I just need to find a handyman. Thanks for sharring.
So fabulous. As always the detail is amazing. What is the color of the raspberry pink paint? Thank you!please let me know when you reply
come to my house and work this amazing magic! PLEASE. This is amazing!
Truly fabulous! I’ve had your other Billy bookcase project bookmarked forever. I finally did it in my bedroom over the summer … I still need to add the trim! BUt this project!! This project solves a problem I’ve been looking for an inexpensive solution for — think I could create a custom media wall in my living room using Billy & Besta? The TV being in the middle part.
You just gave me confidence i could make it fabulous AND in my price range! Thanks
I know this is late, but I just found it through Pinterest. I had been wanting to do something like this but had no idea how to go about it. I will have just enough room along one wall to do this along with a skinny Billy book case at one end by a bi fold door opening into a closet. I can’t fit in 15 inch units all along the wall but wanted one part to be 15 inches so that I could hide some file boxes in them. I have tried and tried to figure out the best way to do this and was resolved to four Billy bookcases, two in the middle being the 15 inchers and the ones at the end being 12 inches, but because of the closet area and other issues, it would look off center even though it really was centered.
And I dreaded trying to figure out how to put doors on the bottom only (I haven’t yet found half height doors on their own, although I am sure I just haven’t seen them yet.) This will work really well, especially by putting a full height door on the narrow book case which will blend with the odd closet door to make it appear almost to be a corner unit. I will have room enough for (most of) my craft stuff!! I love that you put in pictures so I can SEE that it will work. Now to go backwards in your blog to see what else you have done that I can copy!!
Thanks so much for posting this! To anyone thinking this is too difficult, THINK AGAIN! Just follow the instructions and you’ll be happy! I made this for my wife for our 1 year anniversary, and she (and I) couldn’t be happier with the results!
http://i103.photobucket.com/albums/m147/drumbum811/House%20Hacks/Builtin.jpg
Fantastic Josh!! Thanks for sharing!
How did you attach the crown moulding to the top of the bookcases?
With trim attached to the top, crown gets nailed to the trim.
I tried to find the silver Besta base that adds height, but I’m not finding it on the Ikea website. Any ideas?
I believe it’s been discontinued.
Hi. you mentioned that you painted the trim with “cream delight”. How close does that paint match the white color of the IKEA shelving? I’m wondering if i need to paint everything (including the shelving) to be sure everything is the same white color.
Thanks.
Painted just the trim, it was a perfect match.