I’ve had a few emails recently requesting I write up a post offering tips for taking better pictures of interiors. I really don’t consider myself an expert by any means in the field, but I have learned over the years how to take a pretty good picture of a DIY project, vignette, or room reveal.
I wrote an article last year about better blog images, and it was mostly about moving out of automatic settings and into manual mode. It’s a good read, and today’s post really piggybacks off what I wrote last year.
As decorators and home bloggers, we are constantly surrounded by gorgeous interiors, whether it comes from shelter magazines, other blogs, or the newest sensation, Pinterest. The bar continues to be set higher when it comes to photographing our projects and our homes. Don’t be discouraged by this, feel the opposite. Any novice can improve his or her ability to take great images of homes, projects, or spaces with patience and practice. I know. I’m proof.
I look back at my pictures from a few years ago and I cringe. Just take a look at this and you’ll see what I mean. Back then I knew nothing about photography beyond the simple point and shoot. But I realized that I had to better my ability to take decent pictures if I was going to grow as a blogger and have my work recognized and featured. I’ve been blogging for almost three years and along the way I’ve taught myself a few of the basics of better photography.
So to answer the questions of a few readers, I’ve narrowed what I’ve learned to these ten very basic tips for taking better images of your interiors or projects.
1. Invest in a Good Camera
I’ve read a few posts here and there from bloggers who use a regular point-and-shoot camera, and yes, I do believe a more basic model has the ability to take a really good picture. So does my iPhone. However, a good SLR digital camera with variable settings (F-stop, shutter speed, ISO sensitivity, white balance, etc.) is the best ticket to high quality interior photography simply because it allows the user to manipulate the amount of light that enters the lens. And if one thing is true, a great interior shot is all about proper light.
Both Nikon and Canon offer excellent choices, personally I use a Nikon D90 and I stick mostly with two lenses, my 18-55 mm lens (the standard one that came with the camera) for close ups and a Tamron 10-24 mm lens for larger room shots. A great camera will do most of the work for you, so I consider it a worthy investment.
2. Read Your Manual and Get Intimate with Your Camera
The ability to manipulate your camera’s light settings makes all the difference in the world in less than perfect light conditions, especially when shooting interiors or capturing detail shots. Each camera is slightly different, so get up close and personal with yours and learn where all of the settings are to prepare you for manipulating your captures.
It can feel overwhelming at first especially since most manuals are written in technical terms and your eyes can quickly glaze over with all the language. Don’t try to absorb it all at once. Start small and learn how to change the focus mode or image quality one day, then add to your knowledge a little at a time as you play with your settings.

3. Learn the Exposure Triangle
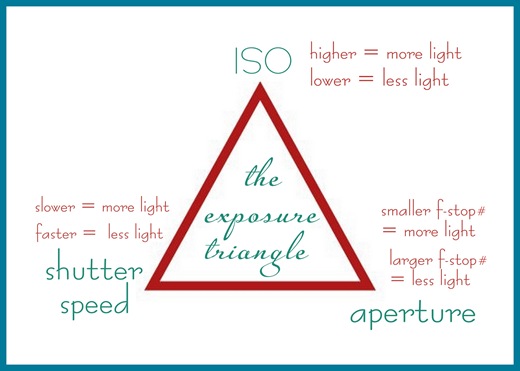
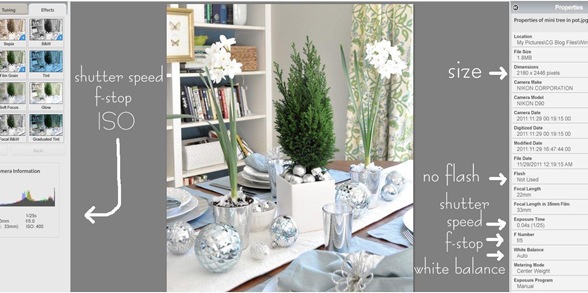
Studying your manual will teach you about the three ways to pull light into your lens when you’re taking your picture and the natural light is not enough. These include 1) widening your aperture, 2) slowing your shutter speed, and 3) increasing your ISO sensitivity.
Ack, what the heck? I know, these are slightly intimidating concepts at first, but you’ll be surprised when you apply yourself that you will be able to understand the basic formula with just a little memorization and practice. You’ll have that moment where the light bulb in your head goes on and you’ll finally get the concept of manipulating light in manual mode ~ it’s a really great feeling!
Here are the basics:
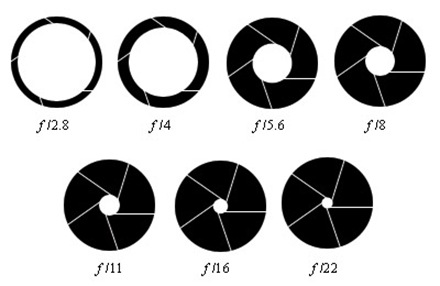
Aperture: the aperture is the width of the opening of your lens and it is measured numerically in what are called f-stops (f/4, f/5.6, f/8, etc). Your camera will list them for you as you rotate the proper dial up and down.
What’s important to know: A lower numerical f-stop translates to a wider aperture which means the opening is bigger and more light will enter the lens. Lowering (or widening) your f-stop also decreases depth of field which results in a blurrier background but it will definitely brighten your image (great for detail shots).
Increasing the number of your f-stop decreases the size of the aperture which reduces the amount of light that enters the lens but also increases depth of field (ideal for larger room shots).
With aperture, you’ll notice the number and size equation actually works in reverse. A lower numerical f-stop equals a larger amount of light, and a higher f-stop equals less amount of light entering the lens. Think of it like your pupils, which get larger in dark environments and smaller in bright sunlight. It’s the same with aperture, you need a wider aperture (or bigger pupil) in low light situations (wider = lower number) and a smaller aperture in bright light (smaller = higher number).
Shutter Speed: the shutter speed is the numerical representation of your exposure time. In other words it’s the measurement of how long your lens is open when you take your picture.
What’s important to know: A slower shutter speed allows more light to enter your lens in darker environments as the sun sets or on cloudy days. However a slower (or lower) shutter speed (especially below 1/10) can make your shot blurry because your lens is open longer, so it’s best to stabilize your camera on a still surface or with a tripod (see below).
With interiors, you can work with slow shutter speeds, but when shooting people in action you’ll end up with blur. But since this is an article about interiors, and not action shots, always consider you do have that added option of slowing the shutter speed to 1/10 or below to allow more light to enter the lens because your subject isn’t moving.
ISO Sensitivity: this is your camera’s sensitivity to light which varies depending on your camera from 100 to 1600 or higher depending on the camera.
The higher the ISO setting, the more sensitive your camera is to light. A higher ISO translates to a brighter image, however a higher ISO leads to grainier or ‘noisy’ images so it’s best to keep your ISO as low as possible, typically under 1000.
These are the three ways I always use to manipulate my camera when snapping images of rooms or projects. If I need more light, I simply widen (or lower) my f-stop, decrease my shutter speed, and/or up the ISO.
4. Apply the Rule of Thirds
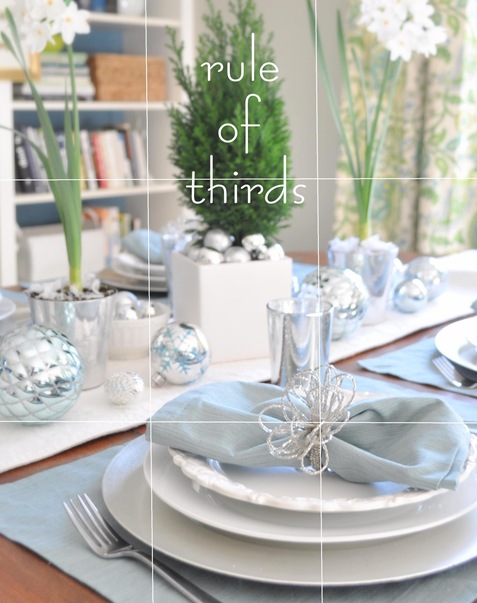
This is a basic photography trick for composing more dynamic or interesting images. I don’t always use this rule, but I do find it works for more mid to close up shots of a subject. Think of it this way, every time you compose an image through your lens (or crop it with basic photo editing), split the image in thirds from top to bottom and left to right. In other words, imagine a tic tac toe grid on top of the photo and simply place your subject on or in one of the four intersecting points.
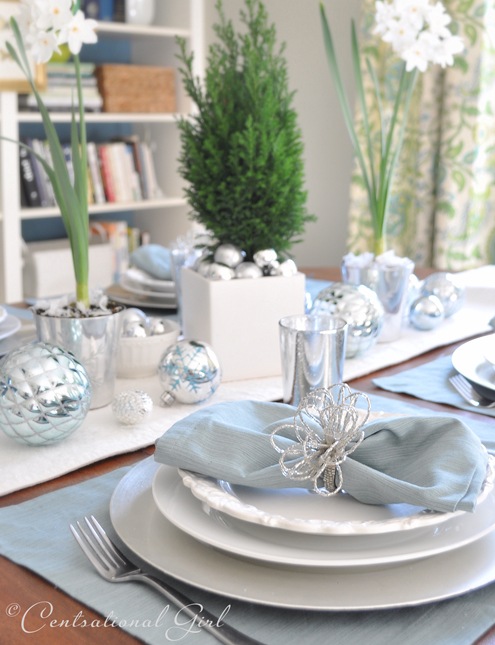
When you consider this formula when composing an image, you’ll often end up with a more dynamic shot. Take for example this recent tablescape. I chose the napkin ring as the focal point and weighted it so that the napkin ring appears in the bottom right intersecting point of the grid.
The result is a well composed attractive image.
settings: f-stop 4.0 shutter speed 1/30 ISO 400
5. Capture Interiors in the Best Light
If you want to show off your project or space in the very best way you must shoot it in the best light. Ideally, that’s a sunny day with all your blinds open allowing for the most natural light, but in winter or late afternoon, your light is often compromised. Knowing your best lighting conditions is key.
For us DIY and home bloggers, this means you should plan ahead and shoot your subject when your lighting is best and brightest, whatever time that is in the space you’re capturing (late morning or early afternoon).
6. Turn Off the Flash
I haven’t used a flash indoors in years, instead I’ve learned to manipulate the light that comes into the camera’s lens. The flash can be useful outdoors, or late at night, but 99 times out of 100, using the flash indoors will not produce a pleasing image. I know there are some fancy flashes that you can manipulate that don’t blast your subject, but I don’t own any of those yet. For now, I stick to the ‘only shoot interiors in daylight’ rule which is trickier in winter but I still plan accordingly.
7. Snap from a Different Perspective
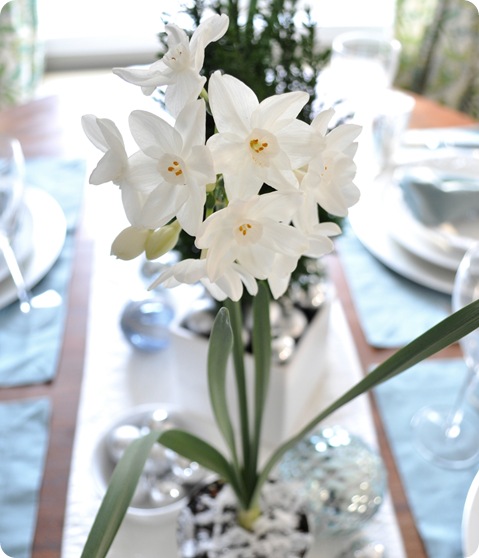
Some of the most interesting images are taken from somewhere other than eye level. Try standing above, getting down below, or zooming in close when capturing your subject for a more artistic shot. Experiment and play, that’s how you improve. You’d be surprised how interesting a subject becomes behind a lens when you think beyond eye level.
settings: f-stop 4.0 shutter speed 1/10 ISO 400
8. Stabilize
It’s important when shooting interiors to be able to stabilize the camera indoors especially with lower shutter speeds as mentioned above.
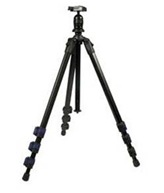 Sometimes I’ll use just a stack of books or a stepladder to hold my camera still. Mostly I use my tripod which is a versatile lightweight ProMaster Featherweight 23T that cost me $90.
Tripods range in price, but I recommend skipping the cheap ones you see at Walmart and spending the extra dollars for a decent one from a photography shop, which you can pick up for around $80 to $120.
. .
9. Take a lot of Pictures and in High Resolution
I’m never satisfied with just one and I’m rarely satisfied with ten images of the same thing. Typically I’ll shoot 150-300 pictures of one single scene. I fire away at different f-stops, shutter speeds, and angles and will often take away only ten worthy images from a collection of 300.
I also shoot in high resolution, above 2000 px per image. This is especially important for magazines or websites that contact you and want to use your images, they always want high resolution pictures. Many advanced or professional photographers shoot in RAW (I rarely do) but that’s useful if you’re using Photoshop or Adobe Lightroom to edit. I simply up the resolution on my camera settings and use a high GB memory card. I also delete the images I don’t need once I’m done so they don’t take up precious space on my computer.
.
10. Simple Photo Editing
As you improve with your skills, you’ll see that often the camera takes a perfect shot because you got the light and settings just right, and sometimes you’re left wanting more. I tend to like less saturated and whiter, brighter images so sometimes I’ll pull my picture into a photo editing program to tweak the exposure if necessary.
There are several programs available that will give your image that extra boost you need. Picnik, Picasa, and Photoshop Editor are all free, I like the first two just because they’re so user friendly, especially Picasa because you don’t need an internet connection to use it once it’s installed on your computer. I also like Picasa because it will tell you at what settings you captured your image, so it’s educational for those of us still experimenting with manual settings.
I rarely use Photoshop because I really only know the very basics, and Picasa is so quick and easy. I also use Picasa to quickly crop and watermark my images since it reads any font installed on my computer.
I’ve come a long way with my photography skills since the beginning of this blog with trial and error and a whole lot of practice. I still see grain in some of my images, or there will be times when I don’t like the color composition, or I really want a lot more depth. All of these things will get better over time as I continue to improve my photography skills and experiment with more lenses.
For those of you just starting out, be confident that anyone and I mean anyone can improve their ability to take great interior pictures with a little study, patience, and practice. Good photography is a skill that is fun to learn, so be encouraged, enjoy the process, and document the journey. That’s what I’ve done.
If you want to hear from someone who has years of experience and the most amazing photography skills, come on back in a few hours. I have a special guest and true expert who takes the most gorgeous magazine quality pictures and he’ll be sharing a few tips with you on better close-ups and holiday bokeh!
,
.


Thank you! Thank you! Thank you!
Very helpful! I’m trying to decide which camera to buy at the moment. There are just so many options! Do you love your Nikon? Do you know what the equivalent is now- D7000? Any suggestions?
Great post, Kate! I have a D90 also and I *love* it. It’s definitely a learning process, and it took me awhile to understand the “Exposure Triangle”, but I have been enjoying the learning process. I always love your blog photos, so I really appreciate tips like these from someone I consider an “expert”. :-)
Thanks again!
Great tips Kate, your picture taking skills are wonderful….You have done your homework and it shows. Thanks for passing it on to us!
@Shauna…I just bought a Nikon D5100 bundle set on Amazon. VERY reasonably priced I think and I love it. There are tons to pick from and I was so torn between Canon or Nikon. My photographer friends suggested the Nikon, so that’s what I went with. Good Luck with whatever you decide!
I liked the post very much, thanks a lot. It is very helpful! I love digital photography but as you mention it, manuals are so confusing! The same is tutorials! I would like to translate part of your post to greek (or all of it, it depends) and use it in my blog, if you do not mind, to help some friends with their photography skils :)
Wow thanks! This was a great mini class for me. I’m just starting out and this helps me so much. You take great photos, thanks for the advice.
I love you. Thank you!!!!
This is a fantastic post! I’m especially appreciative of the exposure triangle! I’m always confused about F-stops and ISO and the like — that little image chart will really help me out! Thank you for this entry!
Thanks Kate. I really should try to learn how to use our camera…time to look for the manual and take it off auto! ;)
so helpful! So many make your photography posts are geared toward those who already have a much greater understanding of their camera beyond the basic setting. Thank you for giving us plain English!
Thanks for the great tips, Kate! I’ve been tinkering with my settings a lot more lately, love the basics you showed here. I’m excited to try them out! :)
Thank you for this! We own a good camera (Canon something or other), but I haven’t managed to start using it on manual for blog pictures.
I have a million excuses for why – but the fact is, they’re excuses and not worth the effort to write. This weekend I’m going to take pictures of mundane things as practice!
Thanks so much for this! I’ve had my DSLR for 6 months and still haven’t figured this all out. I’ll need to make a date w/my camera manual soon.
Thank you Kate! As always, you are my BLOG GURU! I’ll tweak my camera later on when I get home and figure out the stuff you mentioned here :-)
Thanks for this post! We just bought a DSLR and are going to start adding those photos on our blog in place of our current point and shoot camera. I’ll be bookmarking this post for sure!
This is a wealth of information Kate! I just got my first DSLR (D3100) and have recently started blogging. High on my to-do list: really get to know my camera. It’s intimidating, but your advice is encouraging. Thanks, as always!
Thanks for the tips! I just received a Canon T3 Rebel for my birthday a few months back, and I’m slowly learning it by trial and error. I appreciate you taking the time to put some of the crazy, tech verbiage from a manual into a more user-friendly version.
Shauna- Choosing a camera is definitely a daunting task. I would highly recommend going to a camera store, checking your options, and physically picking them up. I have a Canon Rebel T1i, which is fairly similar to the Nikon D90. So, I’ll come from the Canon perspective.
When I chose my camera, I made sure it fit easily in my hands. There are many cameras out there that are bulky and fit larger hands better. Those larger cameras are also heavier. When you add larger (ie heavier) lenses to it or added battery packs, that adds to the weight. I take a lot of landscape pictures and carry my camera around my neck. You can definitely feel the added weight after a while.
Then, you have to check your options. My camera can shoot HD video, but not everyone needs that. So, I had the option of the Canon Rebel Xsi (without HD video) as well.
Ultimately, I chose Canon because I have a Canon point-and-shoot and have been happy with their products. Plus, I discovered that if I were ever to come across a 20+ year old lens, it would still fit on the current Canon camera body. Nikon changed the way lenses attach to the camera body, but there’s probably an adapter to help with that.
Overall, definitely check whatever camera you’re interested in in-person. Once you find one you like, check online for a better price. Amazon has some pretty good deals. Kate’s other recommendations are absolutely true too. Happy shopping!
This is such a great, helpful post. I’m desperate to get better shots, but think I need to learn to be patient too!
That helps a lot I have been wanting to learn all of this but didn’t know where to start. I will be back in a little bit to see your guest post. Can’t wait
This is so helpful! I just got a Nikon D3100 a few weeks ago with an 18-55 lens as well as a 55-200 lens. I’m still reading through the manual and figuring it out, but I love it so far (even though it’s a beast to carry around).
Kate, thank you so much for so generously sharing your knowledge with other bloggers. I check your blog (several times) every day. I genuinely look forward to reading your posts, and looking at your amazing pictures and transformations. You are truly an inspiration. This was really helpful.
This is awesome. I have the Canon Rebel and it is my “resolution” to improve my skills during the new year. Your timing is perfect :) I’m definitely sharing this.
As I viewed your first post this morning, I noticed how wonderful your photos are..what timing..I am printing your tutorial as it is such a great resource. Hmmm, I think I just added something to my Santa Wish List!..Thank you for taking the time to share all of your expertise..
Thank you so much for your generosity sharing tips for other bloggers. What a kind gesture. Guess it could be considered your Christmas present to your readers. In my most recent post, I apologized to the readers about the lack of my photography skills. I know I’m not supposed to use a flash, but hadn’t had time to learn the basics of manual photography. This kick-started me in that direction. Now I’m digging out the manual and will spend some time taking a higher quality photo. Again, thank you for taking time to share something so fundamental to bloggers, yet so often overlooked.
I love this post! I have recently taken a photography class and learned about appeture, shutter speed and ISO, but you focused on shooting indoors and that’s just what I need. What a fantastic and informative post! Thank you!
I am a beginner and this is so encouraging! Thank you for writing these tips :-)
I really want an SLR but I’m on a tight budget. Are there any cameras in the $500-$600 range that anyone recommends?
I think it’s my first time I leave a comment here, and it’s a shame I didn’t do it sooner. And I love your explanation on how to take better pictures with a camera! It is definitely much easier to read here than what my Canon guide… ;-) And now I will definitely try and use my Canon for real this time. I’ve been experimenting with my Canon without really knowing what I was doing, but now I’ll know better, thanks to you!! Thank you sooooo much!
Love this!
Inge x
Before I got to the tripod point…I was going to say, you shot 1/30 and 1/10 hand held?!? I’m not home during daylight since I work a 9-5 so I can’t get daytime pics of my holiday decor. So I can’t like up to the parties! Dang you winter sunlight hours! :(
Thank you Kate! This was really helpful! I’ve had a D60 for a few years now, but have always left it in Auto mode and hoped for the best. After this tutorial, I’m ready to really start playing with it to see how much better it really can be!
Thanks Kate! I just purchased a DSLR and have been using your first post to gain some pointers. Perfect timing (for me) on this one.
Sarah – Shelly over at House of Smiths just had a post today with a guide on buying SLRs. It may help you in your search! Here’s the link: http://www.thehouseofsmiths.com/2011/12/what-to-look-for-when-buying-new-dslr.html
Kate, you rock! Thank you so much for these tips. I look forward to “playing” to get better pictures!
Thanks so much for sharing this Kate! I have a special window in our master bedroom that has the most daylight coming in, that’s where I took pics of my daughter for our Christmas cards. I took over 80 shots just to get a few that I liked for our cards! I feel much better knowing I’m not the only one! :) Looking forward to practicing your photo tips.
Thank you kate, always enjoy your tips!!!
Happy holidays!
XO
Kristin
These are ALL great tips. I never thought about checking for the settings on Picasa! My husband bought a DSLR a couple months ago, and I’m definitely still figuring it out. I think I may print your “exposure triangle” and hang it on the fridge. ;) Such a good visual.
Great tips! I started practicing before I’d even finished reading.
How serendipitous! I just did a little post on shooting, editing and creating better family Christmas cards and I just added your link to the ‘shooting’ portion since mine is heavy on the editing/enhancing:
http://bit.ly/sEu9pV
Thanks, Kate!
Morgan
Also, which 50mm lens do you have?
Oops! That should have gone on Matthew Mead’s post :). Do you like your standard lens and do you find it provides great up close shots? I’m in need of a lens that allows me to have a lower f-stop than 3.5.
@Stephanie @Ashley
Thanks for your advice. I really appreciate it!
Did I read this correctly? You typically take 150 to 300 shots for one scene??????????????????
Oh my goodness!! I just want to say THANK YOU for posting this with the picture detail!!! I am a picture type learning person and whenever I try to read a photographer’s blog (which is not illastrated) it is always kinda difficult to understand what their talking about! I have a Nikon d3100 (love the d90 but can’t yet afford it:( ) and I just ordered my new 55-200mm lens.
Blessings!
~Kristiana
FANTASTIC. Truly. I could have used this several months ago when I first really started using manual! It took me forever to really figure out the exposure triangle. You’ve made it sound almost easy!
Thanks for the tips! I’m hoping to get a new camera for Christmas, and I’m very excited!
Thank you and perfect timing! Just got a Canon T2i for Christmas and looking forward to diving in. Snapsort.com helped me pick which camera was best for me. Awesome comparison tool!
Great post. I can definitely need some help in the photography area. Thanks for the advice.
how do you add your watermark in Picasa? do you just create it everytime or have you figured out how to have saved version you can just grab everytime?
Great post! Thanks so much, Kate
Great question Christina, I do each by hand since they’re different sizes and colors on each image. I narrow down the images I’ll use for a post, then watermark them before I upload them.
Kate
This is soooo helpful! Now I feel motivated to actually sit and read my D80 manual.
Hi Kate,
Thank you for these tips, they are really useful. I can’t wait to start practicing some more. I love your blog and thanks for all the great ideas.
Kirsten
X
Want to join in the chorus of thanks. My boyfriend’s been teaching me much of this for the past 6 months (he teaches photography to high schoolers)–which has been great–but something about having it all brought together in one place, in such easy to understand terms–is fantastic. I’ve been feeling a little stuck in my progress and this gives me inspiration to keep at it (and some ideas for how to move forward). As for the 150-300 shots: He tells me the best tip is to take a TON of shots, so I believe ya.
Thank you Kate! I’m going to bookmark this for when I can turn in my Nikon point-and-shoot for a SLR …
Love this! I’m really trying to LEARN HOW to use my T3i…thanks for the tips!
Hi Kate,
Excellent tips! I’ve been blogging for a year and a half and my photos used to be so-so. Okay, they were bad! But during an online contest this fall I had the chance for some one-on-one with a blogger “bigger” thank me. Her advice was pretty much what you posted here. Between taking my camera off auto and realizing I need to take MANY pics is one scene to get a few goods ones has made a major improvement in my photos. I would like to improve even more, so I’ll keep practicing. Thanks for sharing!
Shannon
Excellent post! I was shocked when I saw your link to your earlier images – wow – you have come a long way. There is hope for me yet! I too cringe when I see my earlier images- yikes. I am finally learning how to use my Canon 40 D. I have yet to put on my 50mm lens though but after reading Matthew Mead’s article I will!
Thanks again for all the inspiration!
Great advice, Kate – and very thorough! Thanks so much for sharing this.
Erin @ Dwell & Tell
ok when u say high resolution what setting do i need for that? I have a Nikon d3000. And your blog on action shots, I still dont know what buttons to push to go to what I need. thanks o and I’m sooooo glad I found u on pinterest!!!!
Hey Kim, I mean higher than 2000 px, you can find the setting under image size on your Nikon menu button!
Kate
I want to really thank you Kate for taking the time and breaking it down for people like me. You have really have helped and inspired me to learn my camera a lot better.
Amanda
Kate,
Thank you so much for this post! I just got my first SLR camera as an anniversary gift, and I’m at my wits end on trying to figure it out. Granted, it’s only been a few days, but it’s very overwhelming. Your post streamlined a lot of data, and I can’t wait to put it to good use!
Cheers,
Jessica
So glad to read that Jessica, have fun experimenting, it’s so fun!
Kate
Thank you so much, I really needed this right now. I’m trying to at this moment get a post done and so frustrated that not one of the 150 pictures I took today look good, I could cry. Reading this is encouragement, to just take the time to read the manual from my camera. I know the problem with my pictures is in the ‘exposure triangle’ you talked about, but it’s exactly what you said, I don’t know how to get my camera there. I have to become intimately familar with my camera. Thank you! Little Bit from DecorateWithaLittleBit.com
Thank you so much for this post, I like to take photos during the day, but some posts require night-time shooting, like this one http://delachambre.blogspot.com/2012/01/fresh-flowers-celebrations-and-home.html
Your tips really helped me capture the mood/lighting that I was going for in these shots. I just have a Canon s95. I got the shots by adjusting the exposure composition.
Thanks again!
Thanks so much for taking the time to post about photography. I struggle with it and need all the help I can find. I’m going to do a little post about this…featuring you of course. thanks
Very helpful, great post!
Thank you for sharing this!! Especially the “rule of thirds” to be a helpful and quick take-away :)
*especially found
Thanks for the tips!! Do you have any advice for shooting in low light? It seems to me that all the successful bloggers have photos that look like they were taken in a light, airy, sun-saturated room… I have little to no natural light in my home (apartment) and am forced to rely on indoor artificial lighting. In a perfect world, I’d buy studio lights… And someday I’d love to. But for now, I’m on a grad school budget! Any thoughts?
Hi Laura, if you are shooting interiors, then you should really use a tripod! You can set a really low shutter speed so the lens is open longer, your pictures will be just as light filled if the camera is stablized on a tripod!
Kate
Thank you so much for publishing this post! I have been a professional painter for the last 8 years, and only recently decided to join the blogging community to grow my business even more. I have had a Canon Rebel for 6 years and thought I had gotten quite good at it, until I started reading blogs regularly and looking at Pinterest. Wow—I really suck at photography. I am going to put to practice some of the tips I’ve learned here to hopefully get my photos where they need to be.
Thanks so much for taking the time to teach the rest of us!
Wendy Jones
What’s up to every one, the contents present at this web page are in fact awesome for people experience, well, keep up the good work fellows.
Well Kate, I have spent my entire day with you! I do believe I have found a kindred spirit! From the colors we love to the passion in gardening, (which is how I found you, on pinterest) decorating and now this photography advice!
Thank you for sharing your gifts with us! ;)