Wow, so excited to be browsing 170+ links from the Favorite Destinations Party that began yesterday, with bloggers showing off their amazing getaways. I thought my “Need to Travel Here” list was long, now it’s so much longer. You’ve simply got to visit some of these links, filled with inspiring stories of places as exotic as Fiji and Greece, to fun adventures found in our Fifty States. There’s still time to link up a favorite travel destination of yours as well.
Today I have a very special guest, Kristi of Addicted to Decorating. I spied Kristi’s amazing rustic coffee table a few weeks ago on her blog, and asked her to share her step by step with all of you while I’m away. Enjoy this project, it’s fantastic!
“Hello, all of you Centsational people! I’m just thrilled to be here today while Kate is still off on vacation! Allow me to introduce myself: I’m Kristi, and by day, I’m a self employed interior decorator here in the big bustling metropolis of Waco, Texas.
But in the evenings and on the weekends, I’m a D.I.Y. fanatic and a slightly obsessed blogger. My own little virtual home is called Addicted 2 Decorating.
Hands-on D.I.Y. projects are what I love the most. In my free time, I’ve been slowly but surely putting my touch on my own little home, an 834-square-foot condo that I share with my husband, Matt, and our three furry kiddos.
Several months ago, my day job as an interior decorator and my evening/weekend passion for all things D.I.Y. began to merge when I met a very brave couple who agreed to let me use several rooms in their newly-purchased home as my D.I.Y. playground. So far, I’ve finished their master bedroom and master bathroom.
These rooms have been harder work than any other client work I’ve ever done (where I generally hire the work out to painters, tile installers, window treatment fabricators, etc.), but I’ve had an absolute ball doing the work myself, getting my hands dirty, and seeing just how little money I can spend while making huge changes to the rooms.
I’m currently finishing up the last two rooms that I’ll be tackling in their home: the kitchen and family room. And just like the other two rooms, I’m looking for any way to decorate these rooms on the cheap, which of course means DIY projects! Here’s how they started out…
For the family room, I had originally intended to make a diamond-tufted upholstered ottoman by altering my diamond-tufted upholstered headboard plans just a bit. At least, that was the original plan, right up until the day I pulled up at their house, and saw that they were having their fence replaced.
OH.MY.GOODNESS!
There were piles of beautiful old cedar, weathered to perfection with the most gorgeous grayed patina. It pained me to see that amazing wood headed for the landfill, so I snagged about 15 boards and put them aside.
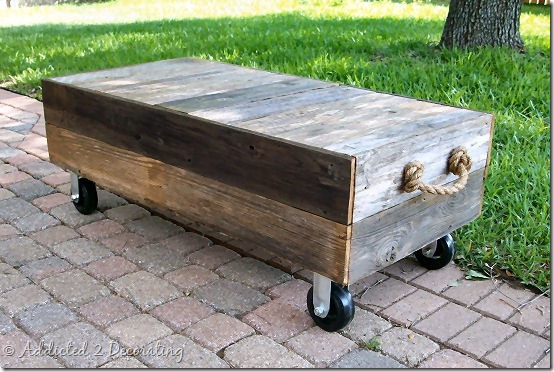
Then I said goodbye to my plans for a diamond-tufted upholstered ottoman, and said hello to this handsome guy…
If you’ve never built anything before, a project like this is actually a great place to start. It’s supposed to look rugged and imperfect, so you can practice your cutting and gluing and nailing, and even if you don’t get them just right, you can tell people, “Oh yeah, it’s supposed to look that way!” :)
So gather your tools, and let me show you how I turned some old cedar fence boards into a cart-style coffee table.
1. Using my miter saw, I cut 1” x 8” pieces of lumber to the size that I wanted the coffee table. These pieces will form the basic frame. (This will make more sense a little later).
2. I also used my miter saw to cut eight pieces of 2” x 4” lumber, about 10.75” in length.
3. Using wood glue and clamps, I adhered pairs of 2” x 4” pieces together. These will be the legs that will support the wheels.
4. Standing the 1” x 8” pieces of lumber on edge, I made a box and fastened the pieces together with wood glue and a nail gun. (If you don’t have a nail gun, you can use wood screws.)
5. I then ran a bead of wood glue around the top edges of the 1” x 8” pieces,
6. And placed a piece of 1/4” MDF (cut to size) on top.
7. I secured the MDF in place with my nail gun.
8. Then I flipped the box over (with the MDF on bottom) and glued and nailed a leg into each corner. The basic frame was then complete.
9. With the frame right side up, I stained the top and the sides. (This was just in case any of the frame showed between the cedar boards or through knot holes. I didn’t want new, bare wood showing.)
10. Starting at one end, I cut pieces of cedar fence board the exact width of the frame, and attached them to the frame with wood glue and my nail gun.
11. I continued to attach these pieces all across the top and onto the other end. (The last piece on the top had to be trimmed using my jigsaw.)
12. And finally, I covered the sides with cedar fence boards, attaching them in such a way that they covered the cut edges of the top and side pieces.
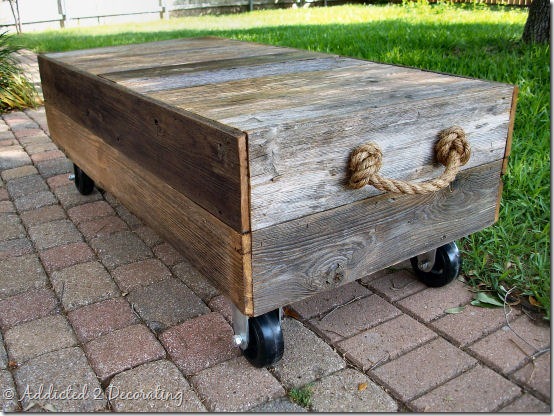
13. With the basic construction done, I flipped the table over and attached the wheels with large wood screws and washers.
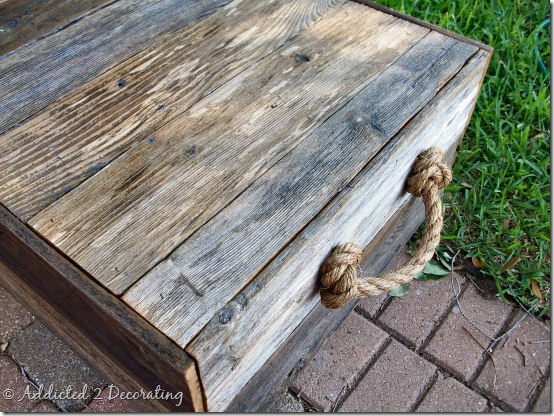
14. Then on each end, I drilled two large holes (actually the largest drill bit I could find wasn’t large enough, so each hole actually consists of three smaller holes drilled right next to each other), and then I inserted jute rope through the holes to form a handle. I secured the rope on the inside of the coffee table with wood glue and staples.
15. The last thing needed (not pictured) was to lightly sand the coffee table (just enough to remove the splinters, but not enough to remove the grayed patina), and then apply several coats of Polycrylic clear coat.
And that’s it! The result is a cart-style coffee table that adds the perfect amount of rustic warmth to any room.
I think it’s the perfect addition to the family room!
**Note: If your old fence boards are pressure treated pine instead of cedar, use with extreme caution!!! Pressure-treated lumber used to be treated with an arsenic compound. You will need to protect your eyes, and cover your nose and mouth with a quality ventilator while sawing and sanding, and handle with caution to avoid splinters. When the table is finished, you need to vacuum any remaining dust completely (and dispose of the dust immediately), and then seal the table VERY WELL with several coats of sealer. You simply cannot be too cautious with old pressure-treated wood.
Thanks so much, Kate, for inviting me here today! And thanks to all of you for graciously allowing me to share some of my decorating and DIY projects with you. I hope you’ll come visit me if you have time!
Have a wonderfully blessed day,


I agree Kristi, that will be a perfect addition to the family room space you’re designing. Thank you Kristi for being such a fabulous guest, and for showing us your DIY skills. I just LOVE your rustic coffee table and I’m sure many more will be inspired!
.

Oh no, there are a few broken pictures? Is it just me? I’ll check back later because this is for sure a project I want to see more of! :)
Kristi, you go girl! That looks amazing! We just built an upholstered ottoman ourselves and were really pleased with the results. Thanks for sharing your inspiring work :)
Love it. My son is getting ready to leave the nest and is showing an interest in building some furniture. I’m glad I clicked over to your blog as the pictures weren’t showing up in reader! Fantastic job.
several of the pictures aren’t showing up….
xo jana
So sorry about the pictures! The Yahoo server that I uploaded them to seems to be having trouble today. My business website on that server is also down. In five years, I’ve never had one single problem with that server…until today. lol…That’s life, I suppose. :) Hopefully they’ll get the problem cleared up soon.
I love it! Looks great!
Gorgeous! Thanks for sharing! I love this blog! http://cottagebluedesigns.blogspot.com/2011/06/room-make-over-design-plan-for-our-eat.html
Happy decorating & living-
Megan
I NEED to make this for our family room. SO CUTE!
Great guest post! I recognize Kristi’s blog from a few of the photos…awesome tutorial on the coffee table. :)
Wow! Gorgeous, clever and looks like something Pottery Barn might charge an
arm and a leg for. Your instructions are so clear too; you really make the project
seem approachable. Great job. I’ll be following your blog for sure.
Love this idea I may need to duplicate it. Great job:)
Kristin — what color did you use on those gorgeous kitchen cabinets? I’m looking for a color like that for this old cabinet I found in a local junk store.
Oops — Kristi!
Kristi,
I am amazed this coffee table is so wonderful! You really should keep this up!
Kate thanks so much for featuring Kristi!
xoxo
Karena
Art by Karena
I have a New, very fashionable Giveaway from the Shabby Apple on my site! Come and enter!
Thanks, everyone! Devon, the paint color on my cabinets is called Hallowed Hush. It’s a Behr color (from Home Depot), but for cabinets I always have it color-matched in Kelly Moore interior oil-based satin finish paint.
Hey Kate, I just caught your appearance on the Nate Berkus Show. Love the colours you used in that room.
Wow! How talented are you?! This is just amazing xxx
Wow, what a great coffee table! I love the re-purpose of old wood into a usable coffee table. I just did my own update on a coffee table with an trunk I bought. You can see it here http://thefirstapartment.blogspot.com/2011/06/50-dollar-fix-trunk-love.html But now I am thinking I need to add some wheels to mine!
~Blair
What a cool table! And the kitchen cabinets are great!
Kristi you do amazing work. I’m still looking through your blog. Gorgeous work! Kate, thanks for having Kristi guest post today. Kristi & Kate are very talented and I always love the inspiration that great bloggers give to others. Thanks ladies!!! :-)
Love that knobby handle, and I totally dig the rustic look! We did something similar (and far less complicated – easy way out!) with an old apple crate:
http://www.yellowbrickhome.com/2011/02/18/from-apples-to-storages/
I’m filing this tutorial for later, for sure!
That’s fantastic! Thanks for the inspiration! I currently have some reclaimed barn boards sitting around that my sweet aunt snagge for me from her Kansas farm. I’m still mulling over ideas, but I wasn’t sure about how to seal the wood. It’s been sitting out in a barn for who knows how long, and I don’t want to bring critters in. I also want to protect it without losing it’s rugged patina. Is the polycrylic clear coat the best option?
I spent an hour and a half surfing for info about how to use my aluminum T tracks. Your ideas hit for me! Sometimes the simplist things for me can be the hardest to visualize. THANKS!!
Note! You could have mitred the edges on a 45 and used a light sandpaper to hide the exposed edges. Weathered wood looks better when the “fresh” insides aren’t showing. Looks awesome though!
P