Hello friends, happy spring, the sun is shining today, at last! There’s just something about sunshine and bright colors that is making me happier this week. I even painted my toes a bright coral yesterday ~ that’s me, livin’ on the edge.
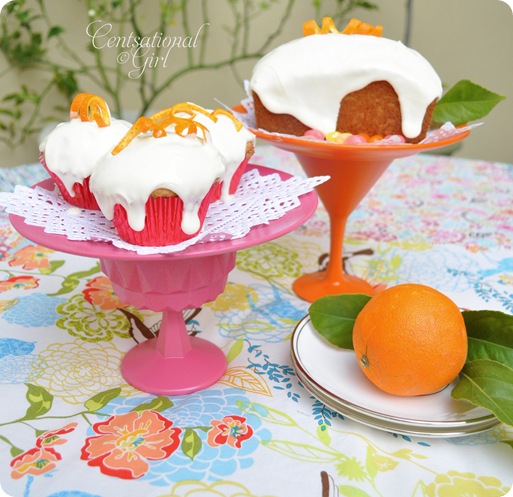
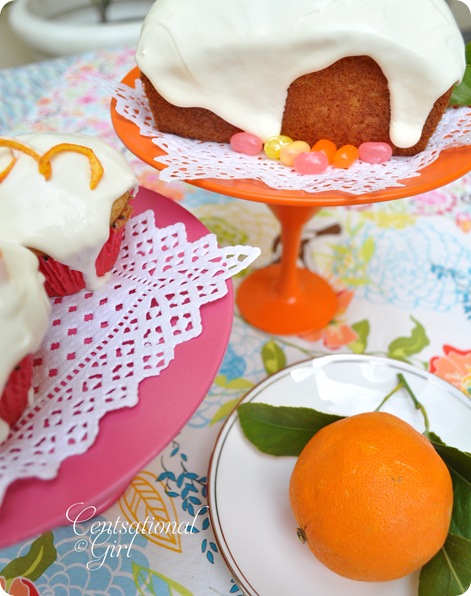
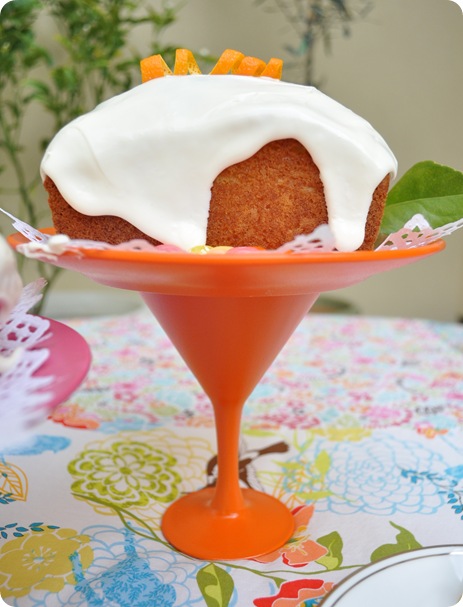
Last weekend, I made these sweet little dessert stands for displaying spring and summertime treats when guests come over. They’re frugal, festive, and fabulous ~ my kind of project!
Pretty Dessert Stands from Goodwill Plates & Glasses:
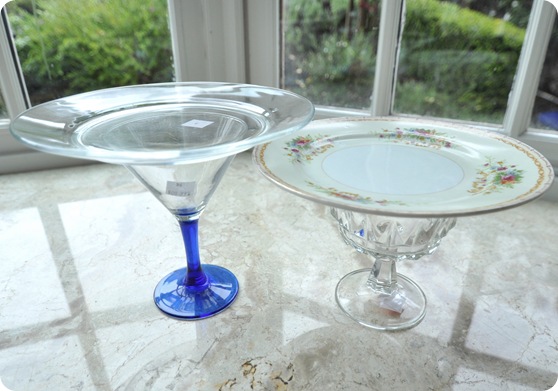
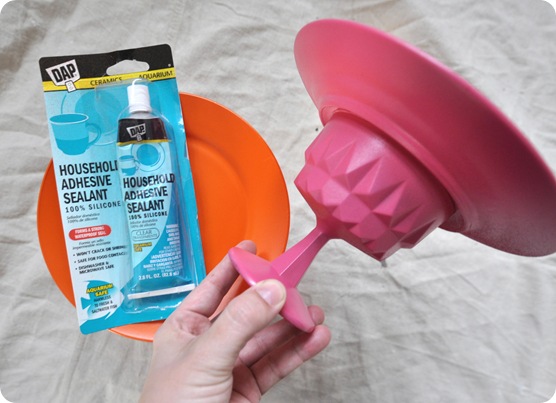
What You’ll Need: Miscellaneous stemware and dessert plates; household silicone sealant (the kind used for aquariums); frosted glass spray paint; colored spray paint; paper doilies.
First, make a stop at your local Goodwill or thrift store. There are always plenty of glasses and miscellaneous plates for sale. Often, you can find matching sets, but among those sets are the equal amounts of hodge podge and mismatched stemware. Grab a few of those, the ones with no mates. They’re the cheapest, always less than a buck. This is a great way to repurpose your chipped china too (like the one below).
Old fashioned (wide bottom) champagne glasses and martini glasses work well, but go crazy! Pick whatever you like. The more variety in shapes and heights, the better!
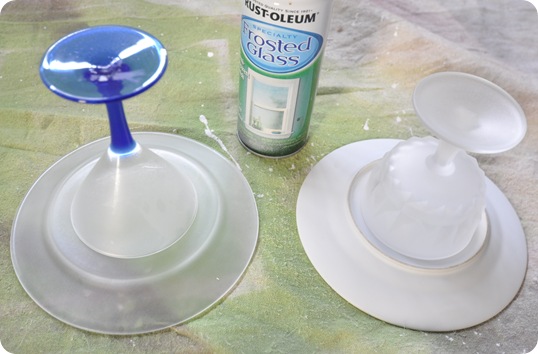
Remove any price tags and clean your stemware and plates. Center your stemware on top of your plate. You can use spray paint designed for glass, but some are not designed for it (or at least they don’t say ‘can be used on glass’ on the can). The way to use any color spray paint you want, even those not designed for glass, is to first ‘prime’ your glass with frosted spray paint. It dries in less than 10 minutes.
Give each side of your plates and stemware a good coat, both tops and bottoms. Make sure you don’t bump your stemware, you need a clean ring for your silicone. [I chose to paint first to use the ring as my guide, and also because paint doesn’t stick to silicone and you’ll have a slight residue, see below.]
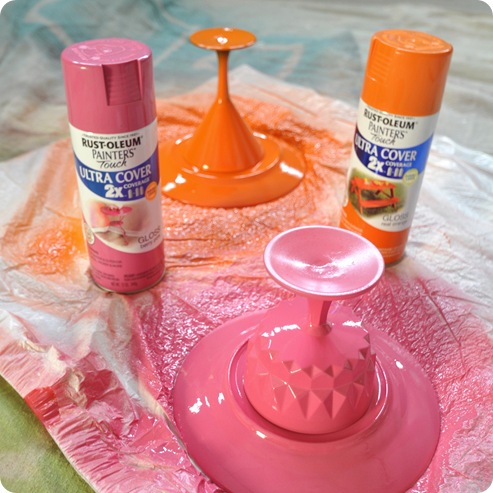
Next, spray paint away, two to three light coats for the best most even coverage. Never spray painted before? Check out this article on spray paint FAQs. For these two dessert stands, I used Rust-Oleum’s ‘Painters Touch’ in Real Orange and Berry Pink.
Once your paint is fully dry (at least a few hours) it’s time for the silicone sealant. Use the ring where there is no paint as your guide, and apply a good layer of adhesive sealant around the edge. Lay the rim of the stemware right on top of your ring of silicone. There may be a slight amount of residue around the outside as you press down. It’s your choice whether to scrape it off, but because it’s hidden underneath, I left mine thick for the best grip between the glass and the plate. It takes about 12 hours or more for the silicone sealant to fully cure, but read the package.
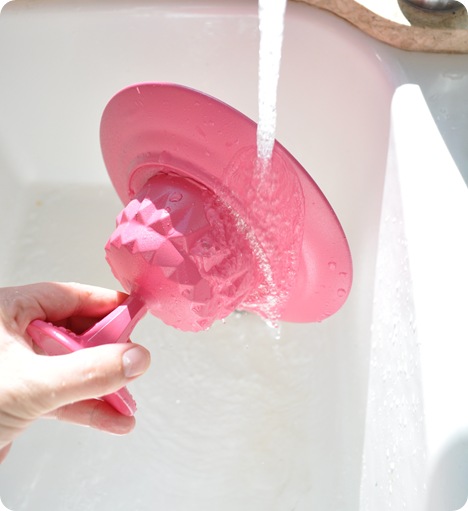
Once your silicone sealant is fully cured, you can do this!
Yes, your stands are completely hand washable!
Sorry hot glue, silicone’s got ya beat there.
Be sure to use layers of paper doilies, parchment paper, or other food safe papers to display your edibles. Direct contact between food and spray paint, even why dry, is not recommended.
I made both of these plates for under $10 dollars total, including the cost of the spray paint and glassware. I had the silicone and frosted spray paint on hand, but you’ll pay an extra few dollars for them at the hardware store.
I’m thinking you could make tiered versions too. Wouldn’t a series of these dessert stands be perfect for a whimsical cupcake party? Or a bridal shower? Or for little trinkets or favors on display? Great for jewelry or business cards too!
If you want the recipe for my orange cake, you’ll have to wait! Sorry, I’m such a tease.
The marvelous Ms. Layla has an upcoming Spring eZine all about color inspiration, so you’ll see it appear there next month.
That fabulous fabric is from my patchwork picnic blanket, I found it at Joann’s, but the receipt doesn’t show the maker or name of the pattern*. I’m off to the fabric store tomorrow, so I’ll update the post with the name of it when I find it.
‘Till then, toodeloo!
I can’t believe I just said that.
** Thank you Elz for finding the fabric! It’s the Fresh Fusion Large Spring Floral by Legacy Studio.
.


So pretty – I love the colors you chose! However, the real show-stealers are those cupcakes and cake – you’re killing me, just killing me. I desperately need a bite of one of those with my afternoon coffee!
So bright, cheery and ready for spring! Great idea!
These plates are so cute! Can you explain why you glued the plates after you painted, rather than before?
These are so beautiful, thanks for showing how easy they were to make. I’ve only spraypainted a few things, so I’m wondering what works best for the mat so that the items don’t stick after they dry? Newspaper makes a mess!
Wow! This is such a great idea!!! Cannot wait to make a few. Thank you for this post!
These are the most awesome dessert trays I’ve seen in a long time!
you dont know how long i been trying to find a way to Paint glass to make a tiered Cupcake Stand!!! THANK YOU SOOOO MUCH!!
SO Incredible!
Those dessert stands are SO CUTE!
This is so cool and such a great idea! WOW!
This is a great idea since the shabby chic / cottagy look isn’t really me. Love the vibrant colors!
What great tips on top of a cute idea! I never knew about the frost spray to prime glass.
Super super sweet! Love them.
Super cute! And thanks for the tip about the frosted spray paint; I’ve always wondered how to get a better coverage on glass. :)
Thanks for the tips!!!! I had no idea frosted glass paint worked as glass primer! loooove it!
xoXOxo
Jenn @ Peas & Crayons
LOVE THIS!!! Seriously, I feel like screaming! Thank you so much for sharing!
While cute and colorful, am I the only one alarmed here by the fact that you’re encouraging people to use spray paint on food service dishes? I don’t mean to rain on your parade here, but this is a major health hazard. That flimsy piece of food safe paper is not enough to protect the food.
I LOVE these little stands! Such a great idea. And I just painted my toenails a bright coral pink, too. :)
One question – can you attach the stemware to the plates before doing the spray painting so you don’t have to worry about accidentally knocking them out of position? Is there a reason the assembly has to happen after the painting? Guess that’s two questions. Hope you don’t mind!
I never would have guessed that those were made from plates and glasses!
I made a similar one using melamine plates and candlesticks!
http://yourlittlebirdie.blogspot.com/2011/03/candlestick-cake-stand.html
Yum!! Great treat for the spring!
Also, I’m having a Giveaway. Feel free to stop by.
Quick tip: Candle holders also offer a wide range of styles and heights for the base!
even though it’s a long post and you have to scroll down a bit, you can see the cake plate i made last year using a goodwill crystal cut glass plate and a parfait glass that i glued using epoxy glue. i never thought about using silicone sealant. i have also made them using candlesticks as bases as well.
http://camerasandchaos.blogspot.com/2010/05/happy-mothers-day.html
i never thought to paint them either…..and getting the dishes at the goodwill?…great bargain saving tip.
thanks again for the inspiration….
cindy
Seriously gorgeous!!!
Jo-Anna
Seriously gorgeous!!!
Jo-Anna
Fabulous!!
This is so cool . . .I have already made a Dessert Stand the same way without the cool colors! Guess what I am doing this weekend!! Thanks for the inspiration.
Those are super cute! I did gasp when I saw the china plate, it looks like a pattern I collect.
I love this! I am working on making my dirt and concrete back yard this week…some fun stuff like this on the table may make me feel better until we have the $$$ saved up for sod! Thanks for the inspiration!
Here is your fabric Kate, no worries, I didn’t spend ages looking. I was in Joann’s the other day and remembered the name because I looked at it!
http://www.joann.com/joann/catalog/productdetail.jsp?pageName=search&flag=true&PRODID=zprd_02292415a
It’s the Legacy Studio line in Fresh Fusion Large Spring Floral Cream. Yes?
Love these! For those of us that are complete klutz’s, could you use the silicone first and then spray paint? Cause you know I’m gonna bump it! Thanks for the great idea!
Brilliant!! They turned out great!!
You’ve inspired me to tackle this project this weekend. I am giving a bridal shower next month and these would be fun and colorful to serve my goodies on. Love the pink and orange. I’ll be patiently waiting for the recipe on that orange cake. My mouth is watering now. That would be yummy to serve at the shower as well!
Those are so HAPPY! I love them!
These are brilliant!! I’m hosting a community bake sale in support of the Japanese Red Cross Society May 1st and was just thinking how I can add some colour and beauty to the tables of baked goodies. Thank you!!
Fabulous, colorful and fun!!! Love them, love you. :) Enjoy your sunshine, my friend, we’ve got snow on the ground again!!!!
what a cute, CUTE idea…
and for the price I can take treats to friends on them….though I wish mine would look almost as amazing as yours.
Ah-ha!!! silicone! I’ve been making these (not painted…til now!!), but with super glue. Not so great long term!! I can’t wait to whip some of these out for the summer!
HI Elaine and Stephanie, the paint won’t stick to silicone so if you want perfect coverage, I decided it was best to paint first. Plus it gives you a perfect guide for your silicone.
Hi AW, I have to disagree! The layers of doilies are sufficient, plus you’d be surprised how well fully cured spray paint adheres to glass. I washed it pretty well and see no danger of paint or residue coming off. I don’t claim it’s food safe by any means, which is why I used the paper doilies. Thanks for bringing the subject up!
Kate
Are you kidding? These are super fun and how did you come up with this one?? Kids would love to eat off of those.
This is FABULOUS idea and tutorial- absolutely love it! This would be such a great gift for the many baking women in my family!
I just posted my very first giveaway ever on my site- check it out of you get a chance!
wow, these are so pretty!
Hi Carol, I know, so fun for kids! Make sure you use food safe papers to protect any snacks. The spray paint is steadfast once it’s dry, but not considered food safe, so it’s best to take all precautions.
xo
Kate
These are adorable! They will make great accents at parties! Thank you!
oh my goodness i love this DIY!! So easy, so inexpensive and so bright and springy!!
AH!… now I know what to do with those UGLY margartia glasses we were given last year!!!!.. going to have to go dig them out of the basement!
Maddie- the D.A.
The colors make this project!
I’ve seen similar tutorials before but I really love yours. They’re so bright and fun! I’m considering do this now.
How cute and fun! I love this idea!
I love pink and orange paired together…such a fun, springy combo. You’d never know those stands were Goodwill separates. ;) Great work!
I just thought of a way you could keep the plate foodsafe. If you use a glass plate, you could just paint the back.
love this DIY project, i am so inspired! Im going to goodwill tomorrow!!! :)
xoxo,Laura
Ooooh – freaking awesome! Love this, thanks for the inspiration! :-)
Great post! I was just at the antique store today looking at old cake stands. I think I shall go thrifting instead and make my own. Love your blog!
These are such sweet colorful displays! What a great idea!
Best,
Kimberly
Excellent idea and perfect for my upcoming English Afternoon Tea birthday in May. The best thing is that you can re-spray them when you want a colour change for another occassion and be able to re-use them again and again.
This is brilliant! Bravo :) XOL
Kate, what a timely post. I was just eyeballing a 3 tier dessert stand but I really love your stands much better and the price to make one of your stands is much cheaper too. Well done!
I love the colors you chose for the stands, so springy. These would be pretty for an Easter tablescape.
You are wild – I mean WHAT CAN YOU NOT DO? Your family (husband, and kids) are so lucky to have you. I am a lady and i want to be like you someday. So creative
LOVE IT!! This project has been on my list for a while, but had fallen off. This is such a great tutorial and fabulous photos to get me inspired to start painting!
Hello! I have been eyeballing these cake stands in your previous posts and wondered were you found them.. Now I can make them too! I look forward to you blog everyday and feel inspired when I see it! I have just started blogging about my design projects {personal and clients} and all of my DIY projects… it is amazing to see the community of people who enjoy the same thing! If you have some free time check out my blog Living Savvy @ http://www.savvydesignwest.com
Thanks!
Just a thought…if you are lucky enough to find two identical clear glass plates while shopping, why not make your lovely stand with one. If you placed the remaining clear glass one on top, you would have no paint contamination worries and it should be barely noticeable. This would make for easy clean-up, also.
I’m IN LOVE with these! My kids and I are going thrifting later. Guess what I’m going to buy? :)
Absolutley clever. Loving it and can’t wait to find goodies to do the same. Thank you for the tutorial.
You. Rock.
I think I have some plates at home I can use. I just need to get the paint & I looove that pink color…so pretty!
Gorgeous as usual. Your mind must always be churning with all your awesome creative ideas. I check your blog everyday wondering “What awesomeness has Kate come up with today”?
Love, love, LOVE this post!!! Thanks for the awesome inspiration! My hubby will be very thankful that there is a much more inexpensive way to match up serving dishes to the theme of a current party…as am I!!! LOVE. IT.
These turned out awesome!
Very timely, I am trying these :)
Wow, those are really, really cute! I can’t to give it a try! Love these.
LOVE these!!!
very cool. i like this idea.
Hey, I just wanted to let you know that I featured this on my blog today if you’d like to check it out. Sassy Sanctuary Such a cute idea!
These are completely fabulous! I cannot wait to make my own! Thx for posting :>)
These look great!! I love that it’s easy to make!!
My 1st ever comment ( but you are sooo worth it ) … Ikea has the perfect doilies to line these beauties for pennies…think I paid $1.99 for my multicolored set of 4…best of all , they are very thin plastic so they are washable , reusable, and completely cover the painted area – protecting food from contact, while showing a decorative cut edging! And if they’re too large, you can easily trim them down to fit, giving your own cute edging !
Great tip Patricia, thanks so much! I’ll look for those doilies at IKEA. :)
LOVE this! But I have to think there is some kind of sealant or something out there that could go over the top so that you don’t have to use a doily right? Anyone able to think of something?
Can’t wait to do this!
*******LOVE!!! I love cake stands!!!
Hi Laura, I thought of that! Turns out the only way to get paint to be food safe that I know of is to fire it in a kiln. Those are a little out of my budget. ;)
What a creative idea! Am going to have to try this! I love how you can make them any color you want for any season.
is there any reason why you couldn’t do the silicone first? thinking that may make the spray painting easier?
LOVE this!!! I’ve done this before with clear glass – I made a tiered cupcake stand. I never even thought to paint it!
Rachael :)
You are brilliant!
I love this!
Super cute! I actually tried this over the weekend . . . I couldnt find any cool glasses like you used at my Goodwill, so I went for candlesticks! They turned out just beautiful! I also bought a couple of extra candlesticks to paint and actually put candals in for easter decorating! My only tip for anyone giving this a whirl, is to try and stick to the lighter colored plates! I liked the shape of some that were black . . . several coats of light blue later I had finally covered the dark plate!
I absolutely love this idea too! That makes 2 of your ideas in the last week that I am going to have to try. You’ll have to stop producing such great posts until I get caught up!!! ha ha!
Thanks for the fabulous idea!
CC
I loved this fabric so much I went out and bought four yards. I’ve made three table runners – one to go lenthwise on my table and two for the sides so I have six ready-made “placemats”. I put the runners over a peachy/orange colored table cloth and have turquoise chargers that will go under my all-white china with a silver rim. My centerpieces are a metal candle holder and a birdcage which I spraypainted in two colors of blue. I found cute little birds that clip onto the cage; one of which is the hummingbird that goes with this beautiful fabric. I had enough fabric to make matching napkins too. I have gobs of Princess House heritage pattern crystal which I’ll use to complement the dinnerware; wine glasses, salad bowls, small bowls to hold pastel candies, etc. I’m looking forward to a few spring and Easter dinners with this theme.
thank you for the inspiration for these awesome cake stands. I made some of my own! http://sewmuchlove.wordpress.com/2011/04/20/diy-cake-stands/
Kate,
I love your citrus colored cake stands! I remember them when I saw a striped candlestick at a yard sale, I snatched it up knowing I could do something similar.
Would you mind if I shared your photo with a link to your post?
Thanks!
Brittany
I would like you to share the recipe for the cake….YUMMY:)
This ia a brilliant idea. LOVE IT!
:)
Fabulous, gorgeous, I love it.
I LOVE this idea! I was on the hunt for something to put our wedding cupcakes and mini cheesecakes on, and I thought this would work perfectly! I tried it out, and am blogging about it in the morning! Here’s a link to my blog:
http://lifeloveandpuppyprints.blogspot.com/
My only concern is my spray paint seems to chip off pretty easily. What did I do wrong?!?! :)
Did you have to use multiple coats of the frosted glass spray paint? One hardly did anything for me! If the colored spray paint is for glass is the the frost necessary?
I made this yesterday and it turned out so stinkin’ cute! I used an Aqua color and I couldn’t be more in love. Thanks for this awesome idea!
Cute idea. My question is…..Are these food safe? I know alot of painted items should not be used with food.
Love it!!
I borrowed your pictures an wrote about it on my blog. With a link back to you. Hope it´s ok?
If you used a clear glass plate, you could just paint the underside of that and then when you turn it right side up, the surface where you place the food would not have paint on it. Maybe you could decorate the edges with some doodles of paint to hide the painted edge if it doesn’t look quite right. Just a thought! :-)
Great tutorial. A delightful way to present summer goodies!!!
Thanks so much for this! I’ve repinned your images on my pinterest Recession Proof ideas board. What a great way to make something beautiful without breaking the bank.
Also, love your commenters’ suggestions, too… Hope you don’t mind, but I’m highlighting this project today on my RecessionHome.com site: http://wp.me/pCkYA-7Y
Thanks, again!!!
~Ashley
Oh I absolutely ADORE that pink one! How fun!
L O V E these! My daughter will be 5 in Nov and I will definitely be using this idea. Perfect for her princess tea party.
I’ve had my eye on that exact fabric at joanns for sometime…I’m thinkin it would make a fun skirt! As for these plates…YUM!! And not just the desserts on them! I love these! One question, how did they hold up to the weight? I was looking at some glasses and plates but I was concerned that the martini glasses I saw were to think at the brim to hold the plate with a desert. How did yours work out?
How perfect! I love cake stands but I can never find ones I really like, not enough variety. I’ve wanted to know how to make my own and these look so perfect! :D
eu adorei a sua idéia. parabens!!!
I loved your idea so much that I went to the thrift store on a hunt for plates and I chose to use candle stick holders. Thanks for the idea!!
I was going to suggest the same thing as Content Ewe…use a clear glass plate and just paint the back and base to make it food-safe.
I think it would look great, to see color through the top.
Hey Kate! I know this project was done a while ago, but I’ve always loved it and thought of it when I was working on using a little spray paint to give new life to a severely tarnished silverplate bowl recently. Also, loved your post on creativity the other day :)
If you want to see my little silverplate bowl makeover, it is right here:
http://simcoestreet.blogspot.com/2011/10/how-to-refresh-old-too-tarnished-silver.html
Best,
Jenny
Love the idea. Once again recycle/reuse. You could even hand paint or stencil on these then recoat with clear sealer, or add some bling with silicone!!! Make them Diva-licious!!!
I love the colored plates. I have made these kind of serving trays before but not with color! You can make them food safe by spraying on a coat or three of polyurethane, also available in spray cans in the paint dept. I mod podged paper onto tray and made it waterproof by using this stuff and it is just fine. just coat them after your paint dries.
Thanks for the great Idea, sugarbelle posted it and I have made many of these already. What a creative mind you have. I love it!!!!
These are darling! Not sure if you still get these Replies, but I could never get the recipe for your orange cake on Lettered Cottage E-Zine. It looks amazing!
Thanks!
Krylon Triple Glaze can be sprayed over the spray paint for a gorgeous “glass like” layer. I usually do two layers and then you can put food directly on the plate if you like. The Krylon will also prevent the inevitable scratching of the plate.
Thanks Heather, hadn’t heard of that!
xo
Kate
I suppose the clear plate could’ve been left unpainted on the part that touches food to make it food-safe… I wonder if that would’ve looked as pretty, though… such a cute idea. I didn’t know there was such a thing that could adhere dishes together. Brilliant.
@HeatherWalker – are you sure that Krylon Triple Glaze is food-safe? I couldn’t find anything on their website about it, and the MSDS sheet doesn’t give me a good feeling about it.
Hi! I’m wondering what clear sealer you might recommend when making these? Thanks!!
Hi Ashley, I didn’t seal mine with any protectant, the gloss spray paint was hard enough, but there’s nothing I’m aware of that would make these food safe for direct contact, which is why I used the paper doilies. Is that what you were thinking?
i will be visiting your website often! LOVE so many of your ideas! Thanks
dollar tree has a good selection of plates and glasses, too”)
How fabulous!! I saw this last year, but I had to share it on my blog for some spring ideas: http://vixenmade.blogspot.ca/2012/03/15-spring-decor-ideas.html
Hi, there! These are so adorable! I want to make these for my daughter’s birthday party. I’m wondering how you spray painted them before you glued them together? That seems difficult to me…? Could I glue the pieces together & then spray paint it all? Thanks ;-)
Yep you sure could glue them first Kat!
Kate
I like how you painted them, such bright colors. When I made some (years ago) I glued the bottom of the glass to the plate which made them a bit more stable. I wish I had thought of painting them. Thanks for sharing.
I did this project today and everything turned out beautiful. I painted a cheap plastic cupcake stand pink, I painted, glued and sealed a glass & plate cupcake stand, and then I did the same with an old copper candle stand and used a glass plate for the top. I now have 3 great cupcake stands to use at the Farmer’s Market! Everything was items that I planned to put in the yard sale this Saturday. LOVE this project and thank you for showing how to do this. The instructions were very clear and easy to follow!
My thought is to use whatever paper you like and decorate with ahole punch or fancy scrapbooking punch, whatever you have already, say to match the wrapping paper on gifts.
Kate, how is the finish on this? It looks smooth but seems like the frost would make it rough to the touch. So excited to try this for the 4th!
Hi Chris, they’re very smooth, the frosted spray paint is really very thin and pretty smooth too!
Kate
I have done this with colored melamie plates from Target. Dinner plate, salad plate, and bowl and used clear glass candle sticks from Dollar Tree. I also used E6000 glue. No painting needed. They are great on a dresser for jewelry, pocket change, etc. or for holding makeup, etc. in the bathroom.
Made these today!! They turned out great!!! Thanks for the ideas!! (:
Great idea! My daughter made these over the weekend, when she went to touch up the paint all of the paint cracked. Any idea what might have caused this? Any suggestions to keep this from happening again? Please email reply if possible.
Hi Jeannie, I”m so sorry that happened to you! Wondering if it’s temperature…. I still have mine and the paint is still intact. Did you use the frosted spray paint underneath?
Kate
Love this tutorial….I see treasures all the time to make these. They are absolutely darling!!!
This is just a suggestion. For people who want to be able to eat off the plate just use a clear plate and only spray the bottom of it so you still see the color and it is safe. You could also glue a pretty plate on top with similar colors. Just a thought.