Y’all know I’ve had my heart set on ridding my kitchen of the decorative ‘fruit plate’ backsplash behind my range since last year. In fact, I placed it at the tippy top of my 2011 home improvement To Do list.
Please cue the Etta James background music . . .
“Aaaaat laaaaaaaaassssstt . . .”
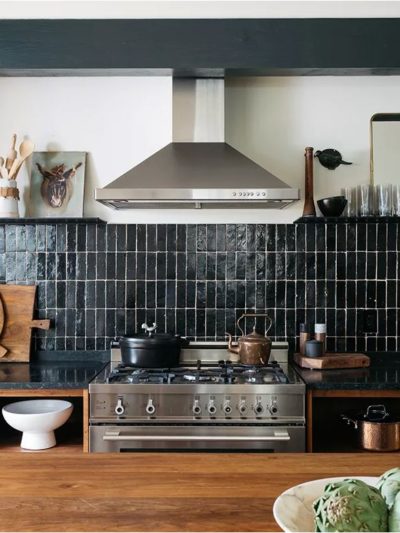
I can’t tell you how excited I am to finally have a clean white backsplash behind my range!

I feel like I can breathe now.
.
You’ll recall that adventure in tile removal from last week where my Dremel MultiMax and some sweat equity yielded a new canvas.


I wanted white harlequin tile for the inset, but couldn’t find an affordable version or color match to my existing white tile surround (which is basic Daltile right off the Home Depot shelf).
Plan B lead me to a simple diagonal pattern with 4’ x 4’ tiles and a chair rail frame in the same color ~ again, the inexpensive white ceramic tile available at any HD store.
I don’t own a tile saw, so I enlisted the help of our good friend Ramon who has serious tiling skills. In 2009, he helped tile our master shower so we called in his assistance and borrowed his wet saw again.
To find the center of the design, we drew a simple grid with pencil (you could also use a chalk line). Then Ramon demonstrated how he cut and installed the chair rail. Next we began to lay the diagonal design, working from the center point.

Behind every piece of tile is a good layer of mortar (or thinset), not to thick, not too thin. You can apply it to the wall, then set your tile like we did with the chair rail. For individual pieces set in a pattern, we applied the mortar to the singular piece then set it on the wall.
It’s important to work in sections if doing an entire backsplash surround, using just enough mortar or thinset to set just a few pieces as you work your way around.
In hindsight, I should have bought white thinset instead of gray mortar, but since the grout covered it all up anyway, I wasn’t too worried about it.

I’m not a fan of thick grout lines, so no spacers were used in this project, but you can buy them in varying widths at any home improvement store. Small pieces of cardboard support the bottom tiles above the chair rail.

For the trimmed pieces, Ramon showed me how to mark the tile to know where to cut, pretty simple.

The coolest part was next learning to operate this wet saw!
Careful girl, watch those fingers !!!

Hey Ma, look, Ma! My very first cut piece of tile!
For a moment, I even considered saving it as a souvenir.
![]()

Once the pattern was installed, we allowed it to set for 24 hours. The next day, all that was required was some simple white grout applied with a trowel to fill in the seams between the tiles (forgot a pic!) then I sponged the excess grout off the surface of the tile.

The final step once the grout is fully dry is to seal it to protect it from stains. For another simple tutorial on installing a ceramic tile backsplash, check out this step by step over at This Old House. .
At last, the much improved clean white backsplash tile !!

I have to share this: I was flying back from New Orleans yesterday, and I picked up the spring edition of one of my most favorite magazines in the airport: Renovation Style. For me, this BH&G special interest publication never fails to deliver the most gorgeous livable real homes and always great before and afters.
I nearly choked on my chips when I spied this.

Oh sweet validation !
If you’d like to see the entire kitchen (and read about the lessons we learned from building it), here is the full tour.

Have a fantastic weekend!
xoxo,
![]()
.


The new backslash looks amazing! It is awesome that you were able to remove just a few tiles and replace them. I also think the diagonal line adds just the right amount of interest. Clean, Crisp and beautiful!
So so lovely! Good for you! That tile saw looks like a lot of fun too!
it looks so great! btw i am SO jealous of your stove/oven….drooling!
Oh how I love this post. I have pepto-bismol pink tile. The fruit looks better than what I have. I am working up my nerve….
Hi, just wanted you to know that we put up our Mirrormates frames in both the master and guest bathrooms last week. They really “make” the bathroom. After I read your post and saw your results and process, I decided to give it a whirl. Glad we did!
Goodness me you are one busy girl! I swear you’re always up to something great :0)
It looks gorgeous!
::sigh::
I have *total* kitchen envy. :)
Great job on the backsplash!
Emily
OMG! Gorgeous! Great job on the backsplash. You’re ideas are going into my “home renovation” file.
Wow! I love the new look, Kate! The pattern you laid out is very flattering…amazing how going back to white can make such a difference. Congrats on your first wet saw tile cut. :) Like Emily, I have kitchen envy too. ;)
It looks fantastic Kate and I would have choked on my chips too! How did they know??? *wink*
WOW! It turned out fabulous! I too have kitchen envy :)
Love the new tiles. you’re going to be so glad to have the fruit salad gone! I think the square tiles on the diagonal are much nicer than the harlequin ones. I have just finished my kitchen and nearly used the harlequin ones but decided against it.
Enjoy!!
Looks so clean and fresh! Love it!
You go girl!!! Don’t you just love marking that project off the list of “to do”..Thanks for sharing!
Good on you, Girl! BHG must have been spying! :)
Love it Kate !!! And congrats on the magazine !!! I too love that one !! Wondering if there is any way I can get my blog on your bloglist?? Don’t know how that works?!?
Tracie
Great job! Tiling is something that I really want to try!
Your new backsplash looks wonderful. Good for you for being brave and using the wet saw. There’s no telling what you might tile now!
That really looks great – I’m about to tile the side of my kitchen and I’ll be using your hints, for sure. I do have a question – what did you use to “seal” the tiles, and how did you do it? Thanks so much.
Looks fabulous!! Doesn’t it feel good to get rid of something that’s really bugging you in your house?! Such a relief! :) xo
PS: Great job with the tile saw, they can be kind of intimidating!
The backsplace looks great but I reallllly love that wire fruit basket you have in the corner!
Outstanding job, the tile looks amazing, as does your kitcen.
It looks so much better. Looks like you were a real champ with the wet saw. So cool.
Look at you… I have a job for you on the Peninsula if you want it :-)
xo,
cristin
It looks awesome! At first when you showed the picture from the magazine I made a double take; I thought it was your kitchen. It feels great to know you are right on trend.
Bravo Kate – I love it! Looks so much “cleaner” ;).
beautiful.. really. nice job & loving your all white kitchen!
I absolutely love it! It looks so fresh and clean and really “lifts’ it all….
Great job!
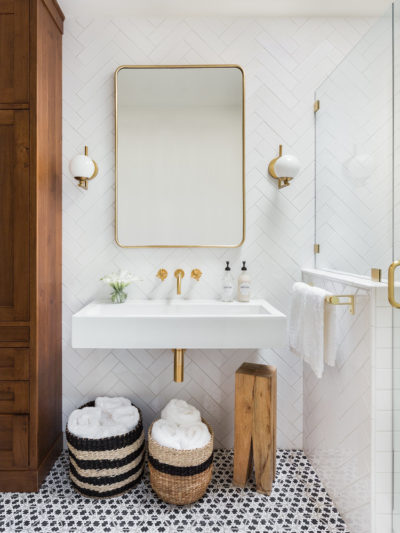
The bathroom’s pretty darn good too!
Lesley
Are you kidding me? Go girl! It looks absolutely beautiful! The only reason I wouldn’t do something like this on my own is because I am super freaked out to use one of those saws. I’m terrified to cut off fingers and I’m just the sort of klutz that would!
That’s gorgeous! Seriously, looks straight out of a magazine.
Looks awesome! Did you put that fruit backsplash in earlier, and now want a change? Or was it from the previous owners? Just curious. The new backsplash looks amazing.
It’s beautiful, Kate! How proud you must be of yourself for laying your own backsplash and learning the wet saw. That is amazing! We are ordering our new backsplash tomorrow. Are you available next weekend for an install? Kidding of course but you obviously know what you’re doing and it looks like perfection. Have a great weekend!
Looks fabulous! Great job!
Looks fabulous! don’t you just love when something you do turns up in a magazine?? That feature is pretty much exactly like your tile work, you should be very proud!
It looks AMAZING. Great job!
You crack me up!!! I’m so thrilled that YOU are thrilled with the new tile backsplash. It’s gorgeous as always!
I really wanted to go to Blissdom this year and meet you in person (Rhoda is a friend of mine and I really wanted to finally see her in person, too, and Edie and….)!!!
But, alas, I’m moving to Italy for almost a year and have been crazed with packing.
I hear that you are a ZANY LASS!!!
My kind of gal!!!
Keep rockin’ the blog world!!!
Hugs,
Lana
Way to go, Kate! Your new tile looks so clean and fresh–a beautiful background for ANYTHING. Yes, ma’am, I think you made just the right choice! And how cool to have it validated with that lovely magazine pic!
Your kitchen is one of my very favorite spaces in the entire blogosphere. Seriously. It’s just dreamy. :)
Wow! This looks fantastic. You did an amazing job. Very talented.
“Waaaaaaaooooooooow.” (Using a whisper voice)
Great job! Those tile saws are scary, good for you for being brave and not asking someone else to do the cutting.
Wow! You never cease to amaze me.
You go girl! Your kitchen is AWESOME!
Jen
Scissors & Spatulas
I don’t mean for this to sound gay, but I love a woman in protective eyewear.
(This is where you pick up on the Parks & Recreation Tom–Justin reference and reply, “That doesn’t sound gay at all.”)
Love your kitchen! Have to say though, that I really appreciate your “printer friendly” feature. I wish ALL bloggers would do this!!!!! :-) Thanks!!!
It looks amazing. And I am glad you still have all your fingers!!
Great job! Great improvement…I can see why you had to tackle this job stat! Janell
Looks fabulous! My hubby has a tile saw but I haven’t been brave enough to use it yet! Thanks for the inspiration! Love your kitchen!
I’m not a big fan of grout lines either.
What did you use to seal your grout?
I would like to redo the tiling in my kitchen as well. I’m thinking of skipping the tiles and using the fake tin stuff you can get at the big box stores. I used to live in an old city with lots of tin ceilings and they make me so happy.
I absolutely adore your all white kitchen. It is so light and airy.
Love it! Great job! Beautiful kitchen and great tile work!
~ Ali
Congrats on your first tile cut! It looks great. I feel obligated to say that it’s a monumentally bad idea to operate a wet saw without eye and ear protection.
kate, you seriously have one of the prettiest kitchens in blogland!! This just took it up another notch. Great job girlfriend! I had fun learning that wetsaw stuff when I did my subway tile last year. Piece of cake!
You’re a rock star! Love everything about your kitchen!
Girl! That turned out great. You did an excellent job. So much better than the other.
Debbie
You did a fantastic job! It looks so much better than before. I really like the clean white look with the tiles set on an angle.
Hey! Love your new backsplash!
Just WOW! Gorgeous kitchen! And how wonderful that you are so handy and can do that sort of work yourself! I am very envious.
Kate,
Great job! Tiling backsplashes isn’t all that hard once you give it a try. Thanks for sharing.
O.k. I know it’s wrong to covet and so I’ll call it the next less sinful thing I can think of…I am jealous! I love your kitchen! I have a nice one with custom wood cabinets and granite, etc. but oh the lightness and brightness of your white kitchen…(sigh). That backsplash is so nice and simple. Great job! I’m now truely inspired to rid the maple and bring in the white! Better look out hubby. If I keep reading Centsational Girl, you’ll not recognize your house:)
wow! great job…seamless!
Looks amazing! The diamond pattern works so well in your kitchen!
Wow. You are amazing!! Such a great idea and such a big before and after difference!
Looks amazing! I just love your bright, fresh kitchen!
Love it! Great job! We just finished re-tiling our master bathroom as part of a big reno. We had a tile guy, though, so major kudos to you for DIYing it!
You.are.my.hero. Love it,love it!! Adore that white. I’ve always loved white and somehow got too influenced by the ‘has to have color’ trend a few years ago. Well, this is proof white is to quote my 3-year-old, “Booful” (beautiful!)
Wow, Kate, it looks wonderful! Great job! I’m so impressed that you used a tile saw….I would have left that up to the hubs. :)
Beautiful job!!
Such a great job as always!
Hi Kate.. love your blog — find it so interesting and helpful! Your backsplash looks aweseome. I toyed with doing mine too, but ended up not having the courage! One thing I would like to ask you though — you said you “sealed the grout”. Could you fill me in on that? Would I assume that the tile setter have done that or should I be buying something and doing it myself? Did you paint it on the grout lines with a brush? thanks
I ENVY your kitchen!! Beautiful job… as usual:)
My Dream Kitchen! It is absolutely GORGEOUS!
Beyond gorgeous but why no safety goggles Kate? All you need is a loose chip of tile to fly up and put out an eye.
You rock…I love your “can do” attitude!!!
I absolutely love it!! The white is so clean and classic. Great job!!
Same question as Judy – you sealed the grout? When my kitchen was put in nothing was sealed (I’ve only just learned about floor tiles being sealed) so dirt is a constant.
Fantastic splashback. You must have done a lot of stretching over your cooker, tightening those tummy muscles! And congrats on your first tile cut. Great job. xx
HI Andi, yep I do believe it’s important to seal grout on a kitchen backsplash, especially behind a range where sauces will certaintly spatter ! You’ll find grout sealers in any home improvement store!
Hi Denise, so glad you pointed that out! Yep, safety goggles are certainly recommended! With a wet saw, I didn’t experience any matter flying about since we were workign very slowly and since the cuts are ‘wet’ I didn’t notice any loose particles. However with the tile removal, I did wear the goggles since tile chips are flying everywhere during that process !
~ Kate
Fabulous! Looks so much better.
Wow, what an improvement kate. And you did it yourself, so inspiring. Your kitchen looks beautiful.
Kate! Fantastic job! Is a wet saw awesome?! At first I just browsed through the post and I completely thought it was YOUR back splash in the article, until I went back and re-read it all. Wow! Sweet Validation indeed!
Wow, you did a beautiful job! And I love that the magazine had the exact same thing. They should be looking you up and putting you in their mag!!
Have a great day.
Pam
Fabulous job!
A little love on Valentine’s Day.
A greeting.
It looks awesome!
Kate;
Wonderful job….would never have thought you could “undo” that backsplash ((and guess what else? I’d have taken that one in a flash!) You may remember I howled when you changed from butternut to the lovely green cause I thought it was already gorgeous.
Seriously though, what ever you do, yours is once and always my Favorite Kitchen Ever… and the pic in Renovation Style is just a wanna -be- CG copy catter!
“Hi Denise, so glad you pointed that out! Yep, safety goggles are certainly recommended! With a wet saw, I didn’t experience any matter flying about since we were workign very slowly and since the cuts are ‘wet’ I didn’t notice any loose particles. However with the tile removal, I did wear the goggles since tile chips are flying everywhere during that process!”
Kate, having cut decent bit of tile on wet saws, although you don’t get matter flying about often, it can happen. It’s happened to me. When a chip does fly, it’s going at a very high rate of speed. It’s really not worth taking a chance by not wearing eye protection. You should be wearing ear plugs too, especially if cutting more than a few tiles.
It is such a small change but it makes a HUGE impact in your kitchen!! I love the update. You did a great job!
Oooh la la! Looks marvelous! I really want to do the same, if only I could get my hubs on board, however, seeing you rock that saw makes me wonder if I should just go for it! I am sure once I am halfway done and screwing things up, my Mr. wouldn’t be able to resist rescuing me and finishing it up! LOL!
xoxo,
Jen
you inspire me. This Christmas I repainted my kitchen cabinets which made my house very sellable:) Now we are waiting to move into the next one. Do you have recommendations for good pricing on tile ?
Your kitchen is prettier than the one in the magazine! Great job!!
Hi kate! I love it! I’m going to do this same backsplash in my kitchen, totally inspired by you!!!! I’m also not a huge fan of thick grout lines but never thought to just negate it all together. I’m wondering, did you also not use spacers for rest of the kitchen backsplash, or just for the decorative part? And I still see tiny seams between the tiles before your grout went on so I was wondering, did you purposely still try to eyeball and leave a little bit of a seam for grout, or was that just the natural seam that occurred from the fact that they wouldn’t butt up against each other perfectly?
Hi Liz, I used no spacers for the rest of the backsplash, I like very little grout!
Kate