Board and batten is all the rage in DIY land, and for very good reason. It’s a fantastic way to add architectural interest to your home and a project any homeowner can tackle. Board and batten adds clean lines, breaks up bare walls, and complements many styles of modern homes, and these days it’s de rigueur to install it yourself, and then blog about it.
I call my project basic board and batten because for me it was extremely simple to install, but that was because I had no corners to deal with, no strange angles to cut or windows to work around. Just a simple light switch to accommodate along a straight wall. We did a full room of board and batten, you can read about that here.
I’m going to install this same board and batten treatment in my son’s room, and in that space, I will run into all those issues named above, so I’ll be sure to do a follow up post addressing those more difficult cuts and installation when I tackle that project later this year.
For yesterday’s before and after project, I had the four supplies I needed to whip up this wall treatment rather quickly: 1) pre-primed MDF, 2) a compound miter saw, 3) a fast brad nailer/compressor, and 4) a handy husband helping me cut and nail boards on his extended lunch hour.
Installing Simple Board & Batten
My Supplies: 4 x 8” panel (1/8 inch thick); ½ x 3 ½” pre primed MDF boards for base and top; ¼ x 2 ¼ pre primed MDF boards for battens; ¼ x 2 ¼ strip for ledge; 11/16” cove molding; jigsaw; compound miter saw; brad nailer; Gorilla glue; spackle, caulk.
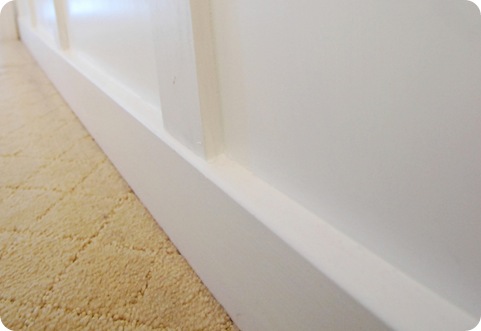
1) Remove your existing baseboards if their thickness will not accommodate the bottom of your battens (the vertical strips). Most existing baseboards will not allow for the battens to sit on top, which is why I replaced it (see below). We talk about cutting and reusing baseboards for board and batten in this post.
Before you shop for supplies, measure measure and remeasure your wall, starting at the baseboard and taking the width measurement every 18” or so until you reach the height where you want to stop on your wall. Decide how far apart you want your battens to be, it’s up to you, but 12” to 16” in distance works well, and map out a sketch to take with you to the home improvement store.
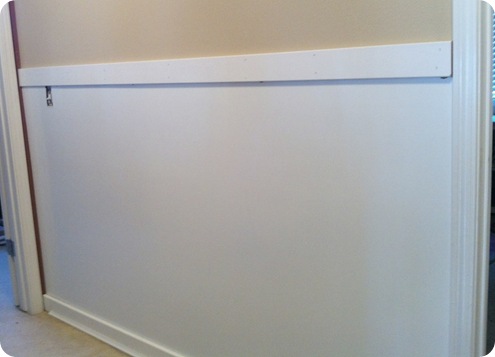
(Optional) If you have smooth walls, you can skip the addition of a smooth panel below. In this loft, the homeowners have ‘orange peel’ texture, so to provide contrast and a smooth wall below, I purchased a 4’ x 8’ flat panel at Lowes (the same boards used for our own picture frame wainscoting project) and attached it to the wall with construction adhesive and a few brad nails. Be sure to notch out any light switches or electrical outlets with a jigsaw.
2) Attach the new ½ inch thick baseboard below, and the same ½ inch x 3 ½ board above. (Ignore that skinny trim piece you see below next to the baseboard, that’s the cove molding that’s installed much later). You can see the panel had been notched to make room for the light fixture all the way to the left.
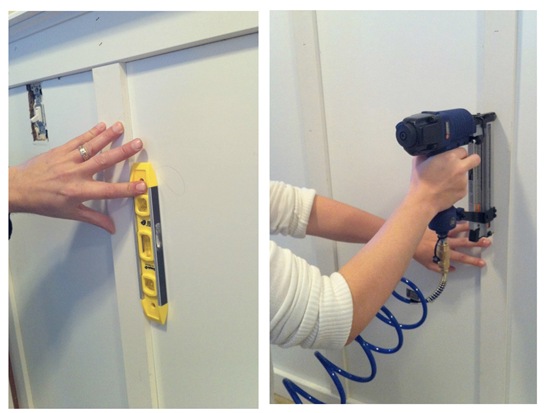
3) Now that your top board is set, map out the placement and distance of your battens, then cut those pieces with your compound miter saw. Use a level and brad nailer to secure them in place.
You’ll save more money for larger projects than this by cutting up one board of MDF at your home improvement store, but you’ll have to prime/paint them after they’re cut. For this simpler smaller project, I bought the individual boards at Lowes that are pre-primed on all sides.
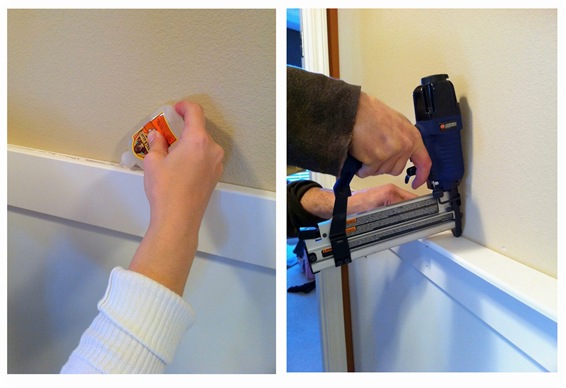
4) To create the small shelf on top, run a strip of Gorilla glue, lay your ledge down, then again secure with a brad nailer.
At this time, I would like to pause to say, this is my definition of a romantic lunch date.
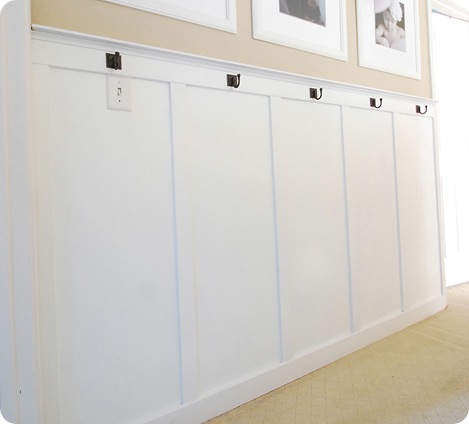
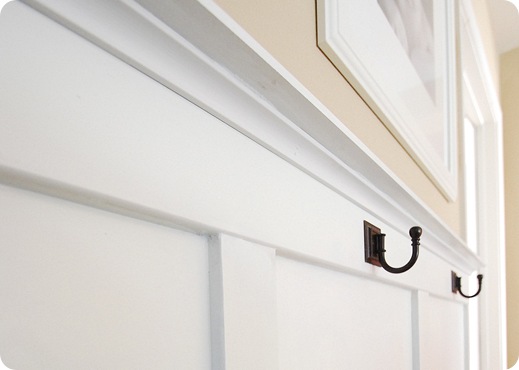
5) Attach your cove molding trim underneath the same way, with some Gorilla glue and a brad nailer. You can see it underneath the ledge here, I think it finishes the look nicely.
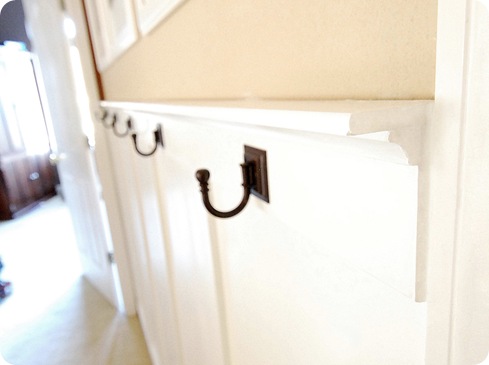
You can choose a thicker or deeper ledge, but in this case, I chose a more shallow shelf so the homeowner wouldn’t run into it coming out the adjacent bedroom door to the right, whack her arm, and curse my name. These things I think about. ![]()
6) Fill all seams with caulk and patch any nail holes with spackle. Cover it all up with at least one coat of paint!
The hooks were attached later for added utility for this loft wall, and you can see the rest of the accessories in yesterday’s before and after post. For an even more detailed look at how we finished an entire room in the same wall treatment, check out this bedroom.
Want to see more great tutorials for board and batten? Check out this handy diagram over at This Old House. Also, pay a visit to Melissa, Karla, Kimba, Nester, Sarah, Chris, AnNicole, and Jen for more inspiration and great ‘How To’ posts. Did I miss anyone? If you’ve done your own DIY board and batten, be sure to list it in a comment for all to see!
Happy home improvement!
.


So the baseboard on this wall does not match the rest of the baseboards in the room? Ooooh….that would be hard for me to do! :) I’ve been thinking of doing this in my dining room but with the doorways the way they are, I don’t think I can since the baseboards wouldn’t match those of the hall and living room, which are connected with wide arched doorways (without door frames).
Nice work! I was excited to see your project this morning since we just decided to use board and batten in our basement refinish coming up. I guess we’re on the band wagon, do you think board and batten is the new bead board?!
Your projects are always easy to follow…and your end results are just as amazing.
Mr. Goodwill Hunting
I wonder if T would get the hint if I emailed him this link and left a Lowe’s gift card on his pillow?? ;) Great tutorial, Kate!
Ooh, that’s a good trick Amanda, I’ve used that one before! Mike, I agree B & B is the new beadboard but the style is less cottage, so it works with so many types of architecture. Heather, the baseboards don’t look all that different than the new board installed! Clean lines make it work.
I am in the midst of board and batten-ness in my home right now! Did a hallway, am finishing up a laundry room and then am moving down to the bar area in our basement. I hope that it proves to be as timeless as I think it is!
But oh what a difference it makes!
http://evolutionofstyleblog.blogspot.com/2011/01/board-and-batten-reveal.html
Great work, as always Kate!
This is GREAT! Thanks for posting the how-to! =) I want to install something similar in our future home! Right now i’m renting but have this bookmarked for later! yay!
xoXOxo
Jenn @ Peas & Crayons
Wow, thanks…do you think my landlords would notice if I installed some? :) It’s so cute, and you make it look like I could actually do it myself.
you are such the genius. looks great!
Too funny- I’ve been researching board and batten for hours today. I think I’ve decided to take the plunge and install some in my house.
I love this – it looks so great. I would love to get up the courage to try it!
Warmly, Michelle
looks great and as per usual, you make everything look so easy. Will have to find a home for this treatment in my own home. Thanks for the tutorial! liz
I love this and have an entryway that I can’t wait to do. My husband and I always end up at the home store when we go out on dates together…
Thanks for the wonderful tutorial!
What is the final height of your B&B? Did you cut down the 4×8 panels, or just lay them on their side? I’m hoping to do this in my future baby’s room….Thanks!! -Stefanie
Thanks for the great tutorial. I’m going to keep this in mind for future projects. Love the way it turned out!
fabulous, simply fabulous! I’m writing an Ideabook for Houzz on wainscoting and paneled walls this week and it has me wishing for some in my house! Janell
This is just gorgeous. I’m trying to figure out where B&B would look good in my house! :)
I have been craving this B & B look for quite some time now for my home office. I am getting closer and closer to actually tackling it (need to declutter first) but I think I will wait for your post to deal with the tricky windows/outlets/corners. :) Thanks again for a terrific and informative post. You rock!
Your tutorial is so helpful! I recently added moulding to my formal living room (http://www.houseofhepworths.com/2010/11/19/piano-room-phase-3-the-bones/) but it isn’t board and batten, it’s box moulding.
I have a question. My formal living room and my dining room are directly across from one another with the entryway in between. You can easily see both rooms as you walk in the front door. In your opinion, do you think it would look okay to have the box moulding at about hip level in the formal living room but then do the board and batten at about shoulder height in the dining room?
Do you think the two different heights of moulding as well as totally different styles would clash and not work well together? Or does it matter?
Thanks so much for your opinion! I appreciate it.
~Allison @ House of Hepworths
Looks great! And great tutorial – thanks!
I have the same thought about the baseboards not matching the rest of the house?!?! I don’t know if I could do that – but the end result looks so good.
One question – Do you have to do anything to put the outlet cover back? Do you just buy longer screws?
Thanks!
Jenn
Looks fantastic! I love how you added the hooks. Thanks for sharing it with us.
I did board and batten in my master bedroom.
You can see the results by going here.
http://thriftyparsonageliving.blogspot.com/2010/06/master-bedroom-makeover-revealed.html
Joy
Thank you! This is an awesome tutorial. Onto my wish list for the laundry room it goes! The only real way it’ll get done however is if you come here and do it. Care for a road trip to Canada? Ha.
This has been on my to-do list for a very long time. I just can’t decide where to add it in my home.
I love the ledge you place on to. It gives such a great finished look.
Fabulous tutorial, Kate. Very easy to follow!
Looks Great (and surprisingly manageable!) Might have to tackle that myself at some point :)
Thanks for the great tutorial! I would love to do some board and batten for our dining room. But the problem is I have a counter height dining room table and I’m worried it would make the table look taller than it is. Any ideas on this?
Thanks for sharing this! I love the idea and have started thinking about where I (or hubby actually) can put something like this in our house! Thanks also for posting the sites of the other ladies that have done this in their home. All together, GREAT ideas for me to “borrow.”
Jennifer
Scissors & Spatulas
Your tutorial was posted at the right timing! I appreciate all the photos and how concise your explanations are. We are thinking of doing this for our boys’ room as it is a large room. I noted with interest that you ripped out your baseboard and wanted to know if bits of the drywall came off with it? If so, did you have to re-plaster the wall or just placed the new baseboard over it without touching up the wall? Thank you!
Kate! That looks great! I am so in love with board and batten right now! We installed it with no trouble at all in our laundry room. But we only had one corner to worry about. Well…I didn’t worry, cause my hubby did it! :)
Here’s the link:
http://www.beneathmyheart.net/2010/12/easy-board-and-batten-for-the-laundry-room/
I am so loving this! I planned to do it in my bathroom, but that will be a while. Too lazy to figure out how to work around the toilet!
i love this look, i do have a hallway i need to something with. this would be ideal.
This would look great in the entrance of our house. Wow you really inspire what can be achieve. You have made a wall look amazing!
I can’t even TELL you how much I LOVE this!!! Thanks great job!!
Kate…this is great! Thanks so much!! Love it. I am wondering~~>we just installed “wide slat (?)” bead board in our dining room and there isn’t a whole lot of it. But, I really like this idea and would love to do it in our not so grand entry way. Good clean wall and it is seperated from the dining room by a coat closet, and two sets of stair stub walls (?). Would this be too much?? This truly is pretty damn cool!
darn…I meant. sorry.
Here’s my board & batten bathroom: http://www.domestically-speaking.com/2010/01/board-and-batten-bathroom-finally.html
Hoping to get to the family room this year.
Great transformation Kate, very inspiring as always!
Kristen
Thank you for coment :) You are a superwoman…good too much :) I love you home and blog :)
Big hugs from NORWAY
That looks relatively painless. Presumably when you want a change, you’ve just got a bit of light spackling to do?
I love board and batten – simple construction and oh so pretty :) It keep popping up all over the place! If I wasn’t in a beadboard frenzy I might try it, too!
Ok, I am beyond motivated and inspired and grateful for this tutorial! YAY!!
Question, I just painted the trim in my house white. So I am on the right track. However, I don’t have much going on in the rest of the house when it comes to moldings {yet, boo}. However, I would love to do this project right in between our front door and large picture window in our living room/entry {one space}. It almost looks to be a similar situation to the room you worked on, I am guessing the rest of the room doesn’t have the Board and Batten throughout? Would it look awkward in our room just having it in the one spot between a door and window, yet no where else, in the room or house for that matter? Just wondering your thoughts!
Thank you!!!
xoxo,
Jen
I’m really interested in doing this in my bathroom. Love the post! I’m terrified of jigsaw’s though and I have a airvent on the wall I’m interested in doing this in. I might have to find another wall in my bathroom to put this on.
amazing! this is definitely going in my file of TO DOs! Thanks! =)
Oh KATE – it looks spectacular. I need to get off my bootie and do this. It was on my goals for 2010….ha. Well, care over is good, right? :)
I’m always curious if the mdf is a necessary step. What if you just painted the lower wall white and then installed the trim?
Duh. I just saw where in the post my question was answered. Woops!
Please note, I am saving this for future reference. I love this idea and the tutorial makes it seem so easy.
Perfect tutorial! I want to do a client of mine’s family room with this – she loves “beachy” and this would fit right in (although this really works so MANY places). Thanks so much! Oh- and the comment about the romantic date – I force my husband to watch Nate Berkus with me almost every night and he’s so sweet about it! Aren’t we lucky?
Sheri
Hey Mrs. Pottery Barn, Could I do a space like this for around $100 or am I way off base on the cost?
I have the perfect wall in my hall for this exact project, and I’ve been wanting to do something like this to it. And I think I have most of the materials needed sitting around left from other DIY projects, now just to convince hubby…
impressive project. I love that the hooks are the perfect height for children
I’d like to do this on a wall with one rounded edge. How would you stop?? I’d love to tackle this… HELP!
The construction adhesive and Gorilla Glue seem awful permanent- are they absolutely necessary? Could you get away with brad nailing on the studs? If you ever changed your mind it seems like it would be a bear to remove.
Hi Colleen!
Yep, you could get away without using the adhesive it you are concerned about it being permanent, however B&B is rather timeless so if you’re going to put it up, I say go for it and get up there nice and solid by using the adhesive. The Gorilla glue goes just on the surface of the top board, so it would attach to that, not the wall. But yes, you could get away with a whole bunch of brad nails and years down the road if you ever wanted to change it out, simply patch the holes.
April, you have two choices on a rounded wall. If you want to stop, create a clean edge on one side with a strip of trim. If you want to keep going, run your two panels together to form a corner, then add a trim piece over the top. I’d probably cut two battens in half lengthwise, then butt them up against each other. You’d cut the upper ‘shelf’ pieces at a 45 degree angle to make them come together on the top.
I am excited to try this in our keeping room! My concern is that all of the baseboards in our 7 yr old
house are stained a light oak.With an open floor plan do you think it would look odd to have a room with
all the baseboards painted white-due to the board and batten?
I really dig your blog, tons of eye candy and cool projects. Last weekend I installed a board and batten of my own on a somewhat useless hallway wall. Thanks for the great idea.
This is great….I want this in my laundry room…BUT, I have a tile base molding (matches the floor tiles) that’s 1/2″ thick (about 3″ high)…any suggestions on how to install this treatment without removing the tiles? Thanks!
I have a wall between my kids rooms that would be Per-fect for this! I do have a similar wainscoating board & batten wall in our drop zone, but then the kids bags, etc. wouldn’t clutter up that area quite so much. Thanks for turning on the light bulb!
you have the best ideas! oh, i´m so in a total renovating mood now!
thank you so much for sharing!
I am giving this a try in my laundry room.
I do have corners and stuff, no real tools other then hammer/nails/hand saws/drills. So I am wondering if it would be ok, to not miter the corners??
And could you do a 10″ board on the top for a shelf?? Any tips, I want to put baskets on the top shelf for storage.
THANKS for all the info, it has inspired me.
(even if I have had to put 3 coast of high gloss paint on the bottom parts of my walls).
Deb
I feel like I’ve already WON with this information-packed post! I am dying to do a board and batten look up our stairway. I also have a guest room with twin beds that I’d also love to do a high chair rail and use the stencil ideas you gave us as well for the top half. I am so happy to have stumbled upon your site!
That is the perfect color of khaki on your Basic Board and Batten project blog. Please share what paint color/brand your walls are? THanks so much and love your blogs Leslie E
I am new to your website and am obsessed. This being the week before Spring Break was a perfect time to find you. I am totally inspired. This is my question. I have a green highboy I want to pain horizontal stipes of black and cream on. From top to bottom going over drawers and all so think STRAIGHT STRAIGHT lines. Have you ever done this? Any tips? I have heard that to get it right I need to paint over the tape lines with clear glaze. Anything else I should know? Thanks in advance.
Thanks for the sweet shout out. Beautiful post and great board and batten information. It looks great!!!!
You are amazing!!
xoxoxox
Jen
Hi Alison, the clear glaze or contrasting paint will work, see this article!
http://www.centsationalgirl.com/2010/11/how-to-paint-perfect-stripes-on-walls/
Kate
Love what you did with this wall! I referred back to this tutorial while I was doing my own version of board and batten. I especially appreciated that you gave specific directions about finishing the top. I haven’t done that part yet, because I haven’t found exactly what I want, but it was very helpful that you were specific with the parts you used. Thank you! Love your blog.
My board and batten (so far anyway):
http://pinktoesandpowertools.wordpress.com/2011/04/03/board-batten-post-5/
I’ve seen this so many places, but was never able to pin down what it was called or a tutorial until I stumbled across your blog. Thanks so much for the detailed photos. I’m itching to try it in our hallway! Fingers crossed it comes out looking even close to as good as yours. Thanks, again!
Just thought I would let you know that I had spotted your tutorial a while back and bookmarked it for our bathroom renovation we just completed!! It looks amazing and I get such great compliments on it!! Thank you for the tutorial! :) Here’s the link to our bathroom if you want to see how it turned out: http://kmanndesigns.com/blog/2011/04/18/bathroom-update
Nice job! You could also assemble the vertical boards and the top rails using pocket screws. You’ll have an easier time flushing up the boards to one another.
I am so excited to do this project my daughter is the one who saw your blog and I was about to hire someone. But I can totally do this myself. Do you have any suggestions on the shelf for long walls. I have 17′ to cover no interruptions straight wall?
Where did you get those perfect hooks? I’ve looked everywhere!
I love the look of the board and batten so we did this in our office. The first couple people we showed it to asked, “what color are you going to paint it?” I was really confused by the question… I’ve only ever seen it painted white, and it’s painted in the same bright white that the rest of our trim is. But now that Every Single Person (more than a dozen) that’s seen it has asked the same question, I’m starting to get really paranoid!
Have you had anyone ask what color you’re going to paint the board and batten?
Hi Renee! That’s too funny, I’ve never had that question but it can be any color you choose. I believe most choose white to match the door trim, baseboard and crown molding that is typically white in most homes. :)
Kate
Hello, my husband just finished installing board and batten today on a living room wall and foyer wall. It looks great! It took several days as he used unprimed masonite, which had to be primed before it could be painted, and contact cement (go with the odorless variety), which had to dry before he could hang the wood. We painted it Benjamin Moore White Chocolate. Compared to the bright white of the primer it looks cream but goes great with our gold walls. It doesn’t match the white of the adjacent base boards but I’m ok with that. Adds so much character to the rooms, especially to the 2-story foyer wall. Great DIY project. :)
So great to read this Susan, glad you love your room!
xo
Kate
Kate-
So, can you find the 1/4 x 2 1/4 and the 1/2 x 3 1/2 pre-primed MDF boards at home depot or lowes? Or do you rip them yourself from 4×8 sheets? I LOVE board and batten and did it in one of my kids’ rooms, but we used pine lattice boards that were at least $.58/foot, so it ended up costing us more than $200 for the wood strips alone for an average sized bedroom! So, I’m REALLY hoping they sell MDF precut… Thanks!
Hi Melissa, we bought those pre-primed battens at Lowes (as I recall…..) and only had to cut the ends to fit the height of the wall.
Kate
Where did you find those hooks? I’ve just did the same project to my kitchen wall following your tutorial, but I’d love to have stylish hooks like these that fit in that small space under the shelf.
Anyone know where to get the 1/4″ and 1/2″ mdf boards/battens? I cant find them at either of my Lowes or HomeDepot. We are trying to duplicate this. Thanks.
Hi Scott! I found mine at Lowes but you can always buy a bigger sheet and have them all cut to the same width, I’ve seen that done too.