Last Sunday I went in search of double welt cord. I’m in the middle of reupholstering a chair, and I was seeking this specialty trim to hide some staples. I read somewhere that you need double welt cord to make double welt cord trim, but I have since learned this is not necessarily the case. My day started like this:

As I browsed the local fabric store, I realized they had no such thing as double welt cord in stock. Wrenching my hands, wondering what to do, nervously pacing back and forth, I paused next to the upholstery supplies. It was then I heard from behind me, “Whatcha looking for Hun?” I thought at first this was some bored sales clerk, but then I realized by the way she said ‘Hun’ she was, in fact, a well intentioned stranger. A stranger I shall dub ‘Saint Seamstress’ for reasons which will be revealed.
I’m prone to striking up conversations with strangers, so I related my dilemma, wholly expecting her to shrug her shoulders, say “I dunno” and walk away. When I explained I was in the middle of reupholstering a chair, and I needed to trim the edges to hide the staples, she immediately said, “Have you thought of using gimp?” Gimp? Gimp! I knew I had encountered someone who speaks upholstery language!
So I tackled her to the ground and made her answer all my questions under extreme duress.
I kid. No, I explained I didn’t want to use gimp this time, like with this bench, rather I wanted that polished double welt cord look you see on high end upholstered chairs. I started rattling off questions and then I hit the jackpot.

This lovely woman stood there unshaken at my brazen unending questions. “Am I insane to reupholster with velvet? Velvet is so fussy and temperamental, always prone to puckering. Is velvet really the diva of fabrics?” “How do I round this corner with my piping (pointing to the old smoke scented foam seat)?” Where can I find inexpensive quality foam in this town?” And the ultimate question: “How do you make double welt cord trim?”
She shared all her secrets, tips and tricks with a smile on her face. Don’t you love when experienced professionals share their knowledge with the world for freeeeeeee? Why didn’t I get her name? Why didn’t I give her my name? Why didn’t I snap a photo of us with my phone for me to remember this blessed soul for all eternity (and then of course add to this post)? Why God whyyyyyyy????
Sewing Your Own Double Welt Cord
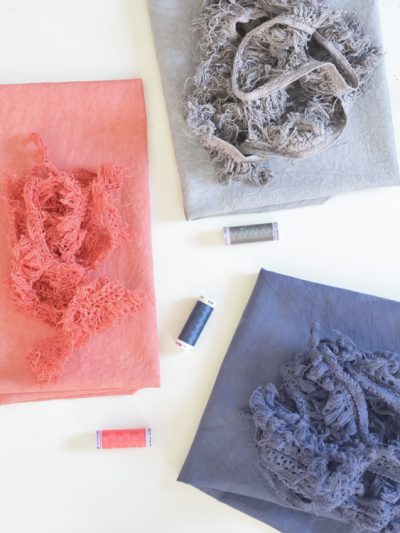
Start by cutting your fabric on the bias, then sewing it together to form one long strip. Make sure you have about 2” width of fabric to form your cord casing. ‘On the bias’ simply means cutting ‘on the diagonal’ so that your threads criss-cross and therefore bend around the turns better. At least, that’s my amateur definition. Someone much smarter than me with more experience figured that out a long time ago in a galaxy far far away.

With your zipper foot, sew your first layer of piping by stitching your cord into your casing.

Switch your machine foot back to standard, and insert a second layer of cord. Flip over and pin your fabric to hold your second cord in place.

Sew slowly right over the top.

Trim your excess fabric when done.
Just be careful and sew reaaaaallly slow or you’ll end up with one of these:

Like I did.
Anyway, long story short, I made my own double welt cord trim.
![]()
Saint Seamstress, wherever you are, I love you. I want to adopt you into my family and make my stroganoff meatballs just for you. I love you because you didn’t look at me cross-eyed when I wanted to reupholster my chair in velvet. Because you taught me where to buy cheaper quality foam in my town, and how to DIY me some double welt cord trim. And most importantly, you reminded me of the kindness of strangers. All is right in my universe.
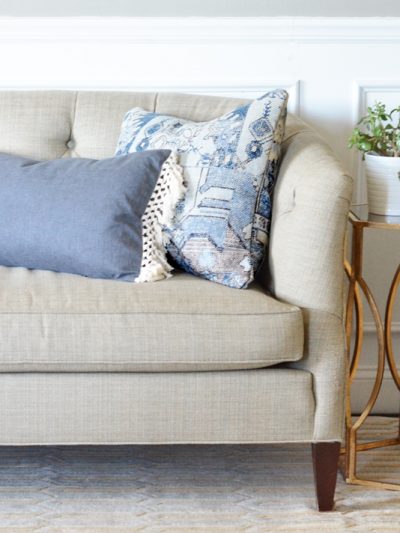
If you’re still scratching your head, wondering what the heck I’m talking about or why would I torture myself in this double welt endeavor, it’s because I’m trying to finish this cane chair.

And as all upholsterers know, double welt cord is the major forgiver of sins. Otherwise known as the trick used to cover up all those unsightly staples and tacks so you can make your chair pretty once more.
If I lost you at piping, or if this entire post about double welt cord just scares the hell out of you, do what Linda did and pay someone else to do it for you. That works too.
Questions to ponder:
Is velvet really the diva of fabrics? How would you attach the double welt to this chair, with fabric glue or hot glue? Is Christmas really three days away? Help please.
.

“I have always depended on the kindness of strangers.” ;) ;) I love it when people are kind enough to take time from their busy day and help a person out. How cool to get some free sewing advice! From the sneek peak, I can tell your chair is going to look fab!! Good luck getting it done before Christmas. I have some baking I need to be working on…in between the preschool Christmas pageant, cleaning, and somehow I got roped into babysitting my niece today. ?? :)
Merry Christmas!
OHHH!! You met the Christmas Sewing angel. I’ve heard of her but have never actually seen her. It’s ok that you didn’t get a picture, she doesn’t show up in pics anyway. It would have just looked like you were standing there with your arm around nothing and smiling. I would have believed you though.
I did this for a chair of mine out of desperation, and lack of funds. I ran out of piping, and used nice wide twine to keep going. You annot tell, and all those Tutes that say you need a special preser foot/fancy dancy machine were wrong! Good for you for taking the leap and doing it! I knw your chai will be a beaut. :-)
A sewing angel smiled down on you. Such a blessing.
Thank Heaven for Upholstery Angels. :-) The double welt looks very, very nice. :-) I’m not a velvet girl but this chair looks beautiful.
Dixie
How funny to think that someone else is like me!
Shoppers at Joann’s beware I too ask complete stranger’s questions! I have had responses from that look of WHAT? To one gal that was so helpful and happy to answer my question. I love it when people share.
I’m in the middle of making six sets of drapery panels for my great room and reupholstering my wing chair. I’m hosting brunch and dinner on Xmas eve day and having dinner on Xmas!!! And I think I have time to read blogs! LOL
Thanks for sharing, Becky
PS. You do hot glue it on.
What do you do on a Christmas Day? You thank God that our Savior was born. You study his Word and praise hiim for his sacrifice on the cross for our sins, and teach your children and others of his love.
Thank you for the tutorial the cording scares the heck out of me and that is why I have a chair that is ripped apart and not recovered. When I took the chair apart the original double cording was attached with teeny tiny nails that were wedged between the two roll of the cording. You must need some sort of small punch to help you pound the tiny tacks in between the cording?
Great post and oh so timely as I am about to embark on the reupholstery of 4 Louis style dining room chairs. I’m a wee bit terrified since I’ve never reupholstered anything more than a standard chair seat in my life but after pulling off the fabric from the first chair, there’s no turning back! I was considering velvet for these chairs but got worried about using velvet in the dining room so now I’m debating a faux leather or sunbrella type fabric both for durability. Either way the project will involve some double welt cording so I’ve been googling like mad to figure out how to make it. I thought I needed a double welt foot for my sewing machine until now! Thanks. A little worries there are lots of broken needles in my future working with these heavier fabrics but I’ve got to try!
That looks fabulous! Thanks for the tutorial for my future projects. Now… what’s Gimp?
You DID it! Looks great!
But between you and me…I still subscribe to the $5.00 upholstery shop down the road theory. And FWIW, Hot glue it on…perhaps there is a special hot glue stick for upholstery…but I just used regular ole hot glue. You don’t need to tack it on with nails…although that is what they did before hot glue.
Have a wonderful and merry Christmas…cannot wait to see the finished project!!
This is looking gorgeous! What a fantastic job you’re doing!!
Thank you for sharing this info. I am so excited as I have wondered how to do this as well. Once you see how it is made you really is very simple.
That is fabulous. Just from that little peek, I can see the chair is looking lovely. Go you for giving it a try yourself.
(Despite reading about the definition of bias cutting many times I still kind of dont get it. I sort of understand the concept but how do I know Im really on the bias?)
I’m not a professional but I’ve done a lot of reupholstering. You attach the double welt by stapling in between the two cords. Then run a tiny bead of fabric glue between them and press the cords together to hide the staples.
Looks great! I got lost at flipping over the second cording, though. Wanna’ come hold my hand and show me? :)
I always talk to people when at the fabric store! I love it when we care exchange ideas and I always want to know what project they are working on. I also am often mistaken as a salesperson…makes me giggle a little.
As for attaching it…could you stitch down through the center of the two pipings and attach to the fabric on the chair? They make those “C” shaped needles that I use to repair floor rugs which may make it easier?? Then maybe glue the outsides? I would be one to try hot glue as it dries so fast but…maybe the fabric glue would be better? Good Luck and I so hope you post how you did it…Merry Christmas!!
Are you going to show us the final project and how you reupholstered this chair? I currently have a chair that looks similar from what I can tell in the photos that is sitting in my bedroom screaming to be spruced up. It’s pretty hideous right now.
I loved your blog before, but I’m REALLY hooked now that I know you are a person who can get this excited about double welt cord and the kindness of strangers! Bless you! :)
Yay for nice people ! Your chair is looking really good. One tip for velvet is be sure to have all pieces going in the same direction because of the nap (there’s a light direction and a dark one, kind of like a rug) I would probably use fabric glue but velvet does suck it up. I just did a velvet table runner and used fabric glue for the trim. If you ever have a sewing question, you can always ask me !
I love the double welt. Great tutorial too. I can’t wait to try it. I would use either a hot glue gun or fabric tac fabric glue (I find it’s the only fabric glue that actually attaches fabric instantly). I can’t wait to see the finished product. Great kindness of strangers story too.
I took two semesters of upholstery at a local technical school and the instructor told us to use hot glue to attach double welt cord or gimp to upholstery. You can see my pride and joy project at
http://tallgrassdesign.blogspot.com/2010/12/hearth-room-mini-makeover-part-2.html
she sounds like an amazing woman! your hero, swoon!
So I read your entire post, but I have to tell you, I haven’t a clue what you’re talking about. Re-upholstering a chair seems to me to be some mystical talent that some people are born into the universe with. In other words, I’m petrified by the very thought.
But, your double welt cord looks awesome! And thank you for reminding us to pay it forward with whatever talents we might have (and we now all now that upholstery is not one of mine!).
Happy holidays!
I feel so inadequate! All of you are these seamstress divas and then there’s me ;( I’m truly glad there are people that have that talent.
I’m with you about nice people…I love to meet random people and start visiting with them. I always go home and tell my husband about my new friends ;)
Your chair is going to be fabulous and yes I’m jealous! HA
Merry Christmas!
Quite simply, you are my she-ro!
You should have originally sewn the cording to that top piece of fabric, then attached the back fabric using a strip of flexible upholstery tacks, called PliGrip…I LOVE this stuff! I too had to cover up staples on my first project with hot-glued cording, then I found the tutorial below. I just finished my THIRD couch recovering….I’m kinda obsessed. Especially when I find a killer deal on fabric (PS, Sorelle Eleganti is an upholstery fabric shop in American Canyon….TONS of $5/yd fabric, and great informative shop keepers. Love them!)
http://www.upholstery-supplies-guide.com/pli-grip.html
Love the idea! Just FYI, I heard the same about velvet 5 years ago when I was in the market for 2 matching sofas for my family room. I couldn’t get past the desire for velvet, and purchased them both anyway. They are the best furniture purchase I have ever made! We have 2 kids that sit and jump and lie down on these every day, they have spilled juice and everything else imaginable on them, and they still look brand new! You will love it!
I would say that silk, or its cheaper and tawdry stepsister, satin, is the grand diva of fabrics. I myself like velvet.
Oh and hot glue.
Be merry and bright.
Everything I know about DIY upholstering I learned from Youtube.com….and now, from Kate. Thanks for the primer. It’ll come in handy.
Merry Christmas!
I do uphoslstery and on my blog I upholstered a wicker chair with double welt (I had space inbetween my two cords – there are many different styles you can use depending on the project). http://americkim.blogspot.com/2010/11/diy-how-to-reupholster-wicker-chair.html. I always hot glue trim. It goes where there is the most traffic on the chair so it needs to be firmly in place – not to mention the hot glue helps the fabric adhere better as well.
Just curious; aren’t you busy with the Christmas preparations?!? Argh — I swamped with cookies, wrapping, etc…would love to be upholstering!
Cheers!
YOU are a saint, Ms. Kate! This is JUST what I needed to read. I have 2 french chairs that I got for $40 (i know!) and a headboard I am reupholstering for my daughter and have been stuck trying to find out how to do the double welt thing. I went to a sewing store thinking there was a special presser foot and spent 30 minutes talking to a woman who tried to help me out with an idea of how to do it with a regular foot. This is EXACTLY what I need to finish my chairs and headboard. Thank you! And I think your supposed to use hot glue according to an upholsterer friend of mine. Good luck!
Thanks so much for sharing all this info….so appreciated! It all looks really wonderful and yes, I love it when strangers help out, like the lady who generously offered me some advice in the supermarket the other day….generous beyong words!
Lesley
x
What luck!! I wonder if you could do something similar to edge a rug? I am thinking of making my own rugs but have wondered what I could edge them with. i think this might work!! Thanks so much for sharing. I hope you got the Sewing Angels contact info!! Merry Christmas!
Love this post. I’m in town for Christmas this week so I went to your often praised SVDP thrift store and now I see how you get your great pieces for not much $$. Today everything in the store is 40% off. Too bad I can’t get it back to VA with me :)
You lost me at “sew”, hehe.
I cannot wait to see the finished piece. I am determined to learn some basic upholstery in the beginning of the new year. Once I asked at the register in Joann if they offered any upholstery type classes, and she just sort of scoffed, “I think that is just for professionals.” I’m more convinced now that I’m going to learn…don’t tell me I can’t learn something new!
Thanks for the info. I’ve been wondering if I needed a special foot to make double cording – now I’ll try it with just a zipper foot and regular foot! Merry Christmas. Sally
Sequin fabric has got to be the worst. I’ve sewn every type of fabric but this one. I have visions of piles of broken needles. Too bad. I saw a gorgeous sequin apron (for a special occasion, of course!) but I am not yet ready to tackle it.
i liked Ginny’s idea of stapling between the cords and then pushing the 2 cords together and gluing to hide the staples. that would be incredibly tailored!! again, LOVE your blog!!
Yeah, I learned this a few months ago as well from an upholstery book. I had no idea it was so simple!
OMG yesterday the photography lesson and today welting. You are centsational! I am a self-taught seamstress–I sew almost everything in my home–but I have been searching forever about welting. Every time I inquired I was told that you had to purchase a special attachment to do it. I was willing to buy the attachment but never could find it.
Thank you. Thank you. Thank you. I can do this.
I also want to say that I hate gimp. But as an alternative to double welting I have been adding gimp and then following with nail head trim on top of the gimp. If you just put the hail heads some of the staples stick out.
Thanks, and also thanks for taking a peek at my blog-in-progress.
Yes, velvet is the diva of all fabrics (except for slippery satin maybe) yes Christmas is three days away (well two now) (yikes) and isn’t it wonderful that in this day and age two strangers can stand and have a lovely and civil conversation without expectations of personal gain or fear for personal safety. Your chair is going to be beautiful. Love, love, love your blog.
Well done Ducky! Looks great already.
Merry Christmas and best of everything in 2011.
From my stepmother who is an upholsteress: you would fold the sewn edge under the cords and attach it with tiny brad nails in the seam between the two cords or you can glue it very carefully
Hey! What a great post. This is a good to know (and now I won’t be so scared from chairs like that in salvage shops).
E
So amazing, especially during the Christmas season when people are VERY prone to stress and grumpiness, to find someone that is so helpful and giving! That double welt cord looks so professional and pretty! I am definitely gonna use that stuff…err…make that stuff when I reupholster a couple chairs that are waiting for me! Great job Kate! :)
i luv your blog…..i need a new sewing machine and had no clue which one to buy. thanks for the recommendation and all great tips and tutorials.
Thanks pal, Tee
Thank you Kate, and thank you to Saint Seamstress – I have always wondered how to make double cord, such an elegant finish. I have no application for it, but you never know!
I love the sisterhood of information like this~
@sarah and others –
Many electric staple guns can drive brads – just buy the brads made for that model gun.
If you do a lot of upholstery and wood projects, an electric or pneumatic (requires a compressor) brad driver might make sense.
For occasional use, there are brad nail drivers that hold the brad in place magnetically, and have a plunger that drives the brad into the wood when you whack the driver with a hammer.
http://www.acehardware.com/product/index.jsp?productId=1288962&kw=brad&origkw=brad&searchId=51144307064
Love velvet! Just ordered some regular and crushed for a sofa/loveseat I am about to reupholster!!
What did you use to attach the double welt cord to the chair?
Love this post. The kindness of strangers is so surprising to us nowadays, I wish it wasn’t so. I also met a lurvely lady in Walmart a few weeks ago and she taught me all about sewing machines and buying them from the Goodwill instead of Walmart. She was so sweet and ended up telling me her life story. Oh the craziness of us stay at home mamas – we’ll talk to anybody!
Hi. Thanks for the post. I have a question for you though, about double welting. How did you join up the 2 ends of the double welting once you went all the way around your chair back? I have been struggling with this problem for months and have not been able to find any good answers.
thanks!
Hi Melissa! I hope I can explain this properly in writing. What you do is when you start applying the welting, leave an inch or so unattached to the chair frame, open up the stitching so that you have some of the fabric that you can wrap around the other end of the welting. Ideally when you sew the strips you leave an inch or so of the fabric strip before you start sewing but you can pick it apart if it’s too late for that. Attach it all around but when you get to where you started from, don’t fully attach that end either. Then what you do is make sure the 2 cords will touch, trim away any excess cord and then take your fabric from the beginning, turn the edge over to hide where it’s cut and then wrap the fabric around the end piece so that the extra fabric from the beginning hides the unfinished end of the piping & then secure it to the fram. I hope this explanation makes sense!
So let’s see the finished chair!!!
You just answered a 5 year old question for me! I didn’t know double welt cord existed-as an interior designer by trade I’m kind o ashamed to say that, but I didn’t. I’ve been wanting to add welting to a chair I picked up at a yard sale fo 5 bucks. It has a beautiful royal blue velvet fabric, but whoever upholstered it left foam and staples showing at the edges. So, it seems that double welt cord would be just the thing I’m looking for! Any ideas on where I can actually by this? I don’t have a sewing machine (nor would I know how to make it if I did), so I would definitely prefer to buy it already made. If you have any suggestions I would truly appeciate it! Thanks a bunch!
Great tutorial! It came in handy on a recent project & I referenced it in my most recent post at http://www.atelierbe.com/1/post/2011/11/annie-sloan-louis-chairs.html
Thanks!
jess
Aha HA!!! A year after your last comment and here I am saying this is just what I needed! I have a lovely velvet covered chair that cost me ‘nada’ and I was painstakingly wondering what to do with it when I reach this step! Perfect! …Actually, come to think of it.. I have 2 more chairs that I have hidden away in my “later” storage space wanted to re-do and this will make my life so much more pleasant! And these chairs will shine! Thank you !
And one day later (Nov. 18th) I am looking at your instructions as I am pondering making my own double cording for a cornice board. What size cording do you suggest?
Thanks!
Bonnie
Hi Bonnie, I forget what size I used and I’m all out right now…. hmmm. The best description of width I can think of is a small green pea, does that sound crazy? I’ll take a peek when I’m at the fabric store this weekend to get you a ‘legitimate’ size!
Kate
Absolutely awesome. Followed your instructions and it worked perfectly…and no broken needles! Also instead of buying welt cord from haberdashery shops I bought some blind cord from the local hardware store! Much cheaper and easier to get…and worked a treat. Not sure though if there might be long term problems doing this! Now I just need to figure out how to attach it to the chair.
awesome Not sure though how to finish or attach the cord to finish the chair.
HI Osiris, I ended up using hot glue, it worked great!
Kate
OMG! I just stumbled across this via pinterest and then searching your blog…I re-upolstered a chair last year and was searching for the appropriate cord to finish it which I could not find. And now I also have a sewing machine (which seriously was the best purchase of my 29 years. I love her) so I can make this cord and have the chair finished!!! Thank you!! (And I know that you will not think I am weird for being so excited about this post).
Not weird Elisabeth,that’s fantastic!
Kate
First of all I love velvet. I made an angora mohair (knock off from Mitchell Gold) bench. Custom made, by me, bought the legs and made the frame with a miter saw, and Kreg pocket hole kit. We call our bench, Teddy. My BFF (the greatest designer in the world) saw him regal like Theodore, we call him Teddy. It’s uber $$$$$$ Brunschwig and Fils Mohair retails ~ 400 per yard. Got 4 yards on ebay for 120.00
I had my local upholster shop cover the buttons and it is soooooo luxurious. If you love Velvet go up a notch to Mohair. It’s the old style velvet that they used to use in upscale train cars. I also would get a compressor (got mine at Target for 60 bucks) and my Darling hubby got me a stapler on Amazon for my birthday. I am a self taught upholsterer girls via all Utube videos. The funny thing is I have asked 4 shops can I intern to learn the ” tricks of the trade” they all say NO!!!!! So thank god for someone passing along their insight and knowledge. God bless you!!!! I forgot how to make double trim, thanks for this awesome tutorial.
Was wandering around your blog today – and I don’t know if you will see this question on this older post, but can you share what the wonderful stranger told you about inexpensive foam? the prices for foam at Joann and Hobby Lobby in my area are just CRAZY!!! I was thinking of buying inexpensive egg crate matresses and doubling them, but that is still only about 2 1/2 – 3 inches thick….
if you want to e-mail the info, I am at julieaspear AT gmail DOT com.
or maybe you covered this in another post, still hunting….
THANKS CG!!!!!
p.s. I am a fool for velvet also – I would cover my world in velvet if possible!!!
My Mom always said that was because my astrological sign is Cancer, and we love “soft stuff”!!!
pray for me! I’m going to the store in search for double welt cording and I sure hope I meet someone that can show me what to do!!
Hi, just read all this and I have a tip too. I suppose you know of the “Sewing with Nancy” programs on PBS or her website of the same name. If you look there she has televised how to determine exactly how to know what fabric allowance is needed and how to do it for the two “ends” to meet. I’d explain it to you guys but I’ll have to first find it for myself…it’s somewhere in the tomes of my VCR recording. I’ll also plug it into my browser and see if it comes up, her method is very unique and simple. BTW, I liked the fabric for the upholstered headboard, I wanted velvet by I like the texture of yours even better, now if I could just find the right color and shade.
Because of you, my husband thinks I am wonderful!! Thank you for the post.