Last year I remodeled my home office, and it’s been a genuine pleasure working in this pretty and personalized space. For the longest time, I was loving the sofa that sat on one wall, but over time, paperwork started piling up, and I reasoned I needed a more practical solution if I really was going to run a business from home. So I made some changes!
I started with a credenza I found at (where else?) a thrift store. A few weeks ago, I stumbled across this piece for $40 dollars ~ it was the perfect size measuring six feet long and mostly solid wood, but the finish was all wrong wrong wrong. First, the top is laminate, and all scratched up. Ick. Second, the base was a different shade of honey tone wood that clashed in my eyes. Usually, I like mid century modern style furniture in a medium stain, but this two-tone finish just wasn’t working for me, so I gave it a makeover to suit my space.
Before:

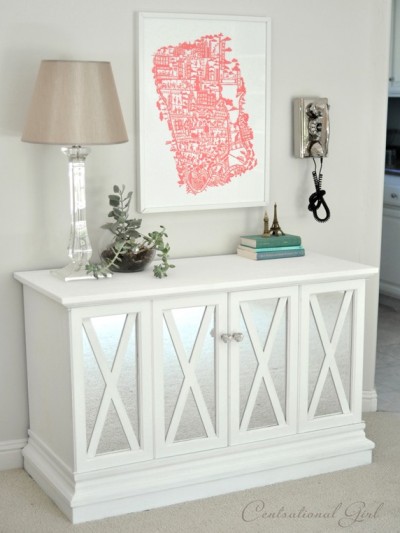
After:

Slate blue/gray paint + sleek contemporary pulls + geometric pattern on top = perfect!

Some of you are probably wondering how the heck did I get such straight painted lines on this piece? Well, it was tricky, but I’ll tell ya how!
First, let’s start at the beginning. Scratched laminate top? No.Thank.You. Slick surfaces never deter me, no sirreee! My favey fave oil based primer to the rescue to cling baby cling!
Here you can see I’m painting the laminate shelf on the inside. Remember oh yes, oh yes oh yes you can paint laminate! All it takes is the right kind of primer. This is it! (You can also use the Zinsser oil based shellac in the red can too.) I roll mine on with a foam roller for speedy coverage, then follow it up with a brush to keep it all even.

Note the can says "No sanding" but people ask me all the time if that is for real. Peeps, it is fo real. BUT, that said, I always ‘scuff up’ my piece with a coarse sanding pad beforehand. Call me crazy but something inside my little brain tells me that scuffed up surface will hold the primer better, but I could just be living in a bubble. Anyway, I do scuff up my piece then I wipe it down. I don’t degloss or sand away the varnish, I simply scuff it up. Got it ? Repeat after me. Scuff scuff scuff. OK, that’s enough.
.
 Moving on. Knowing I was going to paint it dark, I gave the surface a quick coat of deep tint (water based) primer over the white oil based Zinsser. Why the dark primer? Because it ensures your dark paint will stay true to its color.
It’s not absolutely necessary when painting a piece dark, but I find you risk having to add an extra coat or two or three of paint, so I use a coat of dark primer cause it’s a guarantee I can get one coat coverage with my dark paint. And I can’t find a dark tint oil based primer that’s as good as Zinsser, I’m still searching.
..
Next, I thought I was sooooo smart to paint the rough pattern in white, lay painter’s tape on top, then add the gray paint over the top of that. No. Bad idea. I ended up with horribly uneven lines and had to do the pattern all over again. And I know better! I had such an easy time painting stripes on this dresser so I should have followed that technique. Sadly, I didn’t and the lines were just awful.
First attempt:

This I have learned. The best way to get a straight stripe line on a flat surface is to peel up the painter’s tape while the latex paint is still somewhat wet! Don’t wait until it’s completely dry. Peel it off slowly when it’s wet. Reason being, once latex paint dries, it peels, and it takes little pieces of the stripe with it.
Therefore, I declare, wet paint is good for making stripes!

Aaaaaaand this is how I should have done the geometric pattern in the first place, but hey, this gal’s still learning. This is also a great time to mention that the final paint color on this piece is a slate blue/gray color by True Value called ‘Avoidance’. It ended up being a little bluer and less charcoal than I really wanted, but oh well. It still works!
**Please note, I have no experience painting stripes on textured walls. For those of you who have, please feel free to chime in and share your secrets for perfect stripes on textured walls. We’re listening!
I gave this credenza two coats of Polycrylic in Gloss for added sheen. Me likey shiny. Pur-tay! I also added some contemporary hardware I found at True Value.

This piece would have been just okay refinished in gray, but the addition of the sleek nickel pulls and the white geometric pattern makes it something special and one-of-a kind. I love it! It’s so nice to have all this storage for paperwork and now at last practical has met pretty.

Practical, meet pretty. Pretty, meet practical. I think you’ll get along swell.
True Value Blog Squad legalese: “I was one of the bloggers selected by True Value to work on the DIY Squad. I have been compensated for my time commitment to the program as well as my writing about my experience. I have also been compensated for the materials needed for my DIY project. However, my opinions are entirely my own and I have not been paid to publish positive comments.”
I’ll show you the entire office soon!
.

You are the master of disguise! Beautiful job! I love your blog and all the magic you do to things!
Shelley
wow! What a beautiful piece! I can’t wait to see the entire room! Thanks for sharing!
Love this! We have one of these credenzas sitting in our garage collecting dust (I kid you not!) The only difference with ours, is that the top has 4 square tiles embedded on each end – and they are hideous! I’d love to redo ours – any suggestions on what to do with the tile?
Centsational Girl, you did it again! Fabulous!!
Beautiful!!!
Wow, that doesn’t even look like the same piece of furniture. What a beautiful job. And thanks for all the tips!
Wow, beautiful!
Oh wow, I love it. There is no end to your talent :)
I am drooling! I need to find something to copy your credenza ASAP! I think the blue color is absolute perfection and I never would have thought to add the geometric detail on the top. Love IT!
This is adorable!! And I am keeping this post for future reference when I plan to paint this ugly laminate desk I have stowed away!!!
What a great piece of furniture! I love the color and the lines you put on it, job well done. I bet that is such a great storage piece for your office.
That looks great! I really like the pattern you did on top. Way to go :)
It came out great! You have such a good eye for seeing the potential in pieces!
Wow, what a great piece in a great color!
Great job!! It is amazing how a coat of paint and some TLC can make such a difference :)
Beautiful!!
Unbelievable – when I saw the original piece I thought “no way” – laminate! Impossible. And the stripes are fabulous!
Wow looks great!! What type of Polycrylic do you use that doesnt turn the white yellow? I have bought two different brands of non-yellowing poly now and both yellowed!!!
PS…I love the color!!
That is beautiful! You have such great ideas, I will definitely refer to you when redoing my office…or anything in my house really!
Oh, you’re just too good! This is amazing and I did not know you could paint slicky surfaces! You’re the smartest one too! :) This piece is gorgeous and you deserve lots of gold stars!! :)
Be a sweetie,
Shelia ;)
looks amazing. i love the color and the design.
I love your ideas and this credenza! Gorgeous!
Perfect Stripes on textured walls. Okay I have done this many times and people can’t believe my stripes on our textured walls.
Wish I had pics for you…but hopefully I am able to be clear.
Say it was your blue you had there and you wanted a white stripe. First paint the wall blue. Let fully dry. Then place your tape down. Now here is the trick. Paint over the edge of the tape BLUE again -and REALLY get it in there. What happens is the blue goes into the (my technical term) bubbles or gaps where the tape is not adhering to the walls. Now let that dry a bit (not super much we wait about an hour or get sidetracked and make it two). Lastly paint your white stripe. We sometimes score the tape if we are worried about how many coats we had to do (only had to do this once when we had a dramatic color change). Sometimes there may be a tiny bit of touch up, but really if you get the original color in there good. You should be a-okay.
That’s it!
Great Job Kate! I do that all the time, try something that I think will be easier and then mess it up and have to start all over. I guess that’s just our creative mind working over time :)
Oh, now this is such a difference. Gorgeous, Kate.
Wow! Fabulous job. I never would have thought of doing the geometric pattern on top. Super cute! :)
That’s awesome. I love the design on top. Adds the right touch!
For textured walls – I have them and I can do stripes with no problem. HOW? Let’s say you’re painting gray and yellow stripes. First, you paint the gray. Then you tape over the areas you want to tape off… then you paint the gray paint OVER the tape, to “seal” it. Let it dry, then paint over it with the yellow paint. Pull the tape off when still wet.. your line will be PERFECT. It feels sooo good to peel that tape back once you’ve done all the painting and waiting…
Kate, I just started reading your website regularly and you are so talented! You really have a good eye for things! Looking forward to the office reveal!
More info can be found here: http://whatthevita.wordpress.com/2009/11/09/walk-the-line/
GORGEOUS!!!
I love it! The color is beautiful and the white deco detail is a perfect accent!
This looks so amazing! Great job again! I’m about to paint some bookshelves and I keep re-reading your old posts about painting things! I’m getting a little nervous :)
You are amazing!!! The design and color is gorgeous!
I love the clean and shiny lines. Most of my home is pretty traditional when it gets down to it, but I love a modern element now and then (especially in my finished basement). The mixture of the mid-century lines with the modern geometric pattern and color choices is right on point to make it a perfect piece! Thanks for sharing and I can’t wait to see the rest of the office.
Enjoy your day!
Laura of Finding Home
Where do you find the time!?!?! I love this credenza! Who knew the stripe painting could be so easy! I love the hardware too. I really enjoy your blog and seeing all of your projects! It inspires me to get going on my projects (once we move in December). Thank you for being truly inspiring and centsational!
Beautiful! Love the color.
While I love your creativity, I think this piece looks like a big metal file cabinet now. Maybe my monitor isn’t showing the color correctly? Either way, props to you for the painted design. I would probably never even attempt something like that, and you pulled it off perfectly!
Looks fab, of course! I tried a similar Greek pattern on my daughter’s drapes…but it got lost. I hope to pick it up somewhere else.
I’ve striped slightly textured walls….the key was Frog Tape, and pressing the edges down really well. I also brush my paint along the tape line with a brush, stencil style, before rolling over it. That helps to seal for a clean edge.
It looks fantastic! I really love the addition of the white geometric pattern. Definitely ups the wow factor. I love those pulls, too. They work for almost any setting. I love the difference hardware can make for such a small investment of time and money.
I am curious though, if most of the piece was solid wood, why didn’t you opt to refinish it? I know it’s more time consuming, but just curious. Either way, I think it looks great.
http://ourhumbleabowed.wordpress.com/2010/09/28/how-to-refinish-a-bookshelf/
I love the detailing on the top — brilliant!
I love this credenza…I’m in need of one and have been scouring my local thrift stores, alas nothing has been the right price. Great job on the stripes…the second time that is!
Beautiful piece. Your painted furniture always looks so smooth!!! I love it.
Lovely!!! Perfecto lines :)
Question for ya though…Do you have issues with “tacky” paint??
I need some tips as my latest transformation is all tacky :( Been drying for near 7 weeks :(
Thought I left enough dry time between coats…
S.O.S if you please ;)
TIA
Becky
This is a wonderful before and after. I’m going to have to give that primer a try. I have a little that I started sanding… had a blast for the first 10 minutes, then decided it was too much work to get all that shellac off. Thought I was going to have to break out the power sander, but now I know I don’t have to. Thanks Kate.
:)
ButterYum
So beautiful! I love that you’re not afraid to choose a color and pattern to spice things up. It makes me want to reconsider some not to pretty items in my own home…!
A couple of gals mentioned using the other color paint to make straight lines when painting on a texture. I’ve done it, it works, another option is using paintable caulking. I like doing this because it is fast and I think it is fun to use a caulking gun.
I love it! I can’t wait to start on another piece, maybe I’ll even try some stripes!
I love that pop of pink with the grey . Very pretty.
Amazing!! The color, the geometric stripe on top, the pulls! I am bookmarking this tutorial because I have some laminate pieces that I would love to paint, so thanks! The magenta and blue look so great together!! And you’re right, a very practical storage solution.
I remember seeing this credenza at St. Vincent’s. You really did transform it. You have an amazing eye for seeing the potential in a piece
You are incredibly talented! I wish I had the chutzpah to take on these projects. Just curious, do you also paint the inside of these pieces?
Dang you! Now I want one for myself. The search is on!
Bee-uuuu-teeee-fuuuul!!!!! Love it, girl! Those sliding doors are eerily similar to the one I wrote you about. I think I’m just going to do a pre-dated post that will fit way back in my archives and send you the link, rather than just emailing a bunch of photos.
You did a fabulous job! You should be proud of yourself and Zinsser should be sending you some royalties. ;)
It’s gorgeous, Kate. What a transformation! It’s got such a nice sleek, modern look to it now. I love the raspberry accents with it – the lamp and the pretty roses. Very lovely!
This is incredible! I love the pattern you made on the top – amazing! I feel inspired after reading this :)
I’ve painted stripes on textured walls! http://housebella.wordpress.com/2010/10/02/painting-contrast-stripes/
Textured walls are a pain to paint, but painting stripes *really* isn’t that bad. Promise.
My tricks of the trade for texture is to JAM DOWN THAT TAPE. Literally. To paint the contrast stripes (link above) we put up the painters tape, made sure it was truly straight (did the “across the room eyeball test”), and then added some SERIOUS pressure over the tape to make sure it was adhered as tightly as humanly possible. Then, when we painted, we painted straight on. No angles, no edging brushes, straight on. It gives the paint less opportunity to slide under the tape. We let the first coat dry, then peeled the tape off while the second coat was still wet. Used latex paint, worked like a charm. No problems.
I have also heard of people with textured walls putting a bit of caulking underneath the tape to seal it even closer to the wall. I wasn’t willing to deal with that cleanup, so I just pushed the tape down like the dickens. Worked for me!
I loooooove this! Way to go!
Thanks so much to everyone for the tips on painting stripes on textured walls, you are all awesome!!
This has me thinking about my own desk. Yours turned out very sophisticated yet fun!
How totally Fun!!!
Stripes on textured walls: I learned this trick when I worked in a museum painting walls and wall murals. The best way to get a crisp line is to first paint your lighter color on the whole wall and let dry for an appropriate amount of time (or, if you’re painting stripes over an existing paint job, make sure you have the original paint color, at least enough for touch ups.) Lay out your tape lines, then seal the edges of the tape with your original color using a brush or roller. Let dry, then paint your contrasting stripe color over that, and remove the tape while the paint is still a bit wet. Not only will you get a clean stripe, but the only seepage you’ll get is in the original paint color, and should blend in just fine.
Dang, girl. You never cease to amaze me!
Outstanding job. Especially the top. So that’s how you get stripes to work out. I always wait for the paint to dry. Who knew?
Great Job!! It looks fantastic!!
The detail really does make the piece.
SaWEET! I bet it looks fabulous in your room. I love the mid-century modern done in fun twists like this.
Gorgeous! Love the pattern on the top!
Aloha. I didn’t read all 65 comments so forgive me if this was already mentioned. A trick I use when painting stripes is after the tape is placed I roll over it with clear glaze to seal it. After that is dry then I paint the color on top and remove tape while it’s still wet. Hope that helps (if you have extra clear glaze). Have a great day and keep up the great work. You are an inspiration to all of us!
LOVE this! So creative! I love refurbing furniture! This geometric shape definitely made quite an impact! I am working on my office right now too. Fun!
xoxo,
Brandi Nell
Hey, Kate! I hereby crown you Queen of furniture painting. You do such a great job, my dear. I love this piece!!!
I LOVE, LOVE, LOVE how you painted the top of it! I’ve been meaning to do something similar for a while….just haven’t had the nerve! Yours looks fantastic! you may just have inspired me to refinish a piece for my bedroom!
Get out of town with your bad self. That is amazing. I love the top of it. So great.
Another gorg-e-ous project-and thanks for sharing the details about what not to do too!
Goodness, that looks incredible!! I am suffering from severe credenza envy ..;-)
i love 100% of everything that you do!!! but i don’t care for those pulls on that piece!!
That looks fantastic! I’m curious as to how you manage the drawers and sliding doors and interior surfaces. I have a wooden filing cabinet that I’d like to paint, and I haven’t figured out how far in to go, or whether I should tape the edges where I’d like to stop. I’ve also painted a couple of dressers, and the edges of the drawers are chipping where they come in contact with the rest of the dresser when closed. If you have any advice on those things I’d be hugely grateful!
Did you put two coats of the gloss on the whole piece or just the top? And did you spray the gloss or paint brush it on?
The graphic on top makes the piece! Great job!
Love your credenza and I think the pulls really work with it.
Beautiful makeover!
I have textured walls and I’ve done stripes and other patterns many times with success. The key is to apply a thin coat of caulk (the paintable kind that dries clear) over the edges of your tape (I just use my fingers). This keeps the paint from leaking underneath every time – I promise it works! I’ve tried every brand of painters tape out there and they have all failed me. Caulk is the only surefire way that I’ve found to get those nice crisp edges on textured walls.
Gorgeous!!! Thank you so much for all the tips! I’ve been dying to pick up some random furniture to play with at goodwill and these painting tips are absolutely perfect!
Just found your blog today — kind of in love! =)
xoxo
That is so dang purtee! Love love love – I need somthing like that for the never ending piles of paperwork in my house! Thanks for the inspiration … now where did I put that foam roller …
Wow… very inspirational!
Totally gorge!!!! Love the color.
LOOOOOOVE it!!! Awesome!
LOVE this! Your makeovers are so impressive.
I have a laminate desk and I have been debating on whether to paint it or not….you have definitely inspired me to actually do it. I LOVE what you did with this piece! The white striped detail really makes it.
That is utterly gorgeous! How do you do it? You do one thing better than the next! Really.
i was wondering where you found the pulls. were they spendy?
tx and great job.
I am crazy over that color. Absolutely gorgeous. And geometric touch on the top is perfect with the mid-century lines of that piece. Awesome….as always.
why do you live all the way out on the West Coast ??????
Wow, awesome work once again.
Wow, you’ve done it again. You’ve got vision, great technique, and great style. Brava!
Fantastic tutorial. Nice design on the credenza. Who knew that old credenza could be transformed into a beauty. Well done.
Oh so pretty! I love shiney too! The color is wonderful! I love this mix of retro and modern- You go girl!
Oh, Kate. You KNOW what you’re doing! This looks absolutely wonderful!
Beautiful!! This is crazy but I seriously had the idea to the same pattern on the top of a dresser but didn’t do it bc I thought it would be too much work. You have reinspired me!!! Thank you!!
OHHHH-AHHHH. how lovely! My local Habitat Restore has a piece very similar to this and I have been resisting the urge to buy it and rejuvenate it. The urge now is even stronger! I may breakdown and get it! Awesome finish to your project! Can’t wait to see the whole office. I am about to be redoing mine so more inspiration and ideas would be great! :-) ~Iris~ P.S. New blogger in need of some blog love! LOL! Thanks!
This looks fabulous!!! I would never be gutsy enough to do blue, nevermind the top. It looks amazing!
Great job, love what you did with the piece!
the best way to get perfect lines using tape is to brush matte medium (avail at art supply stores) over the lines first then cover with your regular paint. it fills in the areas where it might bleed through and dries completely clear.
Pitch perfect, as always…I’m just impressed at the vision for that piece because I certainly wouldn’t have seen it! I just hate when my paint color doesn’t turn out quite right…but it is still absolutely lovely…now I am just dying to put that top pattern on something…*anything*!
http://loveallthingsbrightandbeautiful.blogspot.com
Beautiful job! It’s not my style, but I still appreciate how fabulous it looks!
Love it. Thanks for all the good ideas.
ARE YOU KIDDING ME?! 40 bucks?!?!?!?!
Not fair-but I’m happy for you :)
First off, after I ‘discovered’ your blog, I have spray painted everything in my house including, a buffet, 5 chairs, kitchen table and a door. All verym very lovely–in fact I think I have permanent colored nasal hairs now (I wear a mask but it always seeps in) and I love it!
But here’s my stupid question:
How in the world do you get all your thrift shop furniture home? My hubby works 9-5 so that’s out for his help, we have a truck but it’s yucky and stays home most of the time, weekends are a nightmare at thrift shops, and last even if I were to take the old truck ‘thrift shopping’I can never get ANYONE to help me at the thrift stores to move furniture to the car! Maybe I am just not aggressive enough.
Give us the skinny on furniture thrifting!
Wow, thanks for answering my question about if you had posted about the credenza, I wouldn’t have wanted to miss this! AMAZING, girl. Love the gloss, the color, the pattern on top and the pulls…all of it! Great, just great! Janell
That piece is day-and-night better! I love the pattern on top and the color choice. Perfection, as always, my friend.
ok, found it! so great! i must have missed it in my facebook feed, but i did read all your thoughts on painting stripes! my mother-in-law’s hand-me-down chest is so getting striped… after her visit this weekend :) thanks!!
Thank you for linking it for me, and if I had just done a little digging I could have found it just two days prior – LOL I found a similar credenza at a thrift store, but they had taken two smaller cabinets, combined and put a top on that was TOO long (like a foot too long) and it was laminate, I wasn’t going to attempt to cut it :) I am going to keep looking, this post has inspired me!
As always, stunning and inspiring!
Very late here but I absolutely love this! I already had a crush on your office but this is fab.
Unrelated question – do you find you use your inspiration board a lot? I have a big one over the credenza in my office but so rarely put anything up there. Im wondering if its because its behind me when Im sitting down in there or maybe Im just not an inspiration board person?
I love this! That looks amazing!!! Great job : ) Thank you for sharing!
once it warms here in chicago {when I can paint in the garage without losing fingers to frostbite}…I am using this as inspiration for my husbands’ highboy from his childhood.
esp. heart the detail on top.
and the color.
swoon.
Hello! I loved your credenza top design so much that I lovingly copied it for my end table before and after. Gave you a shout out in my post. Hope you like it. You are such a great inspiration. Thanks!
http://tallglassofh2o.blogspot.com/2010/07/before-and-after-craigslist-bookshelf.html
Ooops! Here’s the correct link.
http://tallglassofh2o.blogspot.com/2010/12/thrifted-table-before-after.html
Gorgeous…and gives me much inspiration for transforming thrifty finds into “new” modern pieces. Just wanted to share a tip for painting straight lines that I just used. Works like a charm!!! Never had lines so straight and crisp. Paint your base color, let dry, and then tape your edge or your design. Then paint the edge of the tape with your base color, lightly (this creates a seal so that bleed through can’t occur). Let dry. Then paint with the edge color that you want (or design color) with a thick coat, then immediately pull off the tape. Line should be crisp with no bleed through at all if you’ve done it right. Should work pretty well on textured walls too :)
And just a shout out to your old post on grasscloth paper. We had a wall in our ranch that was covered in dull white grasscloth. We painted it a butter yellow (acutual color is Biltmore Bluff by Sherwin Williams) and it is GORGEOUS!!!! Loving the texture so much that we bought grasscloth for the opposite wall and will be hanging it and painting to match!
Thanks for all the transformations that inspire!
Love love love this! I’d never thought to paint over yukky looking laminate before. Thank you for the inspiration and the confidence to fix something like this up if I see it in a second hand store.
Wow! You are a genius and an inspiration!! I actually found an abandoned desk by the dumpster ..and i brought it to my office…its a wood piece in good condition and I was wondering what to do with it..but I think i know what I should do with it! =) Your table is sooOOOOoo BEAUTIFUL!!!
I have fallen in love w/ your blog! <3 <3 <3
I just loved this. You are so smart for how you spruced up the piece. I love your sense of style too because that is totally something I would put in my office. It has a shabby chic feel to it but honestly is much more chic. Love the color and geometric lines.
I looove this makeover! It is amazing just like everything else on your blog!!! I think I am going to recreate it on something!
You asked about painting stripes on textured walls, I have a tutorial on my blog. Here it is: http://fabulousified.blogspot.com/2012/01/perfectly-painted-stripes.html
What a great transformation! The pulls totally make the whole unit. Great job!
Wow… I love how you got the line detail on the top. You are good!
In an attempt to lower the level of fumes, I’ve been using Zinsser Water based primer. Do you think it would work on a laminate project, or must it be an oil based primer?
Hi Gerean, I’m with you on the fumes issue, but I haven’t found a low VOC primer that sticks as well to laminates as the oil based Zinsser. I’d use the low VOC or water based for walls or other projects, but not for laminate. Although it does say (I believe) that it works on laminate but I still hesitate knowing the Cover Stain is a sure thing.
Kate
@Gerean, Ihave used the Zinsser water based cover stain primer on laminate and works great. Plus, it is 4 or 5 dollars cheaper at Lowe’s
I also did not sand down the laminate and painted within a couple of days. No issues.
Sorry, not the cover stain it is Zinsser Bull’s Eye 123 Primer. (sorry for all the comments too. I should really think of what I am saying and post in one) =)
I just inherited a credenza and am planning on painting it. It too, has laminate. I am going to use mine as a T.V. console. Do you feel it has held up well?
Yes very well Megan! I use the top everyday, no scratches or peeling paint, looks great! The key is that bonding primer!
Kate
I found some night stands on Craigslist a few weeks ago for $25 and wanted them desperately. Luckily, a couple of weeks later the price was slashed to $15 each. Needless to say, I went and got a pair and while I was there got a lovely mirror and headboard (I’m doing a complete DIY makeover since we are moving and I want some new interesting things in my bedroom). I followed your steps to a tee. The only thing I would advise if you haven’t already that I’ve seen is to get a couple of foam rollers and wear gloves at all times with the oil based paint. I had a terrible time getting it off my hands and if it wasn’t for my step dad I still would have the white paint on my hands. I still haven’t got all of it out of the laundry room sink. Other than that minor issue I have a marvelous looking set of nightstands and a mirror. I plan on using the same technique with my chest of drawers to have a matching set. :) Thank you!
you said you wanted tips on painting stripes on textured walls.i have VERRRY textured walls and painted my sons nursery and i have gotten soooo many compliments. i think the key is GREAT quality tape! first i painted the walls one color. then got a laser level and taped. my husbands an engineer so he was able to give me an exact messurment that we were suppose to do for each stripe. so we did he laser and then taped. it took us a long time but if you skimp on this step and do it fast or dont do it at all, all your hard work will go down the drain! then we painted with a roller brush. push hard on the roller otherwise you will get pockets in the texture that didnt get any color in it. and then on the edge of the stripes, take a flat edge brush and run it along the edge of the tape. let everything dry for a DAY! then paint everything over again. we ended up having to do this step three times because like i said, our walls are SUPER textured. when you are done painting the last time, let it dry for about an hour and then take the tape off. we had very little touch ups to make but you will have some you have to do. i ended up using a cheapy paintbrush you can get for $.99 thats used for water colors. we then did the touch ups with that, that had bled through the tape. that only took me about 15 minutes because we had been careful the whole way through. this project could have taken me about 3 days but because i was pregnant, i did take a lot longer. i hope that helped!
oh and take the tape of SLOW! otherwise you will peal some of the paint off because you did multi layers.
Quick tip for painting stripes on textured walls (and I use the same technique regardless of the texture) – After taping everything off, roll one coat of the color you have under the tape, over the tape. Then continue with your other color like you normally would. What this does is ensures that if any paint seeps under the tape, it is the color that is already under there. Works wonders :)
Hi Tessa that is a GREAT trick I always do that now, thanks for sharing!
Kate
Just a quick tip for dealing with oil-based paint: I discovered on accident that I had bought oil based paint for a project recently (oops – that’s what happens when you try to get in and out of True Value in under three minutes on your way to pick someone up at the airport). I discovered this when I went to wash my hands and brush, and realized I was covered in paint, it wouldn’t come off at all, and I had no mineral water or paint thinner, and everything I touched was just getting oil based white paint everywhere… So I turned to my personal miracle solution: Goo-Gone. It’s was amazing. Just a little squirt, and I got all of the paint of my hands with NO scrubbing, and a little squirt into my brush, and a little work with my fingers, and I just rinsed it right out! So, if you get stuck with paint and no mineral water, give it a shot :)
Great tip Marika, will try it!
Kate
did you use a stencil or pattern for the detail on top, or did you just freehand (or free-tape) it? I want to do this on an ikea dresser i bought, but i’m nervous that it won’t be symmetrical and it’ll drive me insane.
Hi Tina, I used painter’s tape!
Are the roses real? If not, where did you buy them? Thanks! Ann
Have you ever painted wicker chairs? I tried using paint paint a few years ago, even tho the chair is always on the front porch (under a roof) it is chipping off, the paint I mean. Spray paint the problem? Or is it just painting wicker period? Any advice before I try it again?
Hi Georgie, you know what, I haven’t painted wicker but I know there are paints designed for it, and I know RustOleum makes a few. Have you tried theirs? So sorry you’re having issues.
The geometric design looks fabulous….really makes the piece. What a transformation! Love your site and I’ll continue drop by often. =)
Hi Kate!
I adore your blog, and I am writing hoping you can help with a question.
I’ve used your tutorials very successfully for over a year now, specifically when it comes to painting furniture. By far the trickiest part for me has been getting an even finish with the Polycrylic. On almost every piece, I’ve used Satin finish but a current client wants a high gloss finish, and I am about to cry because I cannot get the Poly to play nicely!
I’ve tried semi-gloss and gloss in the can, and both are streaky. I’m using good brushes. I’m painting inside my finished basement so the temperature is relatively moderated.
Have you had any issues with the Poly, and can you offer any tips at all on what might be going wrong?
Thanks in advance,
Anne