Awhile back, it was my grand idea idea to spruce up the living room walls with some traditional panel and picture frame wainscoting – in fact, it was my specific “please, oh please, honey can we please” request for Mother’s Day. I managed to catch the Mister at a weak moment, and with a little charm and a lot of begging, he agreed to take on this project.
We started our adventures in wainscoting back in May, and over the course of several weekends, we were finally able to finish, whew ! (dramatically swiping hand across brow) There was some intense labor involved, some minor curse words muttered, a few panel do overs, plenty of cutting, a whole lotta caulking and spackling, and then there was all that priming and painting.
I need to sit down, that was exhausting.
Here’s the first peek:

Our Step-by-Step on Panel and Picture Frame Wainscoting, A Quick Recap:
1) Measure measure measure your walls and map the entire project out with precision !
2) Turn power off, then extend all electrical sockets with spacers so that they are flush with your paneling. It’s a good idea to consult with an electrician if you’re nervous in the slightest about working with electrical outlets – safety first !

3) Cut panels to fit length of wall, 4) trim socket holes with jig saw, and adhere panels to wall with adhesive. Reinforce with brad nails.
 * Many previously asked why we bothered with paneling at all, and simply painted the wall below the chair rail white. We could have done that, however the walls are not perfectly smooth and we wanted the obvious textural difference. Since the panels were only $12 each, and Lowes cuts them for free, we went for the smooth surface below contrasted with the textured wall above.
Another added bonus was the panels that we talked about here were only 1/8 inch thick which meant we didn’t have to remove our baseboard – the panels set right on top !
5) Measure and cut all chair rail and picture frames with compound miter saw, then tack to wall.

6) Fill all seams with caulk and 7) Fill all picture frame corners with spackling.  Spackle caulk caulk spackle. Spaukle cack speckle cackle spauk.
Say that fast ten times.
I’d like to formally thank the folks over at DAP for sending me a brand new caulking gun and a few tubes of their silicone latex paintable caulk. It totally rocks, and they’re not paying me to say that. Now if only someone could invent a similar product for crow’s feet, heh heh.
We used the caulk between the seams because it is flexible and won’t crack if the walls slightly shift over time. When caulking, run a damp rag or wet finger over your bead and get it as smooth as possible because you can’t sand it once it’s dry, but you can paint it.
Alternatively, for the gaps in the picture frames, we used spackling because it is sandable, unlike caulk, and we wanted to be able to sand the edges of the frames to remove any small flecks or imperfections before painting.
8. Prime all panels, chair rail and picture frames. Of course, you have the option to pre-prime your trim before you tack it to the wall, or purchase pre-primed trim from your local home improvement store. Finish it all off with gloss white paint !
Panels, frames and baseboard before:

Caulk + Spackle + Primer + Paint = Perfect !

Cool, huh ? That barely noticeable trace of the seam that remains will be hidden by the window panels, so we’re officially patting ourselves on the back for cleverly hiding the seams behind fabric.
Window Walls:
We chose to do lower long rectangles below the windowsills, at the same height from the baseboard as the other taller picture frames.


We used a piece of our picture frame molding cut to 4” as our spacer all around the room to ensure even placement above the baseboard and below the chair rail.

The width of the picture frames varies around the room, but we kept it all proportionate by keeping the spacing between the frames even and at the same height around the space.
Before:

After:

Pitter patter goes my heart.
We’re pretty proud of our DIY wainscoting, and loving that we saved a bundle of cash doing it ourselves. It took us about 20 hours spread out over several weekends to cover this 15’ x 15’ foot room.
Total cost breakdown:
- 8 flat panels measuring 1/8” x 4’ x 8′ at $12, cut to size (free cuts at Lowes) ($96)
- 6 pieces 8’ chair rail at $5 each ($30)
- 18 pieces picture frame molding at $5 each ($90)
- Adhesive, caulk (complimentary from DAP), and spackling ($8)
- Primer (already in supply closet)
- Spacers ($3)
- 1 quart ‘Swiss Coffee’ gloss white paint $12
Total cost for 15’ x 15’ room: $239 (without tax)
Yeeeeeess !
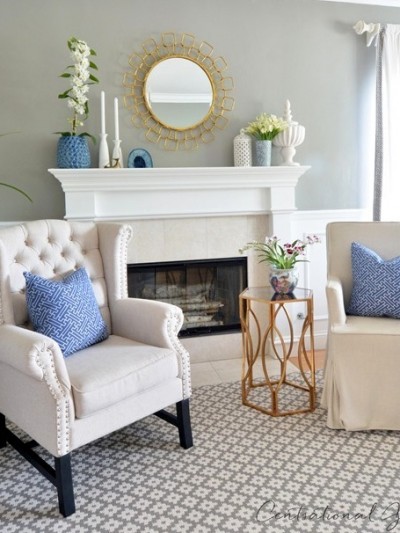
Coming soon, I’ll show you the room slightly more put together with some furnishings and accessories. The space is far from ‘done’ but it’s looking closer and closer to my inspiration photos every day.
.

It looks beautiful!
Bravo!
Awesome job of planning and executing…… now we’ll wait patiently for MORE CG styling as you re fill the room… can’t wait to see the finished ( ior even the “almost”
Hope your Fourth was truly as beautiful as it looked !
i love this. i am pretty jealous! i wonder what my land lord woud say if i did this….haha! great job!
It looks totally fabulous. Worth all the paint/spackle/caulk tongue twisters! Love that soft color combo… hope to see more soon!
That is SO amazing……
Honestly, you are a big reason, why I started my own blog and am embarking on my own “centsational” redo of our music and guest room.
You rock!
Gorgeous!!!!! I’ve been dying to get up the courage to try this myself! Can’t wait to see it all styled up. :)
P.S. How behind in the times am I? I’m just noticing your new blog look and I love it!
Looking great Kate! I can’t wait to see the final product!
LOVE it! It looks fantastic! Can’t wait to see how you accessorize it!
Mahvelous!!! :) I love “Swiss Coffee”–that’s a great color. You did a great job with the recap. It’s all lookin’ good so far!
oh shoot that looks good! I love that you did it for “real” instead of just painting white under a chair rail. This looks so much more finished. By the way, have you said what color you used on the top part of the walls? I love it.
I love it! It came out delovely and delightful!
Fantastic work! I would LOVE to do that in our dining room – so I will certainly be coming back to your tutorial. Thanks for this awesome info!!
You did an incredible job! Kudos and a little envy!
Definitely sending this entry to my mom. Maybe her and my dad will get inspired~
You guys did such a terrific job! Gives it so much character. Just wondering, do you use the same color trim paint throughout your whole house? So hard to determine where to stop and start if I wanted to change tones.
it looks amazing! a lot of hard and it is paying off!
caulk is the best invention….
cannot wait to see it all come together
Just beautiful, Kate!
Wow- that is amazing! I thought I was doing good just painting the walls when we moved in ;)
That is fanstastic- I need to get me some power tools!!!!!!!!!! Great job, it’s beautiful.
Loving that…it looks great. Good job.
Wowza! Looks amazing! :) Great job!
What a beautiful job, I absolutely love it! It was totally worth your time and effort because it looks fantastic. :)
It looks SO good! Impressive!!!!
That is beautiful! Thanks for sharing your steps, time commitment and cost breakdown. Your room is going to look wonderful.
It looks great! You did a great job. It was nice of the mister to give it to you for Mother’s Day… It will last much longer than flowers :-)
Wow, what an ambious project! It came out beautiful, well worth the time and effort. I’m excited to see how the blue and gold medley turns out. I would typically think of blue and silver paired together, but I bet the gold is going to look divine- especially judging by your inspiration photos.
Kate, it looks fantastic! I totally know the pain you went through since I did my DR earlier last year, but it’s SO worth it. I’m glad I didn’t have to add the panels too, that might have put me over the edge.
Such a great way to get an updated and classic look. Great job!
Fabulous job, friend!!! This has been one of my favorite DIY projects in my home, too. It’s so classy and yet, cheerful. : )
Oh, my goodness! It’s gawgeous!
Be a sweetie,
shelia ;)
Gorgeous!!!! Ya’ll did a great job and it adds such a custom touch to your home!
Really fabulous job!! I can only imagine how happy you are to have this project stamped “complete”! Would you do it again? Janell
You crack me up with your “… spackle caulk caulk spackle spaukle cack speckle cackle spauk…”
I am truly laughing out loud!!
Your room is gorgeous! It really changes to entire look of the room!
Oh wow! You did a top notch job, and I love the fact that you used the panels for contrast.
Looks fabulous!! Wonderful work! :)
NIIIIICE!~
LOVE it! I may just do that in my mother’s home… she was just complaining about her plain walls.
What a task! It looks so beautiful, now go enjoy it!
It’s beautiful! Thank you so much for sharing the cost break down; it really puts it all into perspective. I am now thinking I can tackle this in my “office/craft room”, well as soon as we can clear the clutter. :)
I love it! I would love to have panelled walls like that, but such panels and moulds are not sold in my country at all. Were I live people paint their walls or put stuca on it. We don’t even have wallpaper stores. Can’t buy wallpaper anywhere here :)
That looks fabulous! You guys did an amazing job.
It looks amazing!! Love it.
Very nice!Another midas touch! Blisss!:-)
You never cease to amaze. I cannot believe you did that for $239! You should have your own t.v. show. :)
I love it! I can see why you chose the panels underneath the chair rail…we have white painted, but I think the transition to the smoother finish makes it stand out more. Love the color on the upper half. We were looking for a similar color for our daughter’s bedroom.
It looks so so good! And very expensive looking! I love the feeling of completing a project.
XO
Lenore
The cheater way, of course, is to skip the paneling and do everything else. Once it’s painted differently (color and type of paint) it’s hard to tell to the novice.
Exceptional! What an awesome job. Thanks for sharing!
gorgeous redo!
It is beautiful! (I love the finale pic with the hearts – well done.)
Your step by step photos make it look easy, but I know it’s a lot of hard work.
Now I’m trying to think of a room in my new house that I can do wainscotting too!
Kudos to you and your wonderful husband who agreed to a major project.
I’m in love! It turned out absolutely amazing — I can’t stop looking at your pictures! I’m hoping to do this in our living room someday. Just beautiful!!
WOW That is seriously amazing!! You guys should go into a side business :) You should be very proud! It looks stunning and totally professional! Great job and pats on the back!
~Terrell @ FrouFrouDecor~
FFFFFFAAAAAAAAAAAAAAABBBULLOOOOUSSS! Best mother’s day present ever {besides you having to help} but OMGosh it’s GORGEOUS! I love the wall color too – a bluish/gray/green? – not sure but would love to know the name!
I gush about a lot of rooms, seriously, I love all the creativity, but this is just SO beautiful. kudos to you!! =)
Wow! It is absolutely beautiful. I am so jealous :)
I have been looking forward to seeing how this project turned out and you did not disappoint :) Thanks for the step by step and the cost breakdown too. I often wondered how much it might be to do this and I am amazed at the impact with such a reasonable cost. Beautiful work!!
Looks amazing!! And so reasonable!
This looks fantastic!!! We are thinking of doing something veeeeeery similar in our house, so this is wonderful inspiration!
I love the idea of 1/8″ panels and not having to rip apart the base board to make it all work. Pure genius! What a great idea.
So elegant! I also thought about doing something similar in my dining room, or at least the chair rail. Hope one day I will be brave enough to try it.
I spy a spray painted white chandy in the background of that miter saw picture! =) Is that the one you are going to use in this room? Cannot wait to see the final result!
Awesome! I want to do this in our family room but with a board and batten treatment. We have really textured walls, so I would have to used the sheets like you did. Now I just need to convince DH we need to do it!
Thanks for the inspiration,
Laura
Hi!
I don’t have a website, but I love your blog! I too use heirloom white for many projects :). I love the paneling and wanted to know what color your LR is? Thanks!
I am following you for a long time and love your site very much. I wanted to make the same things but in my country to find out boards, paintings and the such things is too hard. I liked to make renovations too. You always inspire to me, thank you so much.
Aygun
Just in the nick of time! I sat in front of this computer 2 days ago in reading your first wainscoting entry and making my list. I’m doing my upstairs hallway very soon!
Thanks a million!
Oh my how big of a difference that makes! It turned out beautiful and I love the paint color you used on the wall above. Awesome job and thanks for sharing!
Isnt it amazing how a little trim can pull a whole room together? I cant wait to start putting some up in our new little home!
I’m very impressed! Looks fabulous! Can hardly wait to see the finished room.
Um wow, its amazing. Love it.
You make it look easy!
First off I have to say THANK YOU! THANK YOU! THANK YOU!
I saw those receptacle spacers somewhere else online and I haven’t been able to find them. I went to lowes, HD, and Ace and asked for them and they thought I was crazy and had no idea what I was talking about! I need them for our bathroom.
What store did you get them at?
It looks so good. I’ve been wanting to do my dining room for a couple years now. I’m re-inspired by yours!
Fantastic!!!!
this looks gorgeous!! and only makes me want to do it in our new house even more!!
I really want to try this at home, but all of my rooms flow together and I just don’t know how to make it work. Hmmm. I’ll have to think about this one for a while. And I’ll just have to find a place to get it done. Maybe in my daughter’s room that I’m about to redo.
I LOVE this look so much! You did such a great job! I can’t believe you did all that for so cheap. :o)
Hi!
Beautiful room! i am in process of doing my living room like this. walls painted starting wainscoting now.
what colour paint did you use (the blue/gry/green paint)?
Thanks,
Tracey
Hi! Just a silly question.. did you use semi or high gloss white paint? I am painting wood wainscoting in my house and I just cannot decide! Thankssss :)
Hello – What a great idea! My questions are – how high was the finished project? Is there a rule to the correct finished height? Is that a different piece of moulding shape that sits on the base board or is it the same shape as the inner framing moulding? Lastly – any ideas on how to finished corner joinings if you need to wrap around an area? Many thanks for all the ideas and suggestions.
I love your room! What color is on the wall?
i love this.. thank you so much for sharing.. you have totally inspired me. What color is the paint on the walls? THANK YOU!
Unbelevibale how well-written and informative this was.
Beautiful room! Do you mind sharing the color of paint you used for the top portion of the wall?
You did great. This is what I’m trying to get done in my living room too. Thanks for sharing.
I’ve been looking all over your website, and I know others have asked you this, but I just can’t seem to find the answer! What color are the walls in your foyer? The stairs and entryway look absolutely gorgeous and I’m interested in doing the same to my home! Thanks so much for the inspiration.
Hi Patty! I’ve listed all the colors in my home here!
http://www.centsationalgirl.com/2010/09/the-paint-on-my-walls/
Kate
My dad and I are doing this in my dining room right now. How did you finish the edges by the window? We are feeling lost as to how to make the edge look nice without framing in the window. Thanks for your inspiration!
Hi Katrina, we simply stopped the edges at the window ledge knowing that the silk window panels cover the edges and to leave room for an inside mount shade, but if you want to round the corners, take a peek at how I did it in this post:
http://www.centsationalgirl.com/2012/01/installing-beadboard-wallpaper/
Good luck with your project!
Kate
Beautiful! Just saw this from Pinterest :)
We used your blog to do wainscoting in our dining room!! We are down to one of the last steps – picture moulding – and are finding it impossible to find. Checked Lowes, Home Depot, Michael’s, custom framing stores. No one has any idea where to find it. Any advice? Love your blog :-)
Hi Liz, I found mine at Lowes – check the preprimed decorative molding section!
I found the electric receptacle spacers at my local Home Depot, in the electrical aisle. (Lowes didn’t have them.)