A few weeks ago, I picked up a mini ottoman at a thrift store for $5 dollars. It was a beige patterned fabric that was ordinary, but nothing special. I dreamed of a perch in my office for my feet and my morning coffee, so I set my sights on reupholstering it in a pale blue silky fabric.
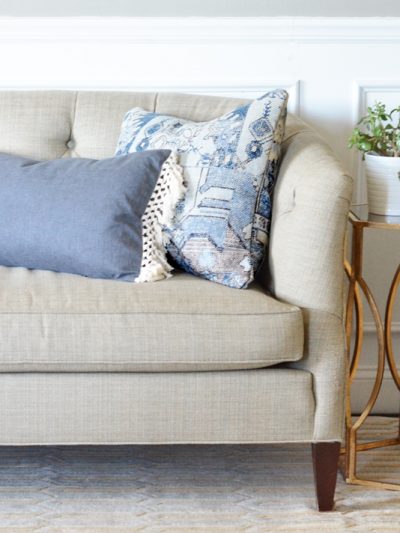
Here’s a peek at the end result:

Here’s a look at what it was before I reupholstered it:

Deconstructed:
We all know the best way to understand how an object functions is to literally take it apart. So that’s what I did – I ripped the bottom off of the ottoman and examined its insides to understand how to construct one in the first place. I wasn’t surprised by what I found. A basic ottoman is made with very basic construction.
Take a look inside:

As you can see, it would not be complicated to build a basic ottoman. All you would need is some plywood or particle board, cut to the shape you want, and screwed together to form a box or rectangle. Add some basic supports for stabilization and for placement of your ottoman’s feet. If you desire tufting, drill some holes in the top.
Here’s a look at the threaded anchor where the feet fit:

In addition to the basic box, purchase some bun or tapered feet from a home improvement store, and stain or paint them to the color you choose. Fit a double ended threaded bolt inside the feet, then screw the feet into the anchor in the frame of your ottoman.

The final step would be to add a piece of foam to the top, and secure it with batting for a comfortable seat.
Re-Tufted:
My task was to make a new slipcover for my existing ottoman, and tuft it with four new fabric covered buttons. Making a slipcover for a small ottoman is a simple sew project.
I didn’t find any fabric within my price range at the fabric store, so I used a pale silky blue window panel that I purchased from Target for $15. In my opinion, 84 inches of fabric from a window panel for $15 dollars is a pretty good deal. (“Girls in white dresses with blue satin sashes…” Bonus points if you can name that scene.)
I used pins to attach my sides to each other, inside out, and then sewed them together.


Now would be a very good time to say this: I. Hate. Sewing. Corners. I can’t stand them. I can never get them right. My three dimensional corners are never perfect. So I am soliciting help from true sewers out there with real and genuine skills. What is the secret to perfect corners ? Help !
Even with my rudimentary sewing skills, I was able to form a fitted slipcover, and continue with my project. I stapled my new slipcover to the ottoman, and then tufted the top with some new fabric covered buttons.

The supplies you need to tuft a bench or ottoman are make-to-match button kits, long decorator needles, twine or strong thread (I use embroidery thread), and a staple gun. I had some needles and thread leftover from this tufted bench project.

Follow the instructions on the button kits to make your own buttons:

Tufting a bench or ottoman is not complicated, as long as your holes are pre-drilled. Here’s a picture of what the predrilled holes looked like inside my ottoman before I recovered it.

Notice how the buttons are secured with the use of thin twine and a staple gun. I use the same technique by threading my decorator needle, pushing up the needle through the top, threading my fabric covered button, pushing the needle back down through the hole, pulling taught, and securing with a staple gun. For a tutorial in greater detail on tufting, see this post on my tufted bench.
Here’s an up close look at my tufting job. Pay no attention to my less than perfect corner. Grrrrrr.

After all of that work, I have a new perch for my morning coffee.

So, who wants to come over for coffee and make fun of my bad corners?

I love what you did.
I have a few items up for some DIY Reuph. but I'm so stinkin' lazy sometimes. Hopefully within the year I will finish one.
I hate corners too. I tried to redo my chair cushions oh what a pain. The scene is "Sound of Music" and Maria dancing with the curtains and kids. Love that Movie!!
Turned out beautiful! Great job!
Gorgeous!!! I love it! What pretty fabric! This looks amazing, awesome job!
I'm glad you've posted this, I have six (yes, six!) ottomans that I've used for a coffee table that need a new face lift and it's been years since I've touched a sewing machine.
Julie Andrews in "Sounds of Music"…Christopher Plummer was dreamy in that movie :)
Beautiful work as always!
PS: I'll have a macchiato with a double shot please!
Beautiful fabric and great job on the reupholstery!
That fabric is beautiful, you did a great job (as always)!!
How did those buttons go , when I did the same thing the buttons were the toughest part and securing them too .
The ottoman looks great .
Wow! I wish I could do stuff like that!!!
Can you do a cafe mocha? B/c I'll be right over. :) And I won't make fun of your corners b/c they are way better than mine would ever be.
"Sound of Music," in Maria's bedroom with the kids during the storm. ;) My family took the SOM tour in Austria b/c my sister and I wanted to so badly. SO cool! :)
You are so fabulous! I look forward to checking your blog daily! Thanks for showing me that my home can look amazing on a budget! I can't wait to see your finished library!
Oh this turned out wonderfully! You are just the smartest one and you're so young! :) How do you do all you do? I'm amazed at all your projects! Wish I had the energy and know how! :)
Be a sweetie,
Shelia :)
Hitting up Target for fabric is a fabulous idea. I am in the planning stages for my office, so I am finding all of these posts to be oh-so-inspirational! Much like Maria in Sound of Music :-)
Beautiful!
Sorry, I can't give you any advice on corners, which by the way… don't be so hard on yourself. I think you did a great job!
Once again, your blog inspires me. Such a wonderful tutorial with gorgeous results!
I'll come over for coffee, but I think your corners look fine {of course, I'm not the best at sewing either}. I love the size of it for your office and how it works with the rest of the room. Simple, straight lines, the tufted buttons add just the right touch – I love it!
This looks fantastic! I love your approach – I always rip apart perfectly good things, too. It really is the best way to figure something out – it just makes my husband think I'm crazy!
it is awesome. My corners would have way more bad! (ok… 've just started sewing…) The fabric is great!
I would take the free coffee, black, please!
What perfect fabric! I'm falling more in love with your office with each post!
This is amazing! I am amazed! Can I come over tomorrow?
Gorgeous fabric, by the way
I have a rule that I only ever sew straight lines! But this looks really wonderful. I am busy eying up fabric from curtains, sheets, and shower curtains, to make a 72" tablecloth for one of those little Ballard-type tables.
I'm trying very hard not to jump up and down like Rumpelstiltskin in envy of your office. But you put the hard work in, you deserve it!
It looks great! The ottoman compliments your office well. You got to love thrift stores!
I will come over for coffee. I will not make fun of your ottoman. Looks Gorgeous!
I have a ottoman that I want to recover as well. I purchased it for 50 cents at a yard sale last summer. A few questions for you: Did you cut out a square top and 4 pieces for the sides and attach them all together? I am a very beginner sewer so any advice would be apreciated. Thanks a bunch.
Absolutely fantastic! I love that you share the details. You're awesome :-)
OMG i have been looking for the perfect ottoman. you have inspired me to make one instead! let's hope i can get to this project!
thanks for posting this DIY!
xoxo
anh
http://anhesty.blogspot.com
wow, that is lovely!! :)
This is fantastic! I wish the thrift stores around here offered up half of the great finds you've come across- and for amazing prices!
I'm with you on the corners. They are maddening! Great job, though, LOVE it! I am so inspired!!
I would love to have a cup of coffee while I luxuriated in that beauty. And I wouldn't even make fun of the corners – especially considering the edges on the last stool I re-upholstered…but we won't talk about that. ;)
Scotchgard that fabric! because bad spills shouldn't happen to good fabric
For rounded corners, sew very square corners.
For very square corners, sew rounded corners.
I would gladly come for coffee if I lived closer, but would never make fun of your corners! I have my own "corner issues." :)
Kate, love that you thought outside the box with the curtain from target. The shade of blue you chose goes wonderful with your room. how much did the project cost? I love when you tell us that juicy tidbit.
That is AMAZING! I love it – such a cute piece to have in your living room.
Hey there IC, the total cost of the project was $26 dollars. $5 for the ottoman, $15 for the fabric, and $6 for the button covers. $26 dollars for my lovely little perch !
It looks amazing! Great job.
Thanks so much for this, especially that interior photo, it really wouldn't be hard to make one, like you said!
Sure it looks easy…but you lost me when you brought out the sewing machine!!
You rock!!
I'll be there at 7am tomorrow morning, but, can I have TEA instead? :)
LOVE the ottoman, and I think the corners are lovely.
I think that your seams look just dandy. I have issues with the corners too. Pretty color as well.
I have an ottoman that is just awaiting fabric, but I don't think that it is going to be as easy as you make it look!
Simply beautiful. The fabric you chose goes perfect with your sofa.
". . . Snowflakes that stay on my nose and eyelashes. . . " Hard to beat Rodgers and Hammerstein for a singable song, isn't it?
I'm a redhead, and I always wanted to BE Maria. I'm not Catholic, but that never really mattered to me. Surely they'd accept me into the novitiate if they were just going to throw me out when I became such a problem, right?
A couple of years ago I got to see Christopher Plummer onstage in Inherit the Wind. I thought I would hyperventilate. Captain von Trapp right before my very eyes!
Love your ottoman. I have a real thing for ottomans, and I think yours is beautiful, corners and all.
I love the ottoman – but even more then that I love your colors. I decided a couple of weeks ago that I am going in a whole new direction and am waiting for my new chocolate brown coverlet to arrive so I can put my bedroom together. Seeing your space makes me know how great it's going to look when I'm done. Love your site! Kris
Really nice!! So elegant. Thanks for the step by step on this project. I am feeling brave!
This is a perfect post for me. I had been wanting to create some "seats" for my finished basement area. I love your "look inside." perfect for me. And if I ever figure out how to get perfect corners, I'll let you know. :)
Thanks Abbie
WOW, Simply cannot choose the faves out of these pillows! I am a pillow FREAK!!! These have to be the most beautiful pillows I have seen! They are gorgeous… and you can see the beautiful art/craftsmanship and LOVE in all of them!
Thank YOU for sharing!!!
Dana
I love it! Tufting is awesome.
My couch matches the "before" fabric! I didn't know until the close up!
A great and fabulously price ottoman "are a few of my favorite things"…Love the makeover (and your office looks awesome) and LOVE the movie.
It is just lovely! I love it! I never knew about the button making kit, now to start looking for an ottoman! :)
I saw one at the thrift store just like the before picture a couple of days ago… I’m praying it’s still there when I go tomorrow!!!! PLEASE BE THERE! Thanks for the inspiration!
can you help me figure out , what would look good with this old chair i found at a thrift store? I would love to reupholster it.
The secret to clean corners is to ‘bow’ the top piece. For an ottoman, cut the top square, leaving 1/2 inch excess for the seam. Then, starting at the corner, cut off 1/2 and inch and taper to nothing at the middle. The top piece should end up with bowed sides instead of being straight and square. You may also want to add a little extra batting at the corners.
A few of my favorite things from Sound of Music (during the storm, Maria is singing to the children). Your pieces are beautiful. Love it all and cant wait to try some of your tips. Thanks
Hi there! Love the blog :)
To get a square corner, sew straight until you get to the point where the corner needs to turn, then stop, make sure the needle is in the fabric, lift the foot and swivel the fabric (using the needle as a axis) until you’re in position to sew the other side of the corner. Lower the foot, and continue sewing.
Round corners are a little trickier- I’m sure there’s an expert way of doing it, but I usually just eyeball it, cross my fingers and sew it slowly and carefully. Notching the fabric to spread the tension in the fabric evenly is essential- I usually do that after I sew, though, because it’s easier to judge where the notches will be needed. And iron, iron, iron- before and after sewing.
Good luck!
No pictures! :(