I’ve been wanting pearlized grasscloth wallpaper since I fell in love from York Wallcoverings. Wanting to remodel my own home office/library space in shades of gray, spa blue, cream, and chocolate, I sought out the perfect luminescent shade of grasscloth from a book of exotic wallcoverings I found at Lowes. This particular grasscloth wallpaper is by Patton Wallcoverings, from their ‘Decorator Grasscloth’ collection.
This book is filled with so many fabulous colors from celedon to gray to cream and mocha brown. My gray/blue pattern number is 488-309.
Here’s the step-by-step I followed for installing grasscloth wallpaper all by myself!
Supplies:
-
Grasscloth wallpaper, enough to cover the desired walls.
-
Wallpaper paste
-
Smoothing tool
-
Level
-
Measuring tape
-
Staple gun
-
Sharp scissors
-
Paint roller and tray
-
Medium sized paintbrush
-
Extreme tenacity!
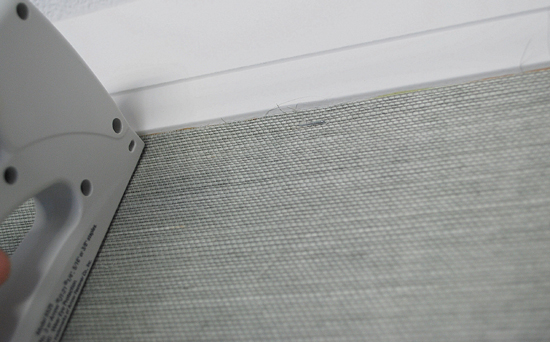
Step One: I measured the height of my wall and cut my first piece of grasscloth, allowing an extra inch on the top and bottom for later trimming. With a level, I realized a certain truth – no wall is perfectly straight. I lined up the first piece of paper in the corner, and used a level to make sure it hung straight. With a staple gun, I secured the top to the wall, then trimmed my corner where the paper was uneven. The only way for me to hang this very heavy, very awkward paper by myself was by use of a staple gun. Otherwise, I would have needed a second pair of hands. I found that the texture of the grasscloth allowed me to cheat by securing my grasscloth with small staples. I later removed them without any holes or damage.
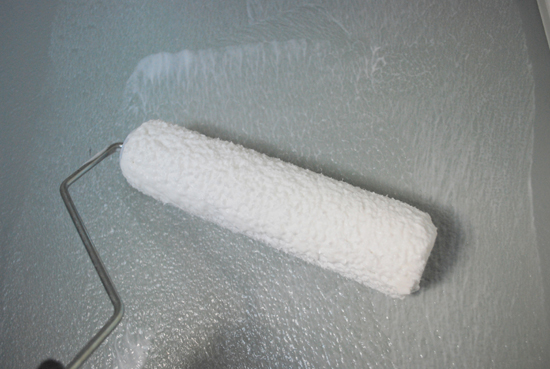
Step Two: After stapling on the top, I climbed under my paper and up my ladder, and added paste with my roller to the wall. I did NOT put the paste on the back of the paper first. I applied it directly to the wall. This way, I avoided the need for a big work surface, and kept my paste exactly where I wanted it.
Tip: Don’t skimp on paste, especially with grasscloth. The heavy paper needs a sloppy amount of paste – I was very generous in my application.
Step Three: I used my smoothing tool to get rid of bubbles, and they creep up everywhere. I had to be extremely patient in pushing them out, and often I had to pull back the paper entirely, and resmooth it. This is where #10 on my supply list comes in handy.
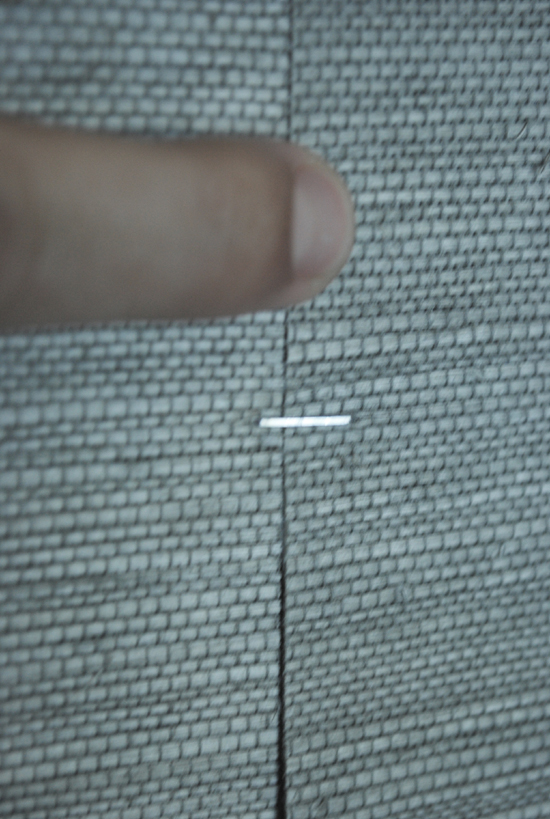
Step Four – Aligning seams: This was by far the trickiest part. With the second piece of grasscloth, I followed steps 1 and 2, but then had to align my second piece perfectly next to the first piece. Again, I used the staple gun, this time on the vertical, to secure the pieces together every 8 to 10 inches. Repeat step three and smooth out all bubbles with smoothing tool. Be sure to remove all of your staples when the adhesive is dry!
Tip: Apply extra paste underneath the seam with a paintbrush before you align your neighboring strip. Be careful not to get any paste on your grasscloth.
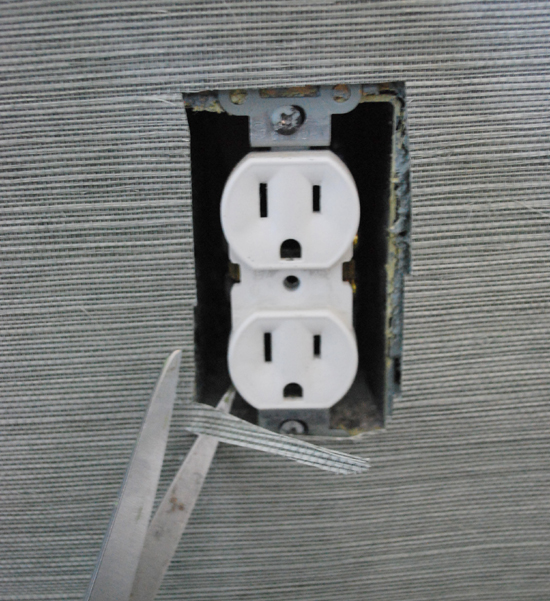
Step Five: Carefully trim around your electrical and light switches. Be sure to remove your switch plate covers before you wallpaper!
Tip: Do all of your trimming, both horizontal and vertical, with very sharp scissors. Do not use a razor blade – it will tear the grasscloth and give you a jagged edge.
Step Six: Trim the top and bottom of your strip of grasscloth once your paste has set.
I’ve never hung wallpaper with paste before, so this project was very time consuming and very challenging for me. It took me five hours the first day, and another five hours today. And it’s going to take me awhile to recover before I consider doing any more grasscloth anytime soon. Besides, three walls in a small office is plenty grasscloth for me!
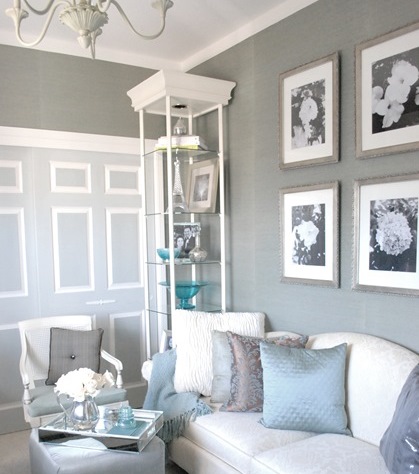
But I am truly loving the subtle texture grasscloth wallpaper adds to a space:
One drawback: the seams are more visible than I anticipated, but that’s just the nature of grasscloth. But with a furnished room it’s less noticeable. Have you all ever wanted to install grasscloth in your home or office?
.



Good job!! Hopefully I can get this done one day myself.
I'm impressed that you put it up all by yourself.
Funny story, I grew up in a house with one wall of grasscloth wallpaper in the living room. When we went to sell our house the realtor insisted that we take it down. At that point, who knows how long the wallpaper had been up. I have no idea if my mom even tried a wallpaper steamer. But she did try to tear it down. We ended up scrubbing it off one little spot at a time. I was 12 and my parents made me scrub the wall every day before I could go see my friends. It took us weeks to scrub all the paper off. I don't think I'll ever be putting grasscloth up on my walls after that scarring experience. . .
I am smiling big time at Torey's comment, because when we started tearing off the grasscloth in the dining room, the very same thing happened…plus, they put it up on PANELING! Yeah, that stuff isn't coming off, so we're just going to save the trouble and replace the paneling with beadboard. The grasscloth in the hallway, however, IS getting painted. We didnt' even attempt to get that off. : )
looks great!!!
I can't believe that you did that all by your lonesome. It makes me tired just reading all of your steps. (not bored, your writing is always fun, just tired)
I live in a rental, so no wallpaper on the walls. I have been thinking of trying it on a few pieces of furniture though.
Oh my, Torey and HeathahLee, with those experiences, I would feel the same way too!
But since I am not grasscloth scarred, I am certainly enjoying my new wallcovering. Who knows how I'll feel in ten years….
Kate
It looks really nice, very chic! It has a nice texture! I wish I had your motivation, LOL!
I absolutely LOVE your style. I've been reading some other decorating/house styling/etc blogs for a while, and yours is by far the coolest. This color scheme is so soothing, and yes, I am totally tempted to dive into the DIY wallpapering bliss that you have created in your home. Bummer though, I'm in a rental, and painting is the extent of our abilities to change the walls (oh and pictures too). I love the "exotic" walls though.
Looks amazing…love your new library!
Wow…I bet you just love the texture it adds to the room! Great Job. I do lot's of DIY projects too! Stop by my blog when you get the chance!
I have wallpapered before – but, it's always been with prepasted paper. Well, except for when I papered my bathroom with sheet music, but that's entirely different. I can't imagine how difficult that grasscloth must have been for you to deal with. Yikes! I'm not much for using wallpaper in my house anymore. Growing up, we had nearly every room in the house papered. It was a pain in the patootie every time Mom decided she wanted to change the decor. I would rather just paint and maybe do a faux treatment or stencil to make it pop.
Having said that, I love, love, love the way the grasscloth looks in your library! And I admire your tenacity! But, I can't help but wonder: With 2 small children and a house to run – how do you ever find the time to tackle as many projects as you do? It truly amazed me!
Looks beautiful!
Pam
First, let me say that I love the glass shelf tower, and can't wait to hear about your deal. Secondly, Kate, I am glad to hear you came out of this project with your sanity intact, and even though every muscle in your body is probably aching – it looks fantastic!
Where do you get your energy and patience? There's no way I could do all of that. I'm really impatient!
I am tempted to just come live in your house!
I think Home Depot is going to love that I read your blog since I'm about to go redesign every room in my house to be more "nesty"!
Congrats! The final outcome is amazing!!!!
http://www.thesouthernnest.blogspot.com
Your walls look very chic!
I read that another poster has a horror story about it as well….My mom installed lots of it in our old house. And I'm not certain how well it was put up as the seams were popping up and the cats decided to use it as a scratching post! I ended up taking it down and boy was it a nightmare! However, my big problem was that it was hung over bare drywall- there wasn't any paint under it.
I'm positive that you'll be enjoying your walls for years to come- they look gorgeous!
love it!
I love your office so far! Can't wait to see more!
WOW! That's gorgeous. I'm going to have to give this some thought. I would love to do this in my living room. Thanks SO much for sharing, I'm super enthused about this!
Love it.
Stop by my blog this week for lots of projects re-visited ,
Chris
Just Beachy
I absolutely adore this! It's stunning!!
Amy
I don't know what space I could wallpaper, but you definitely make me want to try! ;) I love #10…you sure have that goin' on! :) It's stunning…definitely NOT what I picture when I think of wallpaper. I think you're redefining it for me. :)
Love the wallpaper and love your site!
No wallpaper for us, we recently moved into a house and after removing 4 layers of wallpaper (the previous owners just kept putting it up over the last layer) in the kitchen, I'd say not in this lifetime.
You did an awesome job with your wallpaper. I've done it before and I know it's a real challenge!
I've also had to REMOVE grass cloth wallpaper and that was an even bigger challenge! I hope you will enjoy your room for years and years! :)
This grasscloth wallpaper is gorgeous – and I can't believe you did it all by yourself! However, you ask if I'm tempted to do a wallpapering project now? Ha! I think I'll just sit back and watch YOUR labors of love. :-)
It looks lovely, but now I'm positive I can't tackle my tall walls in my office. It seriously looks amazing, I'm just questioning my tenacity.
WOW that is beautiful! I would love to put it up in my living room but after reading your post I guess I will wait until I can pay someone to do it .. Which will probably be never.
Blessings on your day
Highly divine!
m ^..^
This is gorgoues but there is just no way… I know the contractor will love this idea too!
It looks wonderful! I never would've thought grasscloth would look so good on a wall!
Oh my goodness, that looks absolutely gorgeous. Really stunning.
But I think, having read your description and words of caution, attempting it would surely lead to tears so I'll admire this one from afar.
Oh. My. Word. The room is amazing! You clearly have the patience of a saint. I adore the lines of the couch, too.
It looks great!
That looks great. You did a fabulous job!
Truly love this grasscloth!! I would love to have it in our bedroom, but not sure I have the tenacity for it?!
That certainly was an ingenious way to wallpaper by your lonesome. Good job! I have been tempted to use wallpaper and Mod Podge to to a high end look on the inside of a cabinet/side table. I'm torn between a bright fushia or aqua design. Decisions, decisions.
I LOVE the walls! And the shelf is gorgeous. I have been wanting to try some wallpaper myself and am contemplating doing our small hallway…Thanks for giving me the push! Now lets see if I get that accomplished while being on maternity leave! hahaha
I'm very impressed! It looks wonderful – love all the textures going on. I just love funky wallpaper, but my husband has forbidden me to use it in our house. And, seeing as I'm not as industrious as you, I'd probably have to make him help me, so it's probably just paint for me…:(
You really do incredible things with the decorating thing.. just lovely
WOW. That is beautiful. I can't imagine hanging ANY wallpaper by myself, let alone grasscloth. You did an amazing job, and have inspired me to reconsider wallpaper! (with help, of course…:)
thanks, centsational girl. i researched grasscloth for weeks and finally got the courage to hang my own after reading your account….it was totally do-able…the stapling helped tremendously just to help give me a sense of security. by the last two panels i didn’t even need to use them. i redid an accent wall in a cream colored grasscloth. i should have gone with something a little darker, but the technical quality of the hanging looks great…..this was my first time ever hanging any wallpaper….and it was YOUR site that gave me the real insight i needed.
AHHHH! I’m in heaven! Absolutely beautiful! I always thought of wallpaper as “old-fashioned” but you have motivated me to try this technique. Love the calming colors that you chose in the room. Awesome job!
OMG that looks AMAZING!!!! what a GREAT JOB!!!! Loved meeting you!
xo
E
I have saved pictures of your room in my inspirational file. The textures and colors are after my own heart! But I’m finding that grasscloth wallpaper cost so much, for a 16′ x 12′ x 9′ room, it will cost me more than $1k for the wallpaper alone, did I calculate correctly? Any advice is greatly appreciated!
I wish I had seen this before trying to install my grasscloth in my bedroom several months ago!!! I had one heck of a time with it. I tried the wallpaper paste, and it curled the grasscloth so badly!! I read online that pros generally use thumb tacks, so I tried that, but it was so slow getting each thumb tack into the wall, that by the time I got them in, the paper had bubbled, and some of the wallpaper paste had already dried. It was a huge mess. I actually ended up using….are you ready for this?…high strength spray adhesive!! It was a big huge stinky mess, but it worked. I never even THOUGHT about getting my staple gun out and using it instead of thumb tacks. That would have saved me a lot of headaches!!! Oh well, I’ll know for next time. :)
I just came across this post as I was looking into grass cloth wall paper. When I was looking at your photos I noticed your original wall looks like it has some texture. We just moved into a new house that has “knock out” drywall that looks a little like your picture. I have never lived in a house with this type of drywall and was curious (if this is what you have) how well the wall paper has held. I would really love to try it out but was afraid it would not hold because of the textured wall underneath.
This was a splendid intro to grasscloith wallcovering. Thanks!
Thank you for the intro and the pictures, I really want to put grasscloth in my bedroom. Candice Olsen is the best I love her designs and now I don’t feel so afraid of attempting to hang grasscloth. I’m happy to have found this page you have given me the encouragement I needed.
First let me say that I love, love, love your website! I have it saved to my favorites but other websites bring me back here as well, today it was decorpad with your photos of a DIY sea fan
Back to the subject, instead of hanging wallpaper which is so hard to do, why not use fabric instead? At the moment I am looking for a good fabric for my bedroom wall since I am so sick of painting and want a different look. I just learned about the fabric starching process and can’t wait to try it out! Burlap would be very close to the grass cloth look, I have used it on lampshades (very now fabric I have noticed) and love it. Funny how times change, 10 years ago my clients were ripping this “dated” look from their walls or painting over it and now it’s hip again!
Hello, oh how do I love your site !! (adore your twitter button) And what a great tutorial is this, I never hung wallpaper before and have always been scared to try, but your staple technique is awesome !! and might just make me try it myself.
this is my first visit, I just wandered up here, but I’ll come back very soon to read all the other great stuff I see.
Hi!
Love your blog but for some reason I’ve come across five of your postings already in where the pictures were not showing. Instead it is just a black block with a triangle and an exclamation inside. I guess I’ll have to use my imagination to imagine the before and final product! :'[
Hi Eunice, I apologize for that, I addressed it earlier this week in a blog post, it has to do with several images I moved around and actually deleted, I’ll be rebuilding these posts shortly, promise!
Kate
I didn’t know that name of grasscloth wall treatment till seeing this post. Your room looks lovely but I’m glad I definitely know this technique is not for me, those seams would drive me crazy, though I bet it’s less noticeable in person than in a photo!
Yes, I love, love, love grasscloth. The individuality of it is a real plus for me. When you say you got under the grasscloth to paste the wall, how exactly did that look? Did the grasscloth shrink after it was applied to the wall?
As a professional wallpaper installer, I have reinvented the wheel at times when involved with a project in unfamiliar territory and have been able to live with the results, but after gaining more knowledge I realized how I may have tried another way. I suggest pasting the back of the grasscloth with a clear premixed adhesive using a 9 inch paint roller, let sit after booking for 2 or 3 minutes, install. Try a sample with this technique, you may be surprised how easy it is. Letting a pasted paper sit for a bit will eliminate any problem with the air bubbles.
Good on you for tackling such a difficult paper!!
Know this is an older post but just wanted to tell you your staple gun suggestion was particularly brilliant. Ours is very textured and you can’t even see them. It really helped hold it in place while we got the seems aligned, etc.
And ditto re using LOTS of paste. We put it on wall and on paper and it still wasn’t enough.
Thank you
So great to read this Annie, thanks for sharing!
Kate
love this grasscloth! i have heard that you have to hang every other sheet of grasscloth upside down…did you do that? if you didn’t, did the project turn out all right? thanks!
Nope, didn’t rotate it Jerry, the grasscloth still looks great almost 3 years later!
Kate
I’m a professional paper hanger and I would like to share my way of hanging grasscloth. Use a damp sponge and wet the back of the strip of grasscloth. Book it into a loose roll. This allows the paper to relax and expand and will solve your bubble problem.While it is resting paste the wall with ready mix clear strippable, be generous but not so much it squishes out the sides. Pick up your strip go up the ladder and allow the entire strip to unfold so only the back side touches the wall. It will not be too heavy for one person. Place the top and stick it down. Go down the ladder and adjust the seam all the way down. Smooth the strip starting in the middle and work your way up then the middle and go down. If the edges of the roll are “boogered up” you can overlap the seams and inch and double cut a new seam with a straight edge and a razor blade. Remove the piece under the new seam. Wash off any paste that gets on the front with clean water.
Kate, I LOVE your blog! I also LOVE your choice of paint colors! Always perfect!
I would like to duplicate the color of your office. I know that the walls are a grass cloth, but was wondering if you could suggest a BM paint color that would be similar.
Thanks for all the great ideas and inspiration!
Deanne
Hi Deanne, I’m away from my BM paint deck since I’m on vacay, but can you grab a sample of the Valspar paint? BM can color match for you.
Kate
I worked for a professional paper hanger when I lived in San Diego in the late 80’s. We did track homes and installed various types of paper backed vinyls and papers.
The previous comment by the professional hangar is correct – you should always prepaste your paper before trying to hang and let it rest. If you follow the directions and work your way down from the ladder with a prepasted sheet you do not need the staples at all – once it sets and is in place at the top, the paper will not move as long as you do not tug on it. The firs step is to establish your level lie vertically – start about 1″ away from a corner and make very LIGHT pencil lines – be careful when following those lines because the past will allow the lead to leach into the glue and if you have a lighter paper or grasscloth you will end up with grey tint from the lead on your seams and you do not want that. A chalk line is worse because that chalk is very dusty and always leaches into the paste and into the seams – so a light vertical level pencil line is the best I have found.
Also, double cutting is the key to perfect seams when hanging wallpaper – if you master the art of a double cut using the best and sharpest blades, you will be very happy with the results of any paper hanging project.
Although I am not a professional hangar, it has been my understanding that the best results often come from alternating the pieces top to bottom sort of like railroading the materials since grass-cloth is a random pattern and not a match.
Thanks so much Mikenchgo, I appreciate all the tips!
Kate
Thanks so much Mikenchgo, for all the tips!
Kate
I’m surprised people still hang this! We have it in 2 rooms of our home (built in the 70’s) and we hate it! Although our’s isn’t a nice gray, it’s more of a deep brown, making the room entirely too dark.
Hi Kate,
I have been a regular to your awesome site for a long long time. I am thinking of installing the vinyl grasscloth. I have couple of questions.
1. Did u have to prime the walls? if yes, which primer did u use
2. What type od adhesive did you use?
3. Do you still have the walalpaper hung or took it down? if yes, was there any damage to the walls?
Would highly appreciate your response.
Thanks,