For a long time, I have really wanted one of those drying racks from Ballard Designs. You’ve seen them. They’re so perfect in the laundry room for drying your delicate clothing.

I really wanted to save the money and build one myself. I knew I could do it with the right supplies. I even drew my own diagram on a napkin. And I added knobs to the bottom of my design.

Here’s a look at the final result:

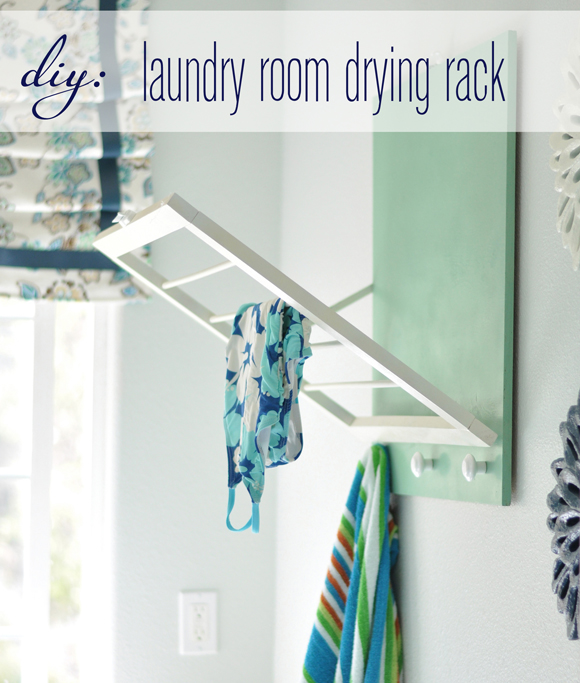
This is the perfect solution for drying all of my delicates! I am so happy with the way it turned out – it is both pretty and practical.
How to Build a Laundry Room Drying Rack + Supplies:
- 2 x 2’ precut birch (1/2 inch thick)
- Two 1/2 x 2” poplar boards
- Two 3/8” dowel rods (48” long)
- Sash lock
- Narrow loose pin hinges (set of two)
- D ring hangers for mounting on wall
- Bracketed hinge for side (or chain with small screw eyes)
- Three white porcelain knobs
- Primer and paint of choice

Necessary tools: Drill bit set, including 3/8 inch drill bit, screwdriver, framing nails, a hammer, and a saw.
Step One: Measure and cut your 1/2 inch x 2 boards to fit the 2 x 2 precut birch. Cut your dowel rods to fit inside your drying rack frame.


Step Two: With your 3/8 inch drill bit, drill holes for your precut dowel rods. Use a mallet to hammer dowel rods into predrilled spots.


Step Three: Finish assembling your rack with framing nails.

Step Four: Attach your pin hinges with a screwdriver.

Step Five: Prime your wood drying rack, then paint with your color of choice. I used a spray primer, then once it was dry, I applied Rustoleum’s Seaside Green to the back. Once the back was dry, I covered it with newspaper, and painted the dowel rods and frame with Rustoleum’s Heirloom White.


Step Six: If you want to make the sides of your inexpensive wood smoother, then use paintable wood filler (or wood putty) to fill in the uneven surfaces. I use my finger to apply it. Once the wood filler is dry, simply spray paint right over it.

Step Seven: When your paint is dry, attach your sash lock to the top of your drying rack. It’s a good idea to drill pilot holes first when working with wood only 1/2 inch thick. This way, when you drive your screws in, you have a much better chance of avoiding any visible split in your wood.

Step Eight: Drill holes to attach your knobs to the bottom.

Knobs after:

Step Nine: Attach a hinged bracket, or a chain with screw eyes, to keep your drying rack at your desired angle when open. Attach your D-ring hangers to the back, and hang on your laundry room wall.

What I like about this new drying rack is that I can dry all sorts of delicate clothing (*ahem* ladies, your lingerie…).

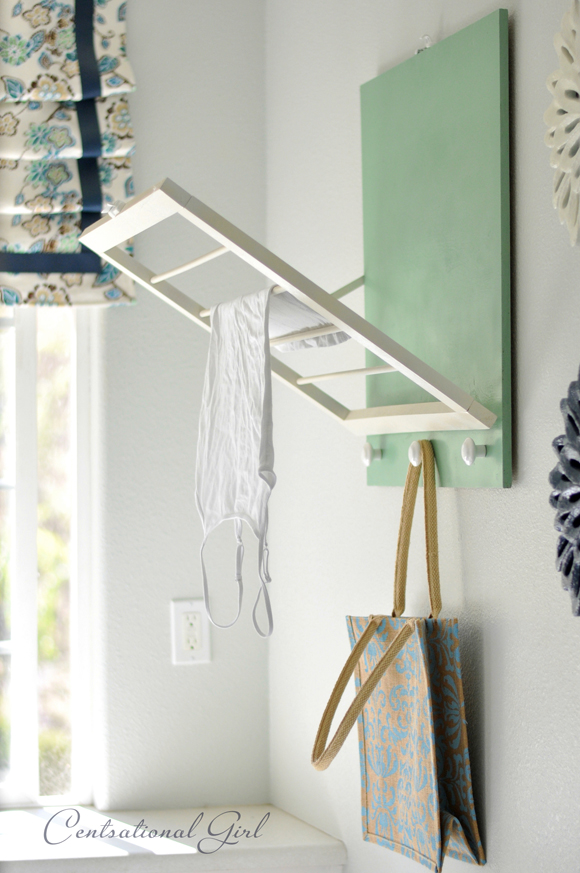
I added knobs to the bottom of my design so I can dry sweaters or other clothing right on the hanger.

It’s a solid wood piece, hung right on the wall studs, so I can even dry towels right on these knobs.

When open, it has four rungs for drying several layers of clothing:

When not in use, it folds up flush with the wall, with the help of the sash lock on top:

I purchased all of my wood and hinges at Lowes. The total cost for the supplies for my drying rack was around $25 (not including paint and primer that I had in my supply closet). Compare that to Ballard’s price of $89 for their small version (not including tax plus shipping).
2013 Update: This drying rack is still working perfectly in the laundry room and definitely worth the effort since it’s used almost every day!
.
.


Very cute. I am in the process of revamping my laundry area (closet). I wish I had enough room to have one of these!
Your drying rack is both practical and very pretty, I really like the colour and the little knobs!
So cute.
You did a great job! I love love love the color you picked out. I am sure you will get so much use out of it.
You do such a phenomenal job with all your projects.
Very, very impressive – and I love the color you chose!
Very professional looking and what a savings.
I have admired the ironing boards too for my sewing room. The cabinet opens and the ironing board folds out. I think I can modify the rack.
I quess I'll have to break out the miter saw and drill. One problem solved.
Now I wonder if I can find someone to work on the ironing. *grin*
I love this! The design is fantastic and the colors are so pretty!
How awesome! I too have admired that from Ballard. I actually like yours better!
I drool over Ballard Designs Catalog. I love this! I cannot wait to refer to this when I have a laundry room that will fit something like this. Great job and thank you for sharing!
I've long admired that very same clothes drying rack – you did a great job!
Ingenious. I need to show this to the contractor! :)
Great job! I've always loved those drying racks and have wanted to put one in our new laundry room. Thanks for the instructions to make one my own! Genius.
You sure are keeping my husband busy :) When (not 'if' – refuse to say if!) we do our remodel & I have space, we'll be making one of these!
What a great idea , I wish I had walls in my laundry area , someday .
You are seriously out of control. This is fantastic! I'm convinced you must not sleep at night :). Very impressive all that you are able to accomplish! Love it.
I've dog-earred this little guy in my Ballard Designs catalog, thinking I should make this… It never got further than that though, so thank you for the diy instructions!! Yours turned out so great (I think it's way cuter than the model one)! Way to go! And thanks for sharing it with us!!
This is great, Kate! I've eyed that Ballard drying rack, too, as we don't have a rod in our laundry room (opted for cabinets instead). I may have to make one with your tutorial!
This is wonderful!! I was just eyeing these up yesterday on the Ballard website, but having hubs make me one for Christmas is a much better plan. Thank you for posting all the details!
What a great idea, Kate! It's very beautiful and functional at the same time – and, like I've said before, you're my inspiration!
Wow, great job!
I'm am so exctied to make this. It's so cute! Thank you for sharing your gifts and talents with us!!
This is so great and desperately needed! Nice work!
I'm adding this one to my project list. Thanks for the step by step.
I've seen those!!! I like yours better than Ballard's! :) This may have to go on T's to-do list. ;)
I was going to figure out how to make one of these too, but you've saved me the trouble! Thanks!
It looks great by the way
I to have been eyeing that baby, but man very pricey. I might have to try one of these. I like yours better than Ballards, the knobs would come in handy too :)
I've been drooling over the Ballard Designs rack, and thinking about making my own version too. I'm so glad that I found your blog, because you inspire me to stop over-thinking, and just do it.
It would be great to have one of these in the bathroom as well.
I'm going to check out my options at the reuse center. If I come up with something, I'll email you the results.
Look at you! You did a fantastic job! I like the idea of the knobs for hanging rather than hooks – I think it fits in with your design better.
That is very cool…and cute! Boy, could I use one!
m ^..^
Wow- Great Job!
WOW! This is amazing! I'm bookmarking this baby for future inspiration! Well done :)
Wow – that is fantastic!! I love the colors you picked too.
This would make such an awesome Christmas gift for someone – do you make your family/friends gifts or buy them?! If you make them, do you want to adopt me?! We could be sisters or something ;)
i love it, especially that pretty shade of green :)
I love this idea…now if only I knew how to use a saw I'd make one myself. I think this way have to be added to the honey do list.
great DIY as usual!
http://anhesty.blogspot.com
that's very cool! you're so smart.
Love it. What a fabulous idea. It looks great. Hugs, Marty
This is the most amazing blog! Believe me, I have read the whole interwebs, twice, and this is a fabulous read.
– Just Julia
I like this more than the B.D. version – the color and added knobs kick it up a gear!
I love it!
I have always wanted one too. I love yours and hope I can get my hubby to help me build one. You are awesome by the way. I love how you just go get/do/make what you want and need for your home.
That's just really cool! And what's neat about the design is you can make it any size or dimention desired. Thanks for the great tutorial!
Donna
What a fabulous project! I love that you made you for $25! And that you have a photo of yourself building htis in the required footware of all industrious do it yourself ladies….flip flops! YOu are my kinda gal! :)
Love it!! I'll have to try this when I have a grown-up laundry room one day :)
Brilliant Kate, simply brilliant!
Many Blessings,
M.
I've never seen anything like this but I love it! So practical but it doesn't take up space and it isn't an eyesore. Lovely!
Awesome! Good job!
I am so glad that you did this. My mom got one of the ballard's drying racks and I too have been wanting one. I will have to make this…after we finish building a bathroom.
Well done! I love it! You should have labeled this one inspriation! Laundry day is not my fav day! I will take any inspiring ideas for THAT day! lol thanks for sharing!
Kate. This turned our wonderful!! Great job. Thanks so much for sharing. Connie
This is great! I've been eyeing that Ballard Designs version for a while and ultimately settled (and I do mean settled) for a plastic accordian-style one from Container Store. I wish I'd been so industrious and handy with a drill as you were. Gotta love pretty+practical!
I love it, especially the color choices. It looks so pretty when it is not in use.
You are such a smart girl! I'd copy one of those, but I've got a nice closet rod hanging in my LR & it works good for hanging stuff. Love this!
Hi there! First time on your blog – it's wonderful! I love this idea. Thanks for sharing and the inspiration.
This is genius! I have been looking at wall mounted drying racks recently. It never occurred to me to make my own. Thanks!
I've been eyeing this for awhile – love the tutorial. It's something I can do without my hubby's help. If only I could keep up with you! I've got three projects to finish, then off to think of something for the nailhead project. Thanks goodness it's postponed, I'm out of ideas!
You need to have your own show on HGTV. You never cease to amaze me with all of your genius ideas. Love the colors.
I like yours better than the on at ballard. Can I place my order? Great job!
That is so cool! I'm duly impressed!
I looks great. I'm going to have to get my hubby to make one when we get our own house.
Love it! I so need one of these or two or three! I am very tall, drying is not an option usually, for clothes are very expensive!!! Love this idea! Great work, it looks beautiful!
i love the way it turned out! you are much more of a handy-maam than i am, i'm afraid! =)
Holy cow. Is there anything you *can't* do?! I have been longing for BD's drying rack and now you've convinced me I'd be a fool to do anything but go to Lowe's and get what I need to make my own. Durn it. Let's hope this one doesn't end up in pieces in the Lowe's bag half-finished…… Thanks for sharing–again! :)
Love it!!!
I just have laundry rope hung the length of my laundry room above my machines (so it's out of the way). Definitely not as pretty as your drying rack!
You ROCK! Seriously, I am simply amazed at the talents you display. I have wanted…coveted one of these and have been trying to get my husband to build one. Now you have the instructions, I am going to just do it myself! Thank you for your constant DIY inspirations.
Great job, and nicely done tutorial! You need your own show! :)
Thanks for sharing, I'll have to add this to hubby's to-do list!
I have had this circled in my catalog for a couple years! I can't wait to show him these plans. He'll either say "great" or hand me the cash to order one. Thanks!!
Wow – Can I say fabulous! Love this project! I will definitely be adding this to our "link luv roundup" on Wednesday! Thanks for another great tutorial Kate :)
FABULOUS… I love your blog you are a real crafty girl.
Erika
You are so talented woman! LOVE this. ANd that color on the back…to.die.for.
~Amanda
What a great job that you did. It looks great and is so functional. Great combo!!
Amy
VERY NICE! why do we not see the side 'hinges' in the pics of it leaning out? it looks like they are transparent. am i missing something?
very very cute. bd is going to come after you for ideas. they will wish they'd thoughta the knobs! =) kt
Wow how cute is that…. I love it and the color you painted it is just perfect, great job!!!
You are amazing. You make me feel like I can do anything. Girl power! Or should I say CG Power! :)
Ingenious
Who knew that something intended for laundry could be so pretty?
The addition of the knobs was a great idea! Maybe Ballard should start asking you for help in the designing of their products. ;)
What a wonderful project, I sent it to my dad and asked him to make me a couple. Thanks for sharing your wonderful instructions!
This is a great project, and not to mention a space saver!
I came across this project and had to say how wonderful it is and also thank you for thinking of Rust-Oleum! We would love to invite you to share your painting projects on paintideas.com!
I have adored these drying racks from afar for some time now. I soooo wish I had a place to put one. You totally knocked this project out of the ballpark!
Oh Wow! I have loved that rack for a long time. What a FANTASTIC job! Thanks!
Oh my goodness Kate, your drying rack rocks! And as usual, you've got a terrific tutorial to go along with it. I love the colors you chose. Thank you for sharing!
Blessings,
Marie
http://emmacallsmemama.com
I am SOOO impressed right now! It looks amazing!
I knew this was it!!! I saw your twit about it and knew it, because we are freaky alike and I've been thinking about how to do my own too!! :) I'm trying to figure out how to make our fold out drying rack work to do it but have yet to figure it out — this may work better!
you are so clever! I have loved and admired the very same drying rack ~ however the tightwad in me could not part $ for it. Thanks for the directions!
OMG, my undies need this. This is brilliant!
Be still my heart. Now this is just perfect, can't wait to make one! Greatly appreciate your creative genius!
I like yours better! It's so cute it almost looks like art and so useful!
Okay, that is better than the one you wanted. I believe a CONGRATS is in order! Thanks for sharing!Come check out my TRANSOFORMATION end table at DIY DAY!
Woo Hoo, thanks for posting over at KIMBA's DIY day again. I lost your linkk and I wanted to look at your headboard post again.
Love your drying rack. Way cuter than the Ballard Designs one and more functional and oh, way better price.
Thanks for sharing how you did it.
This is fantastic! I must book mark this for when I do my laundry. My laundry is such a waste of space! It is HUGE and completely impractical!
Nicky
(www.alittlebitprecious.blogspot.com)
I had to share this on my blog today:
http://perfectsentiment.blogspot.com/
Thanks for the great tutorial!
I have been coveting the Ballard drying rack but alas my bank account has not.
Well done~ this is great!
Please drop by and enter my giveaway.
Have a blessed weekend!
Awesome ! Needed this tutorial,thank you so much !
This is brilliant! I've been coveting one of these for a long time, myself. Kudos to you for making your own. I just might have to do the same!
AWESOME!!!
This is so coool! I figure I dry all kinds of stuff on this rack, flowers, herbs, hubby's hip waders covered in loon poo
Wow, I can't explain how amazed I am by this. I hope to try this out when I move into my own place. Really brilliant!
Wow this is terrific! I love the idea and it is a great way to learn how to use the tools! I think I'll plan my next party/workshop on this great idea. I can use my pink tools from Tomboy Tools too!
Love it! Just brilliant! And I love the price tag. I will definitely be showing this post to the Hubby when he gets home!
This is great for just a few articles. I have stopped using my dryer completely. I use laundry racks that I can place around the house or outside if the weather is nice. I figured it saved me 8% annually on my utility bill. That is a huge savings.
Genius. I have one of those freestanding metal ones and it just gets in the way.
Thanks Kate. I too have been coveting the Ballard Design one, but couldn’t justify the cost to myself. I’m going to give it a shot.
Oh I love this. Absolutely LOVE this. Our laundry room is very narrow, and this would be absolutely perfect. One day winter project for hubby (who is a cabinetmaker) for the basics and I’ll do the rest). I don’t use many of the power tools…stroke in 93 made my hands a bit unsteady at times, although I do help him. He drills the holes and I put stuff in them ‘D
I love this idea! I also think this would work well in a bathroom for hanging towels to dry and bathrobes could go on the knobs. Great work, thanks for the tutorial!
I actually like your version better than Ballard’s. I love what you did with the color (making it pretty and not just functional) and think the knobs at the bottom make it even more useful. Genius!
Kate, this is so perfect! I was just complaining to my husband who keeps drying all of my work clothes. Now he’ll have no excuse. I’ll be sure to post pics when it’s done!
I absolutely love your version of this drying rack. I’ve been lusting after one of these racks since I saw them in a couple of magazines last year. As I live in the UK my only option is to make one which I have considered – thanks for doing the ground work for me :)
Wow. You did a remarkable job with the carpentry. I am very impressed with the design; the finished piece looks professionally made. Kudos.
Fabulous drying rack! I just received the “newest” Ballard design catalog today in the mail, and saw their drying rack… and WOW you’ve done an amazing job! LOVE all your make overs ~ so inspiring.
Hi there, very good idea to built for small laundry room, thank you for the idea, I’ll built one for my laundry room
This is WONDERFUL!!! I’ve added it to a “Green Cleaning” roundup on my website today.
You can also grab an “I’ve been featured badge” if you’d like.
Great site!!
Creativity 100!!! I wanna do it too… Tks for teaching me… :)
THis is genius and gorgeous! I use to DIY everything years and years ago.
You have inspired me to get back to it. I love all the details you give and PHOTOGRAPH.
For instance, the type of primer and poly. Awesome tips and tricks.
I especially love that you share the prices. You have me wanting to thrift shop instead of what I am supposed to be doing. I can’t wait to find my own things to refurb!
Thank you for having this blog and being so darn good at sharing and writing!
I just love it! And the color is so soothing! I have bookmarked this for future reference. It’s just genius! Thank you for sharing!
oh my goodness…
I am a DIY fanatic and I just have to try this! We live in Vegas…and I love saving money by drying the clothes outside…but, THIS is SO stinkin’ cute…and the sun will not fade them!
I’m a fan!
Kathy
Where did you find the bracket hinge- I can’t find one!! Is it called something else?
Ok I love this! I am going to have my hubby make me one and the laundry sorter!!
I have been sprucing up our laundry room over the last few months and this should make it even better.
Oh my gosh – I can’t believe I just stumbled upon your site and this post!!!! I have a very narrow laundry room and been wanting that drying rack from Ballard … but just can’t spend that kind of money. Kept thinking I should just suck it up and buy it – and lo and behold I find your post today! THANK YOU so much! I love the internet…. :)
Loved it so much I made one of my own! :) http://attemptingcreative.blogspot.com/2010/07/ballard-inspired-drying-rack.html
Just moved into a new house with a narrow laundry room and have been seeing drying racks on lots of blogs, then you wrote about your most helpful post and there it is! What I’ve been looking for! Thank you!
This is a great project! Thanks so much for sharing :)
You make me want to do laundry. I will be making one of these as soon as we close on our house!
I just saw the drying rack at Ballard Designs and wanted to recreate it. One quick Google search and I see you have already done it and yours looks GREAT! Thanks for the motivation to do it!
You have no idea how excited I am about this! Awesome job!
This is brilliant! Thanks for sharing this fantastic tutorial!
I noticed that you only used one side bracket for your version (looks like the Ballard rack has a bracket on each side). Has the unbracketed side warped at all? I’d imagine that heavy towels or rugs might cause it to over time.
What a wonderful idea!
I sent your blog and information on how to make this to my sister, and she and her husband made it this weekend. She loves it!!! Thanks for the great idea and tutorial.
My husband made this incredible rack for me. He did adjust the size and some of the features but I use it all the time. I went a step further though and decorated mine to brighten up my laundry room. My kids are jealous! They want Daddy to make them some racks, too.
This is GENIUS! I’ve been trying to come up with a system to dry our sweaters and I think this may be the best solution I’ve come across. Thanks!
Great idea. I am living in a temp Fla. condo for winter with no hanging space. I can transport this with me on my annual pilgrimage south. When I build it though I will try to make one thing different to accommodate my needs…..I want to replace every other rod with laundry rope so I can use clothes pins. Thanks for the inspiration.
I love this idea. Its adorable and a great way to save some extra money!
Thanks so much for posting this tutorial. My husband just finished cutting the wood pieces to make ours. Your instructions were our inspiration for our small laundry space! I’ll be posting the finished product hopefully on Monday and will be sourcing this post in my blog! Thanks again!
Amazing! This is definitely something I wished I had stumbled upon 3 years ago! I will most certainly give this a try– since we’re moving into a new apartment that does not offer private washers & dryers…
I was looking for a way to dry pool towels. This will be perfect. May up the dowel size a bit though
I was also inspired to make the laundry room drying rack and I’m still trying to find the bracketed hinge for the side. Where did you get yours?
Love this…made one for my new, tiny laundry room. My dimensions are a lttle different, slightly bigger, and more dowels. I used small chain instead of a hinge and hook & eye to close instead of a window sash lock. I bought a hinge at HD but returned it for small chain. I like it better, I made the chain the right length for me.
Simple, cheap, custom to fit my space.
Awesome..thanks for the great idea and clear instructions.
I featured this loveliness here on my blog Coffee and their Kisses. I would love for you to come over and grab a featured button. The button is located on the left hand side bar. Have a great day!
Love it!!!… totally have to make one!!
Love this idea, thank you for sharing!! I want to make one for my laundry room!
terrific job!
Love it!!!! I am so making one of these for over the utility sink in the laundry room. :)
I am making one today!! Where did you find the bracket hinge? Lowes doesnt seem to have one. If I cant find one I will use the chain method, but would really like to use the hinge.
Love it!! Great idea and it looks so neat. Much better than hanging little items all over to dry.
Great job.
Judi
Love this! I am so afraid of “building” things, but I may have to give this a try! My mom would love this in her laundry room!
Fantastic! I’ve been looking for something that hangs on the wall that I can hang my ironed quilting fabric on while working on a project. You’ve saved me a long trip to Ikea and no doubt money, and l will have the satisfaction of making it myself and customizing it for my space. Well done, and thank you so much!!
This is awesome! I was trying to figure out how to do this without spending an arm and a leg. Thanks for posting this, i can’t wait to make mine.
I came back to this post to share as an awesome DIY project in a Tips on Tuesday – Laundry Edition post on my blog. Thanks so much for the tutorial! I love it!
Jaimee @ craft-interrupted.blogspot.com
Awesome idea! Thank you for posting :) I love the fact that I am not the only woman who does craft things with power tools…wearing flip flops haha! I built a bar for our patio while I was 6-8 months pregnant…all in flip flops!
Thanks for this! I picked up one side rail of a baby crib at our ‘free store’ to attach to basement rafters – plan was for drying herbs and/or clothing. Your project has given me some ideas on how to mount it.
OMG!!!! I Love this…….time to get out the Power Tools
Brilliant idea! I’m going to make one for our new laundry. Thanks so much for the tut! I’ve also posted this on pinterest and will post it on NZ Ecochick’s facebook page!! Thanks M
AHHH! I really want to do this, but NONE of your pictures are showing up! Any idea why? I want to do this!
♥ Jen
The Teachers’ Cauldron
I would love to make this drying rack. but the pictures are no longer visible to me. I just see a big exclamation mark for each picture. Have the pictures been removed or is it just my computer? Are the instructions posted anywhere else? Thanks.
Hey Kim and Jennifer, that is so wierd!!!! I will see if I can fix it tonight, so so sorry!
Kate
Thanks for trying to fix the pictures – I’m gonna need them! I want to tackle this and the wrapping paper organizer this week. My house is on the market and this would really spruce up my laundry room! Thanks for your great (and cheap!) ideas.
I’m also hoping for the pictures. I’ve just remodeled my laundry room and have the perfect place for one of these.
Chris
What a clever idea. Thank you for the tutorial instructions. I hope you don’t mind, but I’ll be the “millionth” one copying your idea! ;-)
Hello
It is a very good idea and it is beautiful to the laundry. I like a lot
smart smart SMART!!!
I’ve linked to your post here: http://dollarstoremom.com/2012/02/pinterest-picks-27/
Thank you!
This is great, I might try to build one for outside, I’ve been looking for a place to dry diapers outside and I could just mount this to the side of the house :)
OMG! I’ve been looking for something just like this for my laundry room!! Love it! Definitely going to make!! Thank you!!
You mentioned you used a water-based paint, rather than the oil-based, as the laundry room isn’t as high-traffic as a kitchen or bathroom — how’s it holding up??
We are getting ready to buy a house, and I’d love to find some cheap (used) cabinets and breathe in some new life :)
Thanks!
Hi Miranda, they are holding up great!! Again, not as high traffic as a bathroom or kitchen, but the paint I used in my laundry room still looks beautiful!
Here are more details on the paint I used:
http://www.centsationalgirl.com/2010/05/laundry-room-project-breakdown/
Kate
OMG – THANK YOU! My sister and I have always wanted the one from Ballard too but wouldn’t pay the money. I saw your tutorial and went to Home Depot the same day! I’m suprising my sister with it.
I also picked up a thin piece of beadboard in White already and glued/nailed that to the backboard so it looks just like the Ballard one (but I do love the color paint you used).
Thanks again, it was a fun project to make with my husband and my sister will love it! On to making me one next.
Where in Lowes/Home Depot did you find the “bracketed hinges”? I don’t want to go the chain route.
Look in the door and window hardware department Bella, I think that’s where I found it…
Such a great idea! I’ve been trying to find a way to do this for years….in a very tight laundry room. I wonder if this would work with cement walls? Worth a shot!
Love the colors! This is so much nicer than that store-bought one. I would end up wanting to hang plants on it!
I love this idea. I will try to make it this summer. A grate way to put humidity into the air in the winter.
Everytime I see this on your page, I think of how awesome this would be in the kitchen for a pasta dryer! I really need to add this to my project list. Thanks for the website. You are so inspiring!
Looks great! Would love to make one for my Tiny!! laundry room.
It’s more likely that your poplar boards are 3/4″ thick, not 1/2. At the hardware store you would ask for a 1×2 ( since wood is sold in nominal dimensions). the actuall size would be 3/4″x1 1/2″
Your backing board is 1/2″ thick and your poplar frame is much thicker, you can see that in your pictures.
A 3/8″ dowel would also be difficult to put into a 1/2″ thick board!
Also, it’s more usual for the long side to go the full length of the frame. You can see that’s how it was done in the original too. It’s visually more appealing. it’s been done that way for centuries for a reason!
thanks for ideas and the detailed instructions! Good ideas.
Sorry, just to clarify. I said “the longer side should go the full length”. This is, in fact, what you did. What I meant was that the upright ‘stile’ should extend the full length of the side. The shorter piece should be parallel to the dowels.
If you are going to do it this way, you would be better to glue and use 2 screws than nailing a single nail (which can twist and work loose over time).
I can’t believe this, I saw the Ballard one today and fell in love with it, but I can’t afford to buy one so I looked up making one and this site came up. SO AWSOME!!!! Thank you so much for posting this I’m off to Home Depot for the stuff now.
Thank you again
Love the photo that shows you were making it in flip flops! Nice work!
::sing-songy voice:: AWWWESOME!! Very helpful and detailed!! THANK YOU!! :)
I was thinking you could use an old window frame and drill holes on each end to put the dowels through. I’m all about re-use (and cheap) :)
Hi Elaine, with the right window frame that should work!
Kate
Love the way you found something you like and then made it yourself! You rock!
This is such a simple and great idea too. It’s perfect for smaller laundry rooms that don’t have a lot of space to hang clothes and what nots..so this small and compact drying rack would be perfect!
This is awesome I will save this to my file when we redo the laundry room hopefully in the very near future. Thanks!!
I can’t love this more. I never have enough drying space and this would be a great addition to the laundry room. Plus, I love the color you picked. Thanks for the step by step details. This is stellar!
I loved this idea! Instead of painting the back piece of wood I covered it with some cute fabric! Thanks for posting this!
I actually really like this as a desk Idea. Ive been trying to buy one of these types of desks and they are just so expensive. But I think i may try doing this. :)
Thanks a bunches!!
This is one of the best drying rack ideas I’ve seen. You did such a great job, it looks so good! I think this is going to be the approach I take! I just started blogging and added this link to my laundry post! This is great! Thanks!
And, your design uses less wood, so is cheaper and more environmentally thrifty. Thanks for the inspiration!
Great idea, also love the modern feel. Will be showing the other half this. Definitely going on our DIY list.
Like the option that you followed to find something that you want and after that made it yourself!
Such a typical thing however it’s an extraordinary thought as well. It’s useful for little pantries that don’t have a great deal of room to hang garments and what nots..so this little and minimal drying rack would be great!
I saw the Ballard one today and fell in love with it, but I can’t afford to buy one so I looked up making one and this site came up. SO AWSOME!!!! Thank you so much for posting this I’m off to Home Depot for the stuff now.
Thank you again