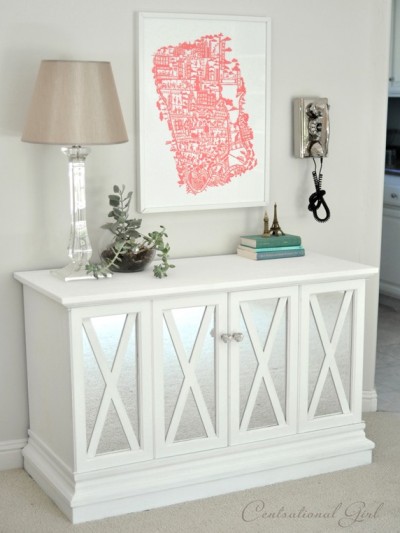
Y’all know I often circle the local thrift stores in the hopes of finding new treasures. Last week, I found a solid wood desk with a few scratches and dings, but overall in really good condition. I mixed up a batch of color with some leftover paint samples, and transformed this old fashioned desk into a lovely green gem perfect for my little girl’s room.
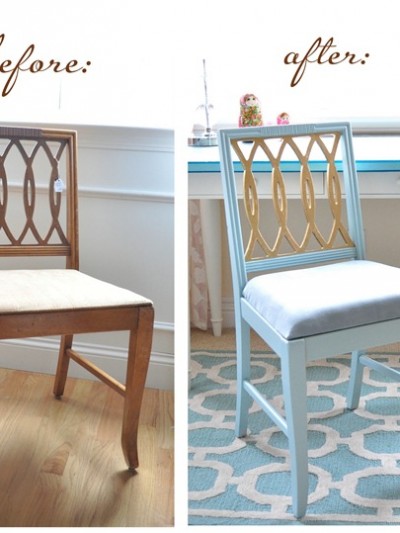
Here’s the Before and After:

I had been looking for a desk for my daughter’s room, and got really lucky when I saw the $16.00 price tag on this desk at the local St. Vincent de Paul. Yes I know. Sixteen dollars.

But get this. I asked the manager for a discount, and he gave me 40% off, so I only paid $9.60 for this solid wood desk. Total score !
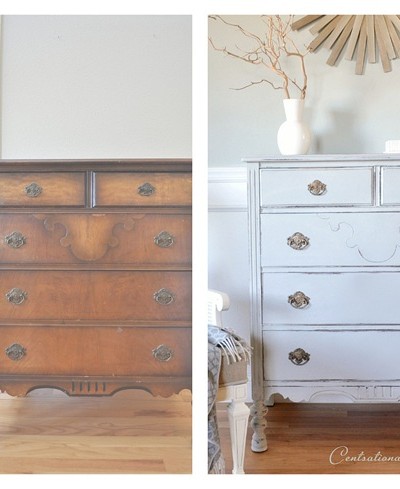
It would have been easy to sand it down and stain it like I did with this dresser, but with those feminine base legs and that French style hardware, I just had to place it in my daughter’s room, and that meant I had to paint it.
I was inspired by these bright pieces I saw at the local Antique Fair a few weeks ago, selling for hundreds of dollars.

I decided, rather than painting the desk a cream color like all of the other furniture in her room, that I would mix it up ! Be bold ! Paint it green ! But what color green ?
I had some leftover color from her wall paint, added some apple green paint from my stash, and I mixed in some gray too for a custom color.

Painting Older Wood Furniture:
Supplies:
-
Medium grade sandpaper
-
Primer
-
Paint color of choice
-
Roller brush and holder
-
Polycrylic protectant
Step One: Remove hardware. Sand your surface to remove any varnish or debris in preparation of primer.

Step Two: Prime your piece with a good primer. I prefer the spray variety since it saves a lot of time, but you can also use a brush on like Zinsser’s oil based in the brown can. Allow to dry for recommended time. I highly recommend these snap on spray paint guns, they save time and finger cramps, plus assist with even application.


Step Three: Roll on the paint with a roller and follow up with a paintbrush to smooth any uneven spots and fill in any hard to reach nooks. Apply two coats and allow to dry for 24 hours.
A few helpful tips on paint application:
- Use a new roller brush (not the rolling tool, the roller brush itself). I tried to be “green” and reuse an old roller leftover from a previous project, but it had tiny fibers and dust on it, which ended up in my paint, and I had to hand pick it all out, wasting about thirty minutes and causing intense frustration. Aaarrrggghh. Spend the extra $2 for the new roller – trust me.
- Paint in an area where there is no chance of a breeze. In my case, it was my garage with the garage door closed and the screened window open. I have tried to paint outside several times, but the gnats and dust always ends up in my paint, and I really wasn’t looking for that extra “texture”.
Here I am painting in my garage last Thursday late at night in frustration because my personal favorite was kicked off American Idol. I was working off my anger. (My poor Danny. Sniff, sigh.)

Step Four (optional): If you seek a distressed or antiqued look, go over the edges of your painted surface lightly with sandpaper to expose the wood underneath.
 Step Five: Apply a protectant like Minwax Polycrylic to your piece to protect your marvelous paint job. I like to use Minwax products for a good reason. If you’ve distressed your edges with sandpaper, the poly also helps to enhance the wood tone underneath. Allow your poly to dry for at least 24 hours.
This French style hardware antiqued and beautiful so I didn’t paint or polish it.

I lined the drawers with some pretty paper too.

Final Result
Here’s the desk in her room:

What do you all think of the new desk? Are you about to paint a piece of furniture and completely transform it? Do tell.
.


That looks so good!
I’m in the process of painting some bunk beds for my daughters..so far the primer has been put on. I’m gonna try distressing it also. Even with that coat of primer on, the beds are looking much, much better.
This is my test before I move on to the kitchen cabinets…
I have a sweet little Pennsylvania House secretary (honey pine) that a friend gave me. (I love “free”!) I am planning on painting it a satin black. I just finished a small chifferobe and am really curious about the linen water/scrapbook paper drawer liner fix that you mentioned. I have scrapbook paper and I have linen water. Now what?
It looks great!! Very cute and pretty!!
I need to come shop where you do–I’m looking for a desk just like that–but I’ll never find one for $10 or even $16. My beloved Goodwill is getting pricey–right now they want $180 for a beat up entertainment center! Guess I’ll just have to keep my eyes open and my fingers crossed.
The desk looks fabulous. How do you get her to keep her room so neat?
Great color mixture! I am always mixing stuff up too.
I’m in LOVE! What great inspiration. Thanks for sharing!
Just found a cute desk myself, but won’t get around to redoing for a bit. I’ll be sure to post when I do!
Adrienne
Looks beautiful!! I’m currently working on turning two salvaged cabinets and a salvaged door into a single storage unit for my craft room – so far, so good! :)
I love it! Thanks for the tutorial! I am about to start mine. I’m most worried about where I might be able to start this project. I am in an aparment and no garage space… hmm..
LOVE it! I am so jealous. I scoured every single thrift store and Salvation Army in my area looking for a WOOD desk for my craft space. No luck. I ended up getting a hideously ugly silver metal table with a glass top, and I am slowly transforming it. :) I plan on doing a post once I am finished. Thanks for the tutorial–great tips!!! :)
The desk turned out beautiful!
That turned out fantastic!! I’ve yet to paint anything but I have a feeling that I’ll be brave enough soon thanks to all of your inspiring posts. I love the detailed “how to” portion — it actually makes me think that I can do it :-)
Wow, you have the best finds! Thanks so much for the tips, I’ll be linking. I’m hoping to find some time in the coming week to go through your archive. I just love your blog!
I love it!
I wish I had the patience to do something like that, but I don’t.
That desk + the tufted bench + the vanity stool = perfection. My taste is not nearly as ornate, but I love the way these feminine, vintage pieces all work together in style and color. I haven’t taken the leap to painting a free-standing piece of furniture yet. Walls and cabinets I can do–they’re nice vertical surfaces, unlike furniture with all of its crannies and curves. But I think something big will be happening in my daughter’s room soon.
Hey kate
the desk looks great and the color you mixed up is perfect!
I recently painted my kitchen counter tops! take a peek:
http://blog.petitdebutant.com/2009/05/painted-counter-tops.html
and a few years ago I revamped my dining room table:
http://blog.petitdebutant.com/2009/05/kitchen-table.html
I would love to see a picture of the completed room… have I missed it or is it still a work in progress?
Totally fabulous! I did a similiar desk like that…
http://infarrantlycreative.blogspot.com/2008/06/spray-painted-furniture.html
I love the green. I am slowly getting into painting furniture something other than creme, white or black.
Another job well done. I was going to paint my bar stools today but it was raining. :( I was afraid I would end up high as a kite if I tried painting them in the garage…I’ll be patient and wait. Maybe tomorrow. Who knows, one day I may be brave enough to take on projects like this!
Beautiful work! I love the way you mixed the paint color yourself!
I love the color and what a brilliant idea to mix your craft paint with the wall base. I’m totally using that hint.
THREE projects actually. :) This is getting me excited to get going!!
Absolutely gorgeous! Check out my blog, many spray paint and house painting projects are about to be showcased.
You did a great job! And yes – I am about to paint my furniture actually – take a look at my blog!
How lovely!
Nice job on this desk. Love your blog!
I’ve nominated you for The Lemonade Award! You can pick it up on my blog here: http://www.craftynest.com/2009/05/the-lemonade-award/ Congrats!
I love what you did with the desk – it looks fabulous! You have one lucky daughter :-)
I just redid a chair this weekend. You can check it out at my blog: http://babendure.blogspot.com
P.S. I found your blog a few weeks ago and I absolutely love it!
Well, guess what? I found a desk almost exactly like yours at our local ReStore. Only the price tag was $25. They just got it in yesterday, so I doubt they’ll come down on the price, but we’ll see. If I get it, I’m looking to you for inspiration and guidance!
Gorgeous! I do have a question about mixing paint. Maybe you or your readers can help. I want to lighten up some paint that I ‘liberated’ from the dump…it’s a beautiful blue, but I need to lighten it up with white. Now, how do I keep that from looking too flat? It’s an eggshell finish, but I want to make sure there is some depth to it…any suggestions?
I think that desk looks totally adorable and perfect for a girl’s room! So glad you didn’t paint the hardware. It looks perfect.
Wanderluster sent me – and I am so glad that she did – this looks great! I am totally all about the custom paint color :)
XO – Katie
Hi,
I live in LA too. I haven't been to St. Vincent DePaul, but I hear wonderful & not so wonderful things about that place. Just wondering, what are some of your other fav thrift stores. I am partial to American Way (Burbank) and the Council of Jewish Women (Fairfax) but alas, mostly I go to the many Good Will stores. There are so many on just my drive home from work. But, they do charge more. There is a very nice new one at Beverly and Fairfax. Anyway, love your blog! Looking forward to reading more of it.
Ohhhh… new to your site. YOu are speaking my language. I own a faux finishing company…. so am always looking for furniture to transform!!!! I’m inspired! Thanks!
Oh I LOVE this and the color is just WONDERFUL! My dd has a similar piece I’m wanting to paint, but not sure how to remove that hardware – how did you get it off, I don’t think it’s screwed on like knobs are.
Thanks!
~TidyMom
I can't believe you got that desk for less than $10, what a find! It looks beautiful with the green paint.
Wow – how beautiful! That you for all the step by steps – and good step by steps! I'm inspired.
Wowie!! You are brilliant! Can I post a couple pics and a link on my blog this Friday? Let me know! Thanks!
~Andy
poppiesatplay.blogspot.com
Thats the VERY desk I have. Except it’s white. Been in my family forever, I’m going to paint it black for my office!
I adore this! I’m getting ready to do a desk over the holidays when I’ll have some time off. I can’t wait. I would love to do a green one. However, this one is going into a red and orange room. I don’t want to do black, although that would be the obvious choice…do you have any ideas?
I’m sooooo glad you posted this!! Been a fan of yours for a while. In fact, you inspired by “new office” transformation!! BUT…I need to finish my office by painting an old dresser to use for organizational purposes. After reading your tutorial I AM READY to tackle the project!!! Thanks so much for sharing!! You truly give me that ” I CAN DO THAT” attitude!!
I think I have a girl crush on you Centsational Girl! I’m searching high and low (my husband’s moderately concerned b/c I “eye” every yard sale and antique shop we drive by) for a secretary or rolltop dresser for my home office. I’m a stay at home mommy and real estate extraordinaire. Oh yeah and my office is in my dining room so I need a fast way to cover it up when we have dinner guests…but it has to look nice. Found a clunky rolltop at Goodwill for $40 but passed it up because it didn’t have exactly what I was looking for. I’m on a hunt for super cheap secretary or hutch that can be closed to hide all my work stuff. You have inspired me to keep looking for a good deal AND what I want. When I’m ready you better believe I’m coming back for this tutorial. You rock!
Your refinishing directions and photos are excellent… I will be recommending and linking to you from my blog!
Oh just beautiful! I love how you mixed colors to get what you wanted! Can you tell me more about this scrapbook paper and linen water for liners? So curious! Keep up your fabulous work!
THANK YOU I WAS LOOKING FOR THIS EXACT SAME JOB! COLOUR AND EVERYTHIN!! THANK YOU SO MUCH!! AND KEEP POSTING!!
Finally! I’ve found a site where painting is explained in a way I can easily understand! YAY! Your desk is beautiful! I have a little chair that someone was throwing away but in perfect condition, but really BAD paint, and have had paint for it for over a month. This will be my first paint job and I’m SCARED!! So, needless to say, in all my searching about how to paint, your site is the BEST! Thank you! Especially for the pictures too. Also, more about linen water and scrapbook paper! OH, one question: Can you spray paint over really bad paint? Thank you! You rock!
Thanks for the info. The desk looks great. I redid a desk this summer that has been in my mother’s small house fire. It was in the attic and the contractor sprayed the wood and everything else, because they did not remove it, with silver spray paint. The desk was mine when I was a child. I had dark brown paint and I painted it. I only did one coat because when it dried it looked like I had antiqued it. It was great.
I am stripping a dining room table and 6 chairs. My daughter wants them painted white. I am using oil base primer and paint. What should I use to protect these pieces? Will the minwax polycrylic protectant do ok and not yellow?
Hi Ginny, yes the Polycylic will work just fine, you can choose either satin or gloss finish.
I’m about to attempt a really old school desk with the lift up lid and seats attached. I can’t wait! Your desk came up beautifully, well done :)