There are many names for that paint job we all love so much: Hand Rubbed, Distressed Off-White, Vintage French, Rubbed Cream, Antique White, Shabby Chic. Over the weekend, I developed a unique way to distress without all of the stress !
.
Supplies:
- Tea light candle
- Rustoleum ‘American Accents’ Spray Paint in Heirloom White
- Fine sandpaper
- Baby wipes
- 1 yard silk blend damask from scrap bin
- Nail head trim kit (leftover from previous project) with rubber head hammer
- Foam filler (optional)
- Staple gun, stapler and hot glue gun.
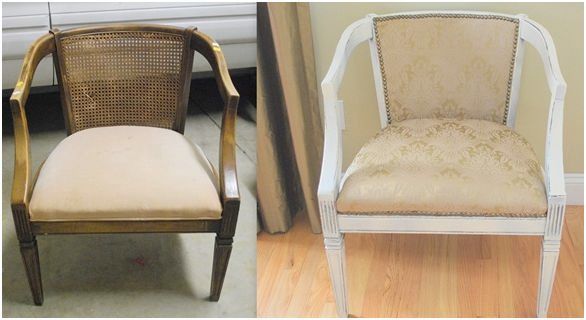
I found this ratty rattan chair at the local thrift store, paid the merchant $8 cash, and walked out. My husband laughed at me when he saw the stained peach velvet cushion and hole punched through the back of the chair. “What can you do with that piece of (bleep)?” Has he learned nothing from this blog? :-)
Before:
.
Step One: Remove seat and give the wood on the entire piece a light sanding with fine sandpaper. Wipe down with baby wipes.
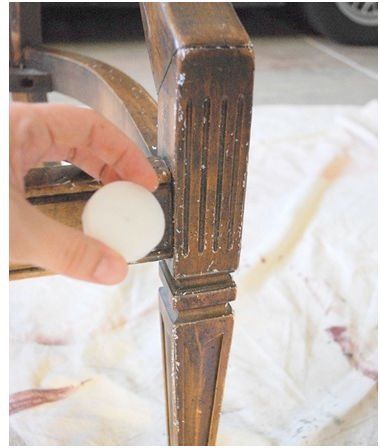
Step Two: Did you know that you can use candle wax when antiquing furniture to prevent the paint from adhering to the edges? Rub your piece with a tea light candle on all of the edges where you want the wood to be exposed. Gently remove leftover wax ‘crumbs’ with baby wipes, but be careful not to rub off candle wax on the edges.
.
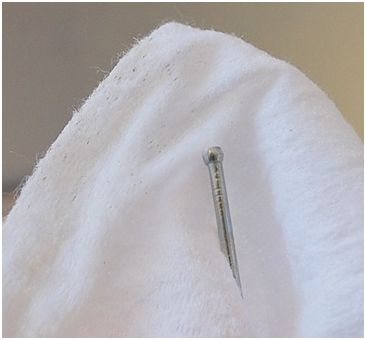
Step Three: Apply a coat of spray paint (in well ventilated area) to one section of your piece, then wipe the edges with a baby wipe where you want the paint removed. Work section by section because spray paint dries quickly. For tight spaces where your fingers won’t fit, wrap a small nail with a baby wipe, to remove paint from smaller crevices. Repeat with a second coat of spray paint for areas that didn’t get coverage with your first coat. Let dry 24 hours.
.
Step Four: If your chair is really old, as mine is, you may find it necessary to reinforce the seat with medium foam, trimmed to fit. Iron fabric so that it is wrinkle free. Center fabric, and recover chair cushion with your fabric of choice and staple gun.
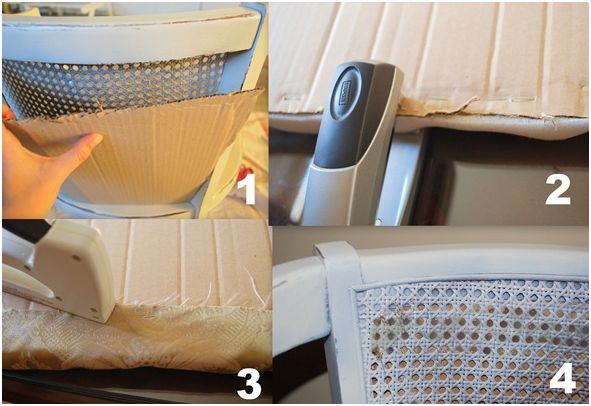
I had to do something to disguise the hole in the rattan, so I fashioned a rear cushion in four steps:
- Create cardboard skeleton of back of chair.
- Staple foam trimmed to fit to cardboard.
- Staple gun fabric to foam/cardboard.
- Stitch “cushion” to rear of chair, then solidify with hot glue application for staying power.
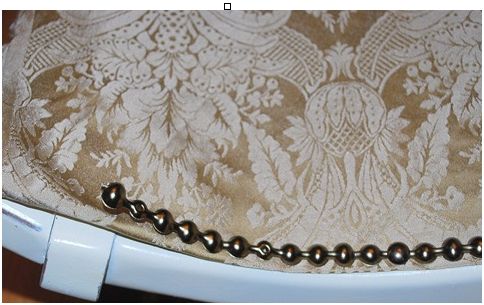
To disguise the hole from the front, I trimmed the silk blend fabric to fit, then folded under the edges, and fastened to the chair with my nail head trim kit. [See previous post on a fabric covered headboard with nail head trim for more information on this kit and its application.]
Refasten chair cushion to seat bottom, then attach nail heads to seat cushion with nail head trim kit. You can really see the paint treatment up close in this next photo.
So now this tres jolie chair sits in my traditional living room, next to the piano.
Cost: $8 Chair, $3 Spray Paint, $2 fine sandpaper, $7 foam filler, $5 scrap of silk blend fabric. I had leftover polyurethane and a nail head trim kit from previous projects.
Total cost to me = $25 (add another $20 for polyurethane and nail head trim kit).
Vous l’aimez ?
..





Oui, je l’aime! Non, je l’adore.
I bet Mr. CG had to eat a big-ole slice of HUMBLE PIE! That looks fantastic! Well done: You ARE centsational!
Gorgeous job–I love it! And such a sucker for that nailhead trim. It’s so pretty!
That is beautiful! What an amazing Job you did.
Great chair! What a find! Thanks for the tutorial too! I’ll definatley be using your technique!
Beautiful! Great work!
I share your love for chairs with great legs! Great job on a great looking chair.
What kind of a "pad" did you use to apply the polyurethane?
Oh this looks great! I have been looking for a chair similar to yours and haven't found it just yet.
Hello~
Just happened across your blog while looking for inspiration for some nail head work I want to do on some pieces.
Your chair looks great! Would you mind if I add your blog to my list of Lovely Links?
Thanks!
Jessica
http://www.designingafamily.com
Oh!
I have two of these, except mine have orange crushed velvet on the seat and back, and the rattan is under the arms (where yours are open). Boyfriend is similar to Mr. CG – he hasn't learned anything from my craftiness. I inherited mine from a Vallejo Freecycler who never found time to recover them, and I think I took her procrastination home with me at the same time!
Def adding you to my blog list. :)
http://www.adorningalabama.blogspot.com
Hi! Im so glad one of my friends sent me to your site! I am about to try your candle trcik to distress an oversized candlestick! I cant wait to post to my blog and tell them where I got your trick!! Thanks os much again!
Do you have pictures of the chair from behind so we can see the back?
I’m trying to paint some pine nightstands I recently bought. For some reason I can’t see the pictures on this post though! They only show up as a black square with an exclamation mark through it. Are the pictures posted elsewhere?
I love your blog. I have done several project with the help of your blog, Thank you for that. I am trying to distressed my dining chairs and I have a question. After sanding your chair do you put primer?If not do you have to completely sand off the previous paint/stain I can’t see the picture like Calli says. Thank you again for all your help.
Oh I keep forgetting to update this post, sorry! I don’t sand away all the varnish when I use a Zinsser spray primer, just scuff it up a bit with a sanding wedge to remove any debris, wipe down, and prime.
I am painting a settee in this same style. I’d love to see these pictures to get a better idea of how to do it! You are so talented.
I just discovered your blog and I am absolutely in love with everything you do! You are a genious! You have opened my mind to so many potential beautiful pieces of furniture. I can’t wait to get started. Also, I love this post, could you update the pictures? They seem to be broken files. I’d love to see what the original chair looked like. Thanks so much!!
Christina
Hi Christina, thank you, and thanks for the reminder to update this post with the pics – they got lost in transition !
Kate