*This post in partnership with CliqStudios.
There is that turning point in a kitchen remodel when you can actually start to visualize the completed space and for me it’s always when the cabinets are installed. Last weekend when I was in Las Vegas I checked in on the kitchen remodel progress and was so excited to see the space coming together with the cabinets in place!
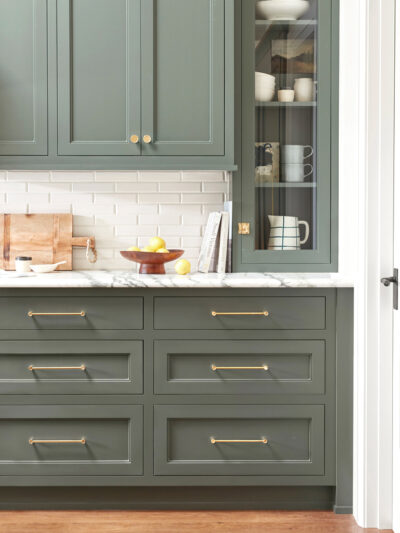
The fully assembled cabinets were delivered in January by truck and we unpacked and inspected each one, then then brought them into the house to acclimate. Instead of an all white kitchen I opted for blue gray bases and white uppers. With white countertops and a variegated blue gray tile backsplash, this kitchen will be a stunner when complete! (Find sources for the kitchen cabinets in part one of this remodel series).
I chose upper cabinets instead of open shelving to maximize storage, I like to include a series of glass fronts for display, I think they feel less heavy than all solid doors and also provide open shelf style storage but protected behind glass.

Our upper cabinets and bases were installed with a 30 ¼” space between them to allow for the range and hood to slide in but it left a gap on the left side so instead of trimming the gap we’re going to fill it in with sheetrock instead to make it seamless.

I chose drawers instead of cabinet doors to the left of the range for cookware, and LOVE the soft close drawers that slide in on their own. You can see the painted sides of the cabinet where they are exposed and the sides where they are not.
We’ve installed kitchen cabinets before for the Alma project remodels (here and here) but opted for a professional finish carpenter in this case for a few reasons. 1) To save time since I was out of town when it happened, my Dad supervised and snapped some pictures in my absence. 2.) Precision was so important since a level revealed the floors, walls, and ceilings weren’t straight and 3.) There were two angles in the kitchen at the sink base and in a corner and a finish carpenter would make it all right for the countertop installers. On top of the install, they had to trim the backs of two cabinets and construct the refrigerator frame and they did an amazing job.

I asked Joe (the finish carpenter) what his opinion was on the quality of the CliqStudios cabinets since he’s installed them all in his 30+ years experience. He told me that because they have plywood sides and a full back, soft close drawers, nickel plated steel hinges, and smooth enamel paint, the cabinets are excellent quality.
In the old kitchen there were cabinets that surrounded the fridge, I had two problems with this scenario: the upper cabinets were too shallow and the refrigerator too deep. See how it sticks out beyond the arched opening?

We moved the old refrigerator out into the garage and replaced it with another gently used one my Dad found for us (his friend was moving). This one is cabinet depth so that it can sit inside a 24” frame.
The new refrigerator cabinet is also 24” deep, but we still need to add some shelves (DIY project!) to the left and recess the electrical outlet and water line so that the refrigerator will sit inside the frame. It allows for panels so we will make them at some point (DIY project!) but for now the white is perfectly fine. Also unseen is a 3” edge on the other side to allow for a full door swing. The fridge no longer blocks the entry and is a big improvement on what was there before!

My least favorite thing about this kitchen is the angled peninsula where the sink sits since angles are wasted storage space, unless you order completely custom cabinets that include those spaces in the cabinets. But since we cut the pony wall down to cabinet height to allow for counter instead of bar stools (see the before here) I’m not so opposed to it. It’s more open concept which is great for spending time with and entertaining people in the breakfast nook to the left and the family room beyond.

I call this the non-range wall, here’s a peek at the kitchen before we replaced everything from the flooring on up to the lighting.

I decided to remove the pantry from the space entirely and instead install two pantry cabinets in the breakfast nook (see below). The choice allowed for more counter space in the kitchen and makes if feel less cramped.

There is one problem though, despite our accurate measurements we ended up with a slightly wider gap to the right than expected so again here were using drywall to cure the problem. We will open up the entry by eliminating a few inches that protrude into the entry (top to bottom) and add drywall to the edge of the base cabinet to fill the gap. It’s hard to explain but I’ll show you what it looks like when complete. The 3” gap between the wall and upper cabinet will have a filler piece so it meets the wall uniformly.
Just beyond you can see how the kitchen connects to the breakfast nook where we installed a set of pantry, base, and upper cabinets to add more storage to the home in the same style of cabinetry and same color as the upper cabinets in the kitchen.

Here is the breakfast nook back in July of last year before we removed the popcorn ceilings and wallpaper and replaced the flooring. Notice the electrical outlet down below.

I had the electrical outlet raised for access and added a set of 18” deep cabinets to the space. Both of the tall cabinets are the same height as the kitchen cabinets but since the ceiling is higher in here we trimmed them with crown molding. They can act as a pantry or to hold bulk or cleaning supplies, the middle base cabinet will have a countertop where anything can sit (appliances, serveware, etc.) and the upper glass front cabinets are for storing more pretty things.

Next I’m making decisions on countertops, appliances, hardware, tile, and lighting, I’ll share more thoughts on those in the coming weeks. We’re getting closer to the finish line! I’m really excited.
*This post is the second in a four part series sponsored by CliqStudios, we were provided with discounted cabinets, all opinions are my own.
…


These look great. This is turning into quite the stunning transformation! Love the colors you chose for the finishes, and the ceiling looks amazing. The wallpapered ceilings in the before pics are halfway to crazy town. I’m in the process of moving into a new place, and I think we’re going to be taking on our first kitchen reno in this house (though not right away–just dumped all our money into buying the place!). Looking forward to seeing your finished result!
We just updated our laundry room with cliq cabinets, qualtiy is amazing for the price!
Great job! It is coming together very nicely.
So pretty! I love the color of the base cabinets and the way they look against the color of the floor.
Wow! It is coming together so nicely. I love the soft and calming color palette. I’m already anticipating the fabulous choices you are going to make with the rest of the finishes. I’m thinking there is going to be some gorgeous quartz, maybe some marble, and some shiny stuff? Can’t wait!
it’s getting along really well:-)
xoxoxo
Ewelina
chiclifestyleofewelina.blogspot.com
We’re also doing grey lower cabinets with white upper cabinets, but I have yet to decide on the counter surface. Oy.
Question: In the breakfast nook, why didnt you take the cabinets all the way to the ceiling?
We wanted the cabinets at the same visual height as the kitchen upper cabinets Marie since the ceiling in the kitchen is lower, just a personal choice.
Wow! It’s looking great! I’ll have to check out Cliq Studios when we’re ready for a kitchen renovation!
Really looking good. In the wasted space just left of the fridge, could you put in recessed storage/shelving that is accessed from the other side? with or without a door? Looks like not too hard while there are not counters and you can see where it falls. Maybe used for games or extra candles, flashlight etc.
Hello! I love what you’re doing in here– I just discovered your blog. We will be renovating a small kitchen that has a very similar layout as this one, and I’m brand new to all of this and feeling a bit overwhelmed, but I know it will be great. May I ask what flooring is being used in these photos– I love it! Thank you so much!
Andrea, we installed Daltile porcelain wood tile throughout the home, see the details here:
http://www.centsationalgirl.com/2014/08/finished-floors/
Kate
Looks beautiful! I have been anxious to make changes in our kitchen, and painting seems the budget friendly way to go, but now you have me checking out Cliq Studios! I love the gray base with the white uppers. I plan to have the same scheme here, or perhaps both base and uppers will be light gray. What paint color (from Benjamin Moore or Sherwin Williams) would you say most closely resembles the gray of your cabinets?
What are you going to use for a counter?
Sarah we will likely choose a white quartz surface for the counters, I don’t have the cabinets with me so I can’t color match the gray/blue hue but Ben Moore’s Boothbay Gray I’d say is pretty close.
Wow! Awesome job! This looks great!
The Office Stylist
http://www.theofficestylist.com
I LOVE the cabinet color! It’s gorgeous, and so YOU. I know the house is a fixer, but I love seeing your personality in all the upgrades.
Love love the cabinet colors! Great job. Can’t wait to see the countertops and backsplash. Love your blog. You are very talented!
Really well done!! …. I LOVE the colors & also was going to ask what the grey was. I think that you have answered that already. I have a similar lay-out & would have never thought to take down that wall behind the sink & make it counter height…. Can’t wait to see the finished kitchen.
The new cabinets look great!
Looks great! Ever thought of installing in-counter knife storage in the dead space to the left of the fridge?
That’s a good idea Joni, although I’m not a fan of knives out in view, just a personal preference, but I do like the idea of shelves for bowls, a plant, art, etc. :)
Everything is coming together so nicely! You are doing a great job, Kate!!
I was going to make the same suggestion as Mia – I think that little nook besidthe fridge, if accessed from the other side, may be able to fit a little wine bottle storage area.
Great job!!! I live in Vegas and the before photos bring back memories of our first home the kitchen is identical. Quick question, how come you chose not to take the cabinets or molding all the way up?
Hi there. Thanks for sharing your CliqStudios experience. May I ask how you ended up with gaps despite your accurate measuring?
We are looking to renovate our kitchen and considering these cabs.
Thanks.
Because of the angled wall Jen, after the cabinets were installed we had a wider gap than expected :)
Hi,
The gap you talked about on the right side of the lower cabinets, you cannot use it as wine storage or bottles storage or else ?
That could be a grat use of those square inches.
E.
The cabinets look great! We are strongly considering using Cliq Studios for our cabinets. It’s great to see someone’s experience with them.
Can’t wait to see what the finished project looks like! So far… gorgeous! :)
What kind of fridge did you choose? I love the look of it.
Thanks!
K.
This looks fantastic!! My favorite part of decorating/design is Kitchens & Bathrooms. I love what you did and those 2 toned cabinets are fantastic it really brightens up the space. That added storage wall unit is a great idea, so functional and pretty.
Thanks for sharing! Can’t WAIT to see it finished
Lauren
http://www.lbdesigns1.wordpress.com
xx
Oh my gosh, I’m so jealous! It looks beautiful already, I can’t imagine how happy you must be as well as anxious to get it done. A kitchen reno is on our “to do” list as well, but will have to wait for a while. Awesome pics, can’t wait to see it completed!
Best of luck…it looks amazing already! I can’t wait to see the final product!! Everything you touch turns to gold!! Wish I could win you for a week…of course I’d like longer, but would settle for just a week! :-)
Don’t you love the cabinets that go to the ceiling? It makes the room seem taller and there’s a lot less wasted space. You just need a step ladder handy for those top shelves :)
I’m sure you have posted somewhere already but could you please share what white paint you used for cabinets? Love all your choices!!!
I have also used CliqStudios cabinets and I agree, their quality, price and selection are great!
What a lovely transformation already and it’s nice that you’re pointing all the details! I’m actually working with a great designer from Cliqstudios (Kevin) and he’s been wonderful. Looking to remodel a tiny kitchen this Spring and seeing your transformation is helping me. Thank you so much.