One of the many things I love about blogging is connecting with people from all across the globe, and I really love hearing from those knee deep in their own renovations and reading about their innovative home improvement solutions. Last week, Courtney from New Zealand sent me pictures of her DIY plywood floors and I was so impressed with her resourceful approach I asked that she share the details of how she achieved this look on a budget so I could share it with you!

First, here is a little background on the project from Courtney:
“I am a full-time mother of one (currently), wife, and homemaker. My husband, son, and I live on a farmlet in the foothills of the Southern Alps near Christchurch in New Zealand, complete with animals and an ever-expanding potager garden.
In addition to living a semi-rural lifestyle, we are in the process of updating our home, a grand circa-1905 Edwardian villa. We’re no strangers to DIY; however, most of our projects here have been borne out of necessity because of the unique proportions (8-foot windows, arched windows, high ceilings, lack of closets, etc.) throughout. As we are starting family life and live in the country, an easy-living and "not-too-precious" attitude toward our furnishings sees me sewing curtains and blinds, painting secondhand furniture, and curating an eclectic collection of home goods compatible with dirt, little hands, and the occasional spill.
The "craft room" (as it’s known) inspiration came as a result of all of these things: we wanted a space for sewing, painting, and letting the littlies experiment without worry. I loved the driftwood look, and the vinyl equivalent in my area was around $140.00/square meter, or nearly $13 per square foot – definitely out of the budget.
The beautiful plywood floors I saw on Pinterest and beyond convinced me this was the flooring solution for us, and after searching for a tutorial on how to DIY the driftwood look, I found none. So, I gave it a go with some paints I had on hand, and even surprised myself with how well it turned out!”

Materials: C/D grade ½” pine plywood (we looked for sheets that had lots of knots, minor cracks and other “character” on the D side); 16-gauge 2” nails; 100-grit sandpaper and cork sanding block; 2:2:1 wash with white or off-white chalk paint, water, and light grey paint (optional); large paint brush; black oil-based enamel paint; turpentine; foam brush; flooring top coat (wax, polyurethane, etc.); face mask for dust and fumes; knee pads.
Tools: 16-gauge finish nailer; table saw; circular saw; random orbital sander (with 240-grit pads); mitre saw for cutting planks to length/angle cuts (optional).

Note: There are many tutorials about how to install a plywood plank floor; however, I
thought I’d include how we did it since it’s different than many I looked at online.
1. Make the planks: Start off by cutting a sheet of plywood in half width-wise. To do this, either set the sheet down on top of some 2×4’s or on saw horses. Measure a line down the middle of the sheet. Then, with a circular saw, cut the sheet in half. You now have two 4×4 foot squares. To cut your planks, set the blade height on the table saw to just above ½” and set the fence to 6½” (or your chosen plank width. With the 6½” setting, you can get fourteen 4-foot long planks per sheet). Starting with the factory cut edge along the rip fence, carefully feed the half-sheet through. Continue feeding the remaining half-sheet through until you are left with a small waste strip (save this to stir paint!).
2. Installation: After all the planks are cut to width, inspect each one on both sides and select the side that has the most character. Mark the other side with a pencil to make installation easier later. It is important to distribute those planks with character across the floor to balance the clear planks. Keep “unusable” ones like those with stamps or other defects to use when you need to cut a short piece at the walls. Prior to nailing down the planks, to make the plywood look more like solid wood, you will need to bevel-sand the top edges of each plank. You want to put a small 45-degree chamfer on the top edge on all four sides. This sounds complicated and time-consuming, and though it does takes a little extra time (about 15 seconds per plank), it makes a huge difference in the look and feel of the floor. To do it, use a cork sanding block and 100-grit sandpaper to swipe each edge a few times. Your planks are ready!
3. Prepare the subfloor: We installed this over a subfloor consisting of particle board over 1” tongue and groove. Since the planks are only ½” thick, they need to be nailed to, at minimum, a 3/4” plywood/strand board subfloor. If your subfloor is concrete, you can use a suitable adhesive compound. (Many tutorials recommend using an adhesive in addition to nails; we have not found this to be necessary).
To start, we stapled bitumen building paper (tar paper) over the entire subfloor. Once
the bitumen paper is down, measure up a reference line somewhere in the middle of
the room; it should be parallel to both opposing walls. Load your 16-gauge nail gun
with 2” nails. Take a plank and align it somewhere along the reference line. Now,
face-nail the plank to the subfloor. We put a nail in each corner plus five nails down
each long side (fourteen nails per plank) equidistant from each other.
You may need a few extra nails to hold down a stubborn plank. In terms of spacing, you can choose to install the planks tightly butted against each other (which is what we did) or insert a small spacer, such as a brad nail, metal shim, or even pennies, between the planks. Continue nailing planks along the long edges until you reach the end of the row.
For subsequent rows, stagger the planks by one-third the length (16 inches). It’s
best to not have more than two unfinished rows going at a time. Remember to save
all the offcuts, because they will likely be used to start or finish the upcoming rows.
When you install the last rows, you may have to measure and cut-to-fit each plank.
Use a table saw to rip planks down to width, and a hand or miter saw to cut planks to
length; bevel-sand newly-cut edges. Once the floor is completely nailed down, you can finish the edges with quarter-round trim or decorative floor skirting.

4. Painting Preparation: Finish-sand the floor with a random orbital sander using 240-grit paper. Ensure the planks are as smooth as possible, especially where they meet up with each other.

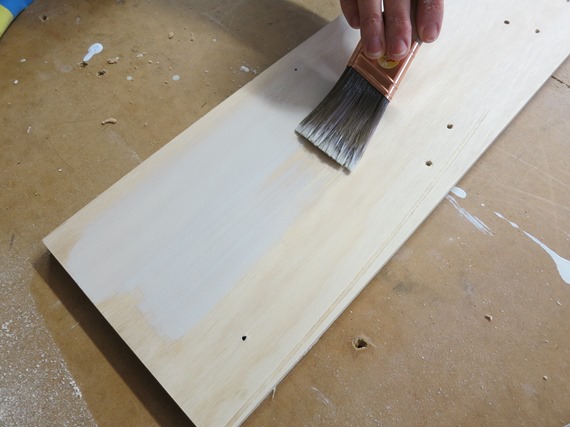
5. Painting, Part One: Mix floor paint using two parts white or off-white chalk paint, two parts water, and one part light grey paint (optional) and paint it on the floor with a brush, stirring frequently.
Let it dry completely (usually an hour or two). The grain of the plywood will likely rise a bit and the floor may become rough again. Go over the floor with a cork sanding block and 100-grit sandpaper. This will smooth out the raised parts and simulate the grain of hardwood. If it distresses or wood shows through, that’s okay! The idea is to create some grooves for the black stain to settle into. (After doing this, I recommend going in the direction of the grain. I did not because I thought it might create some “wear” on the new planks. Though my husband thought parts looked like rough-sawn boards, I did not prefer the effect it created in most spots.) Experiment with using different amounts of pressure and don’t be surprised if this step goes quickly (it only took me 20 minutes). Thoroughly vacuum up any dust.
Painting Part Two: Mix 1-2 teaspoons of black oil-based paint per cup of turpentine. It will be very watery. Use a foam brush to apply this in the direction of the grain, taking special care to apply in the knots/splits, nail holes, and in between the planks. Let this dry overnight.

Use sanding block and 100-grit sandpaper (with the grain) to lightly sand through the black wash until the desired colour is achieved. If desired, finish sand with a sanding block and 240-grit sandpaper with the grain; however, I preferred the slight wood grain effect I had by leaving it at 100-grit smoothness. Thoroughly vacuum up any dust. Apply three coats of your choice of top coat (polyurethane, floor wax, etc.) as
directed, and you’re done!


Amazing job Courtney! It’s a lot of work but they saved so much and created their own beautiful flooring with an innovative approach and a driftwood graywash finish, bravo!
If you have any questions for Courtney, be sure to leave them in the comments and she can respond with more detail. Who’s tempted to try this clever approach to affordable plank flooring in your home?
.

They look amazing! What a huge project to take on but totally worth it!
Absolutely gorgeous! My only concern is the softness of the pine. I don’t know how hard/soft pine plywood is, but regular old pine is pretty soft. Is that an area of concern that over time the floors will show wear and tear because of the softness of the material?
We pit a half inch pine plank floor in our bedroom suite two years ago. It has held up really well and any dings I gave put in it just add character to the floor. It takes a good beating.
I absolutely love the floor…We have been thinking about doing our living/rec room areas with the plywood flooring and probably going with a darker stain. Yours is gorgeous!
Well, I’m never doing that, because I’m I’m too lazy. But, geez, it looks great. I wish I could convince someone to a) buy me house and b) fix everything up for the price of pizza.
Gorgeous!! Id love to know how much this floor ended up being per sqft!
These are lovely! Thank you so much for sharing such a detailed guide on how to achieve the same look. I’ve got some ideas now :)
What was your cost per square foot by going this route?
This is amazing! Makes me wanna rip up some carpet and do it right now :)
This looks amazing! Great work!
Beautiful! Courtney and hubby has to be extremely proud of themselves. A professional couldn’t have done a better job! I love it! And the color! Perfection.
JaG
Awesome. We’re looking to tear up laminate flooring and carpet to replace with better quality laminate. But, I think this may be something to consider. Thanks for the tutorial.
Beautifully done! I love the look of graywash but prefer an alternative to graywash stain (which feels like cheating somehow). Watery oil-based black paint: genius. Totally borrowing this idea. Thanks!
I’ve seen plywood floors on DIY websites before and they’re quite intriguing and pretty cost conscious from what I gather. My big worry would be dirt and debris falling into the larger and more irregular cracks unlike those of regular flooring. I pulled carpet out of my master when I bought the house and, even though it was clear the previous owner was tidy and clean, there was literally a pile of dirt on the subfloor beneath the carpet. Ick!
Regardless, Miss Courtney did a wonderful job and her faux driftwood look turned out really well.
These are fantastic. We’ve been looking for a way to upgrade our concrete floors and this may just do it. So glad you posted this. Thanks Ladies.
wow. That floor looks amazing
Love
Ewelina
xxxxxxxx
chiclifestyleofewelina.blogspot.com
We have plywood plank flooring in our kitchen that I would guess was installed 40 or 50 years ago. It does show scratches/dents and has been restained at least once (and needs to be again). I love the look, but there are gaps between each board that are a total pain and will absolutely never be clean. Hopefully the way this was installed will decrease the size of the gaps and won’t be difficult in terms of expansion. For our rustic kitchen, it works and shows quite a bit of character.
I would love to see a picture of YOUR floors if you don’t mind.
This floor is gorgeous, and just what I am looking for to replace my kitchen floor. The color is perfect. I’m thinking I might try using stain instead of paint, but I’ll certainly do a trial plank first Im thinking that it might last longer with the stain sinking into the wood, seeing it will be a high traffic area. Don’t know, will see. Thanks for the great tutorial.
Wow! That is gorgeous. I was so intrigued with this and immediately went to show my husband. We are looking for a cost effective solution to a guest cabin we are going to build on our vacation property in Maine. I never knew there was different grades of plywood or that it could be used for flooring.
Absolutely stunning! She totally rocked this project out and the tutorial was great. I’m pinning it for sure just in case I find the room for it, thanks for sharing!
My husband and I are exactly in the middle of a DIY plywood hardwood flooring project and I and thrilled to see you feature another project like ours! Courtney did an amazing job and I hope ours look as good as her does!
Thank you all for your questions and lovely comments!
In response…
@Heidi: The pine is soft and will ding and dent. We expect this and think it adds to the look! You could go for maple, birch, or oak plywood if doing this in a high-traffic area.
@Jace @Caitlin: Our room was on the small size; four 4×8 sheets covered it. Since we had all other materials on hand, it only cost us about $1.00/square foot!
@Paula: We did not use spacers as many tutorials recommend for this very reason. Instead, we added the bevel for the tongue-and-groove look and butted them up as tightly as we could. That said, there are still slim cracks between some boards. Polyurethane filled most of these and a broom or vacuum seems to take care of the rest (as well as the knots and nail holes).
@Amanda: I hope our floors last 40-50 years – wow! In a kitchen, you might consider filling the cracks, or, even better, using a heavy-duty, solvent-based top coat like those used in bathrooms or on bar tops. It’s a smelly job but would fill in any small crevices while protecting from food and water.
@Kathy: The oil-based paint + turpentine is sort of a “poor man’s stain”, which will sink into the wood if you use a chalk paint (latex isn’t as porous). For a high-traffic area, your choice of top coat will be key also!
The floor looks totally amazing. Genius! I’m literally totally floored!
I am amazed by how beautiful they are! This is a MUST DO project for our beach shack renovation!!! Thanks for sharing!
Looks amazing! I don’t think this is a project that the average DIYer could tackle though..it’s a lot of hard work!!!
That is one of the most amazing DIY projects (& results) that I have ever seen! I showed my husband, and even he was in awe! I love the driftwood coloring, and the natural wear of pine floors will just increase the fabulous patina over time.
I love out it turned out…looks great. I”m really impressed with this DIY project, good job.
Absolutely stunning Courtney! I would love to see your home and surrounding land–it sounds wonderful. The job seems painstakingly detailed but hats off for doing it! I think you may need to start a blog so we can follow the life on your land, home projects, etc. Congrats!
Can the planks be finished prior to installation?
Wow! I am so impressed!
P.S. And YES to the suggestion above that you should start a blog about your life there on the farm in New Zealand. It would be so much fun to see what projects you’re doing and what the farm and house look like.
Great Job! I was looking for a way to get a weathered wood look to apply to boards that will encase a metal file cabinet. Looks like this technique will work and I won’t have to purchase more expensive wood for the job.
SO beautiful! I love that you didn’t use spacers – so much more practical. Beveling the edges was an awesome alternative.
Amazing! Just amazing!
@Margaret R: I would advise against pre-finishing before installation just to be sure all the planks are level and smooth. Applying the finish once it’s laid will also go a lot faster. If you’re doing a large area and would like to save time, renting a floor sander would be your best option as that is the most time-consuming part of this project.
Is it 6 parts black and one part turpentine?
I LOVE THIS!! My hubs and I are planning on doing a hardwood floor with plywood this spring and I really wanted the driftwood look. I am so excited to have a tutorial on this. Makes it so much easier. Thank you.
@Marianne: Thank you for pointing out an error in the tutorial! After some experimenting, the ratio is more like 9 parts TURPENTINE to 1 part paint (not the other way around as originally stated). In other words, depending on how dark you want the floors, use 1-2 teaspoons of paint per one cup of turpentine. Sorry for any confusion!
All fixed Courtney, I edited the text to reflect that correction, thank you!
Kate
I LOVE the color of your floor! Can you please tell me what paint/color you used?
Thanks!
This floor has the exact look my wife and I are looking for! I am going to print this out to use as a guide to do our kitchen and hallway. I would love an update on how this has held up since 2014.
What about your nails…did u just leave them exposed?
Hi! I love this look. My husband just built a table for the first time out of white oak. He’s leaving it up to me to stain. I’m so nervous about it. I loooove the look of the stain you used on this floor. I hope it takes the same. Wish me luck :)
Beautiful work with the floor. Thanks for a useful tutorial. Did you acclimate the planks after they were cut or simply cut and nail down?
Hi,
Im really interested in doing this project. But, is it possible for me to put in on top of a tile ceramic?
Im plain to use 18mm venner plywood
Should i just straight away put adhesive and nail the wood in the ceramic tile?
Does you suggesyme to put some subfloor on top of the ceramic tile first?
Thanks for the tutorial! I have plywood sheets in my upstairs hallway. They have white primer on them already. Do you think I can follow the steps and still get similar results? I might go a little darker on the top stain though. I’ll have to experiment a bit. If I just paint, they will look like painted plywood sheets. If I try this, I’m hoping it will give it character without costing an arm and a leg for new flooring.
Hello Kate,
I have looked at countless DIY floors as we decide what to put down in our sunporch. Your floor is by far the prettiest, and will be affordable. what a spectacular finish. Thank you so much for sharing, great to see all the photos.
Kate, now that your floor has been down a couple of years, have you noticed any color change?
Thank you Kate,
Darlene
Nova Scotia, Canada
What a fantastic look!
How are they holding up after a few years of family wear and tear?
I would guess a light sanding and fresh coat of sealant would freshen them right up.
what if you just laid plywood flooring then routered out the lines to make it look like planks? Is that possible? Or a dremel and dark stain it? I love this floor, I plain to practice the paint job on a bookshelf/cabinet I bought for $10. Really need a new orbital sander again.
Would it be ok to put a thin cork sub-layer for sound insulation?
Thank you so much for this tutorial. I am slowly trying to remodel a home I bought a few years ago. I have had the subfloor in the bedroom for probably a year and couldn’t find anything that I could afford or liked. This is perfect! I am literally crying happy years. Thanks again and have an incredible day.
Happy tears not years. Darn auto spell check. Sorry
I absolutely LOVE this floor. It would look great in my Florida home with beach decor. Seriously, this IS top notch GORGEOUS! I am so jealous, but now motivated. Thanks for sharing your wonderful project with all the tips. Can’t wait to see what you do next.
Great Job! I am wondering after many years and no spaces between planks did they expand or contract at all??
Hi Courtney, it is now July 2018, can you tell us how well your floors have held up ? I too am contemplating doing the plywood plank flooring, but hesitating only because I don’t know how long or how well they hold up to traffic. If I have to replace in just a couple to 3 yrs, I may as well go with professional grade. Fingers crossed yours is still going strong, as your floors look amazing in the pic and exactly what I’m looking for !
Hi April, so sorry just seeing this comment now.. I’ll write to Courtney and ask for an update!
Beth, speaking from my personal experience with ply plank flooring, after 3 years of having it in my living room, the boards are still as they were when first put down. And I also didn’t space them. I live in New England too so the weather here is all over the place.
Just want to make sure I understand the process did you put the plywood Planks on the cement floor or did you put a wood in between the plywood planks in the concrete floor and if so how did you adhere the wood to the concrete
My husband and I *just* did this on our entire downstairs. We haven’t applied the polyurethane yet, but the smell from the turpentine is overwhelming. Luckily we’re renovating the house and not yet living it for a few more days. I was curious what you did about the odor? Completing this project just about made us sick, but it looks GREAT.
I have completed this project in an upstairs hallway and master bedroom. I followed the instructions and the floors came out just as pictured. I purchased the plywood at Home Depot. 4 ply sheets which were approximately twenty dollars each. For the hallway I cut the sheets myself into planks. For the bedroom, Home Depot cut the sheets into planks for no charge which saved a lot of time and fit into my SUV. With two dogs and kids running around the floor does get minor scratches but that was expected. I recommend this project and you will feel accomplished that you made your own floor!