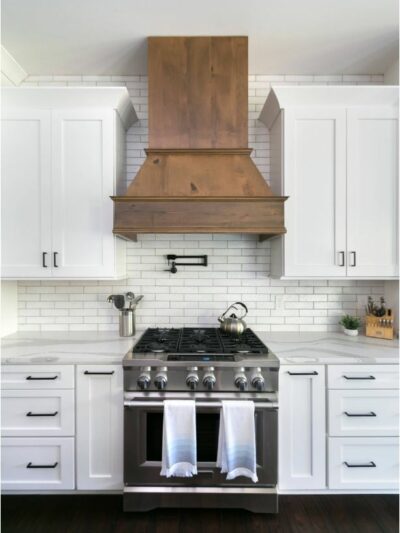
A few weeks ago, I showed up at the shelter kitchen we revealed earlier this week to make sure the mosaic tile backsplash was getting installed by a skilled volunteer, but unfortunately the tile guy never showed up. We never got an explanation as to why he didn’t show, he just didn’t. With an inspection looming, Warren (our partner at COTS) and I looked at each other and decided we would just get ‘er done ourselves that day.
Installing a tile backsplash is not difficult, and it involves following just a few steps from prepping the wall to applying the thin set adhesive, cutting and setting the tiles, and then grouting and sealing. The more challenging part is tiling around a window with mesh tile so that the grid stays perfectly aligned. At first glance you’d think it all lines up easily (basic math right?) but we learned that’s not the case – here’s how we got it just right.

First, I’ll apologize for the quality of some of these in progress photos! I had no idea on this day I’d be tiling when I showed up to the house so I didn’t bring my good camera. Many are shot with a cell phone in bad light, but hopefully they will be illustrative. The project took two days, with me working one side of the kitchen, Warren working on the other, and then we paired up to tackle the feature wall together.
There are plenty of detailed tutorials online for installing a simple glass mosaic tile backsplash, including this one from This Old House, but I’ll do a quick review. What you’ll need: paper or drop cloth to protect countertop, tile, thin set mortar, V notch trowel, tile saw, grout, grouting sponge, level, acrylic caulk.
First, prep your walls so they’re smooth and ready for tile and double check you have enough tile to complete the project. (It’s good to have 10% more than your square footage for horizontal or mesh installation, more like 15-20% extra with diagonal installation due to all the cuts.)

Make sure your outlets are extended to accommodate for the thickness of the tile so the plate will be flush with the new backsplash.

Choose a bottom corner to start (unless you’re doing a unique feature behind the range, then use that as your starting center point). Cut your first grid of mesh mosaic tile with a tile saw to get a clean edge so you can start in corner of wall. If you are using square tiles, obviously this isn’t necessary since you already have a clean edge.

Apply a layer of thinset mortar and notch it with the V edge, then layer the tile on top.

Double check your mesh pieces as you work down the row, making sure they stay level.

Working across a spans of wall with no countertop support, it’s best to install a temporary support so the tile doesn’t slip while the thin set dries. We used a scrap piece of wood screwed into the wall studs for the space behind the range for support which was later removed once the thin set mortar dried.

For tiling around the window, we found instead of starting in the corner of the wall, it was better to start in the bottom corner of the window. We cut the edge of the first piece then lined up the first row of mesh tile directly underneath.

We worked up the left side of the window, making the first round of cuts and checking each row as we went up with the level. Next we established a row across the top of the window to guarantee a straight even pattern above the window.

We found it’s important to establish a straight and even pattern above the window first before making the second round of cuts on the right side of the window.

Here’s a diagram of the order we followed during the installation. Note, if you do step 3 before step 2 you could run into problems getting the pattern to match up above resulting in an awkward seam.

Allow at least 24 hours for the thin set mortar to set, then mix up nonsanded grout and apply it with a grout float. Wipe it down with a large grout sponge. Once it’s dry, apply acrylic caulk to the bottom or corners of your backsplash where necessary.

Ta-dah! A perfect seamless installation of glass mosaic tile around a window!

I’m a huge fan of this design element we’re seeing more and more in modern kitchens, with backsplash tile carried all the way up to the ceiling. I was inspired by some of these favorite looks:


Fiorella Design via Houzz
Are you a fan of this “tile to the ceiling” look too?
Do you have any tips to share when installing backsplash kitchen tile?
.


Great tips, looks stunning! Thank you for your step by step.
How do you recommend cutting that type of mosaic tile if don’t have a tile saw? Will those small cutters that “score” the tile work? Thank you in advance!
Hi Brenda, I’ve never used the small cutters myself but I understand they work well, it’s just a slower process.
Kate
I do like the tile to the ceiling backsplash, but I have a question – My kitchen window is like the last picture, but withOUT soffits. What would you do with tile/where would you stop it if the cabinets are open on top?
Hi Lisa, to pull off the look and keep it consistent, you would need to tile above the soffits and use the ceiling as your cut off point like in the BH&G kitchen. The alternative is to build basic soffits with plywood or perhaps MDF and paint them to match the cabinets. But also take a peek at the Alice Lane kitchen, the tile doesn’t actually go all the way up to the ceiling that you can see in the other images, the homeowner just picked a random high point to end the tile so you could do that too.
Kate
I love all of these!
Wow! It looks great. I am a fan of tiles to the ceiling, I will be doing this in our kitchen when it gets a makeover next year. Thanks for sharing. Yels xox
“Are you a fan of this ’tile to the ceiling’ look too?” I am now!
Did you put anything around the window where the tile stops? Or does the tile just end where the window cuts in? I’m just wondering if I need some sort of a cap/edging to keep the grout from crumbling there or to prevent it from looking messy/unfinished.
Hi Amanda, I forgot to address that! We used 1/2 inch corner trim on the edges of the window to finish it so you can’t see the rough edges of the tile.
Kate
You and Warren did an amazing job!! The kitchen looks fabulous. I love the colors. It’s so nice when people with talent like yourself give back to the community. It makes you feel good too. What a wonderful job you’re doing.
Of course you did it yourself when the tile guy was a no show! :) What a fabulous job, the kitchen turned out beautifully, and I love your get’er done attitude. I’m a BIG fan, we did it in our remodel five years ago with harlequin tiles and I still love it today.
http://simpledetailsblog.blogspot.com/2012/07/transformationkitchen-2.html
It came out beautiful! I love the look, but have a question. What do you do if you have outside corners? How do the tiles meet up? In all of the pictures above the tiles are on a flat wall or on walls with inside corners.
Thanks.
Hi Arli, with outside corners on walls, I’d consider looking into either corner trim pieces – many lines of tile offer them, or with mosaic, just ending it with a clean edge at a natural point where visually it looks best.
You’ll probably think this is so silly, but I was terribly nervous reading this! I’ve always loved this look and am anxious to try it out. And now I’m getting my chance…. My parents just bought a house that they’ll be fully renovating, themselves, with, you guessed it, my help. :O I know this will come in handy, but I’m still second guessing myself, I don’t think all the tutorials in the world will help me get it right. Ahhh, I’m freaking out. Thank you for sharing, I really hope it makes all the difference for me. (It looks lovely!)
Shirley
Hi Shirley, I don’t think that’s silly, it’s natural to be a little anxious about something you’ve never tried before. If you can, get some help from someone with experience to ease your fears, but I say go for it!
Kate
I love the kitchens with tile to the ceiling. Wish I had of done it for our kitchen!!
thanks for sharing!
Looks fantastic! I noticed in the picture of the grout that there is some space between the top of the tile and the bottom of the upper cabinets. What do you do about that? Extra grout/caulk? My countertops and/or cabinets are not perfectly level so we are nervous about what to do with that extra space, especially since it may vary by up to 1/2 inch!
Hi LKS, we filled that with grout and a bead of caulk so it disappears, those two come in handy, or a simple small piece of cabinet trim underneath.
Thank you so much for the tips! We are hoping to do a whole wall like that above our stove. Also, don’t you just love Sarah Richardson?!
Hi Kate,
Did you have to use a diamond blade on your tile saw to cut the glass tiles? I recently did a backsplash in my bathroom with a very similar mesh backed tile and was told I’d need a diamond blade for my tile saw. I was scared off by the idea because I’ve heard they can be very pricey. I scored the tiles instead. Now I’d like to do a much larger area and would love to know if indeed I do NOT need a diamond blade for my saw. Thanks so much!
Hi Ami, yes you do need a diamond blade to my knowledge, all of the tile guys tell me that and we used one on the tile saw we borrowed. It’s necessary for glass tile but not ceramic tile.
Kate
You never cease to amaze me by the projects you tackle – your tutorial makes backsplash tiling seem much more doable than I ever would have expected!
That’s a really nice tiling guide. I really love the tiles and the colors are wonderful. If anyone is looking for more how to tiling guides check this out – http://hometipster.com/category/diy/tiling/
WOW! What a stunning shelter home…a beautiful nest to revive and recover in!! Kudos, Ms. Centsational!!!
Love the tile! Do you have a link to the tile? I have looked everywhere for Misty Seaglass!
Thanks!
Hi Candace, I looked for it online, but the tile was discontinued so no longer available, sad but true. :(
Kate
This tutorial is awesome and so helpful! Book marking this for future references! Thanks for sharing your wonderful pointers with us Kate :)
Wonderful job! I love seeing all the updates.
I love the tile to the ceiling backsplash. I want to try it in my kitchen. I have 3 questions : 1. I want to try open shelving. 2. Can I screw through the tiles to put up the shelves? Do I have to use special screws? 3. Can I tile all the way to the ceiling or should I put some kind of trim up?
Hello HapyGirlX2 – there’s a great post on this very topic over at Young House Love where they hung open shelves over their tile, check it out:
http://www.younghouselove.com/2012/02/thems-the-brackets/
Kate
Yes, I love the look of extending tiles to the ceiling! I’ve been thinking about a new counter for my bathroom. When I do that, I also may add tiles up to the ceiling. It’s either that, or wallpaper. I was leaning toward wallpaper to bring some liveliness to our master bath, but I can hardly stay committed to bedding for long, so I’d hate to commit to a wallpaper and then feel restrained when I want to change my bedding, since our master bath is seen from the bed. A Carrara marble tile may be in my sights instead!
Superb tips – it looks very smart! Your step-by-step guide is really useful too. The tile you’ve chosen is really stunning. Where did you get the tile saw you used from out of interest? Thanks
Thanks for the pics! We are just finishing our kitchen remodel and were having a hard time deciding where to stop our backsplash tile because of a shared wall with the family room, a bar, and a pass through window. We took the plunge and tiled all the way to the ceiling and I love it! A little DIY guilt, we did actually hire a professional because the tiles I chose are not rectangular and we knew there would be a ton of piecework. It took the poor man three full days. It looks gorgeous. Thanks for the inspiration.