Hey everyone, hope you all had a great weekend! I’m finally feeling caught up after all that traveling, and today wanted to share a technique with you on creating inspiration boards by layering furnishings on top of one another for better visualizing spaces.
For years, I had admired the Photoshop skills of others and especially how they were able to layer furnishings in a room to create a mood or inspiration board. As a home and design blogger, it’s a cool thing to know how to create a realistic looking space by using digital image editing tools, right? Even if you’re not a blogger, there are tools you can use to create “rooms” for yourself just for fun too.
I have been playing around for months in Photoshop Elements and finally have a comfortable working understanding of the tools. But here’s the news of the day: even if you don’t have or don’t know how to use Photoshop Elements, there is a way to layer furnishings in a room just like you see below, and without Photoshop!
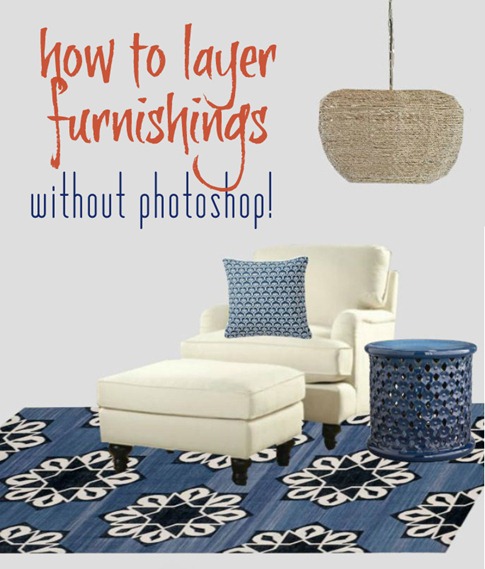
When I say “without Photoshop” what I mean is you really can create a multi layered space like the reading corner seen above without actually buying the software. You’ll be using a few of the basic Photoshop tools but you’ll be applying them in a free online user friendly image editor called Pixlr.
In Pixlr, you can cut out and layer furnishings or objects on top of each other without buying or installing Photoshop and when I first discovered it last year, I thought it was pretty cool and rather user friendly too. If you haven’t taken the plunge to buy, install, and learn Photoshop Elements, this program will allow you to get your feet wet and play around with the tools before you make the leap because it mimics Photoshop Elements in both layout and functionality. And it’s free.
If you want to make an inspiration board that looks more three dimensional, or more like a “real” room, here are the basic steps that allow you to layer a chair on a rug and a pillow on that chair just like you see below.
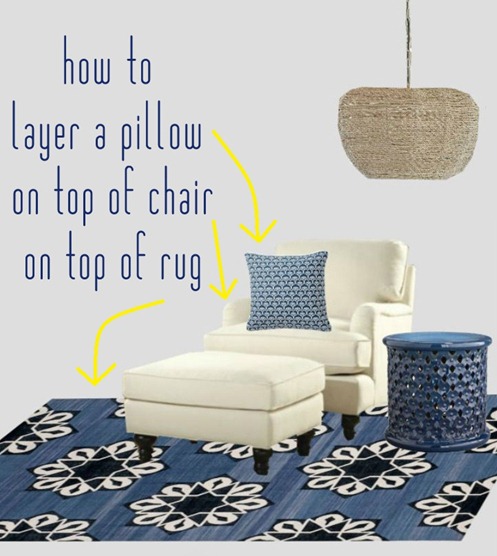
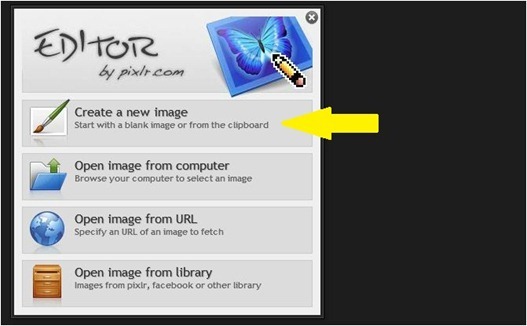
You’ll see that it involves really only four simple steps! Wanna learn how to do it? First open Pixlr in your browser and select the “create a new image” option.
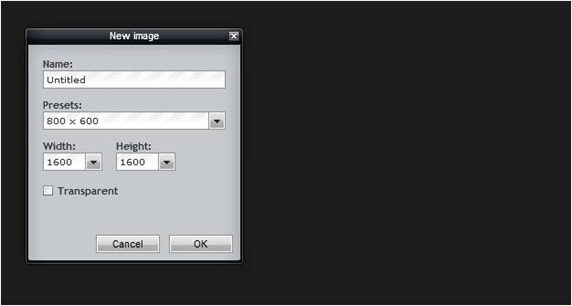
Select new image and choose a decent resolution to work with, somewhere between 1500 and 2000 px to start (you can resize it later).
This next step is completely optional and has nothing to do with layering furniture, but if you want the background walls of your room “painted” a certain color instead of all white then use the Paint Bucket tool to change the color of the background. I chose a pale gray.
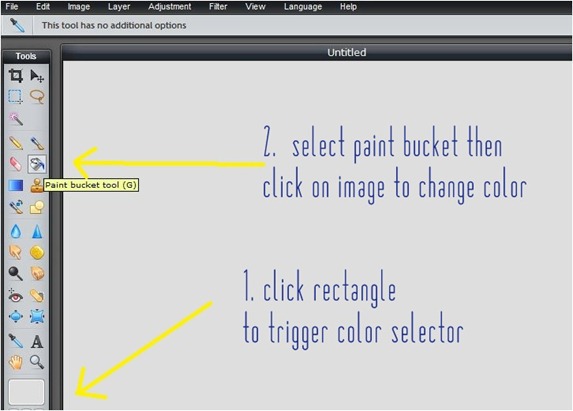
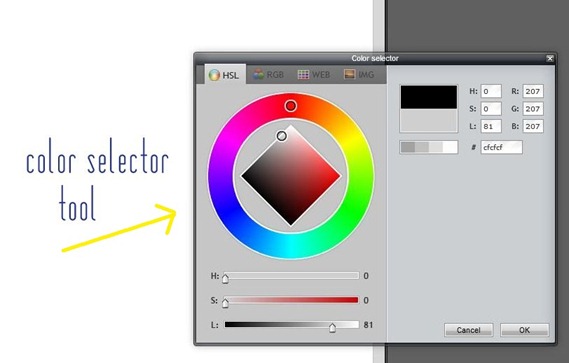
Again, that’s an optional step and one you might want to wait on until you’ve mastered the layering technique below and just leave the background white. So let’s move on to the four basic steps.
Ready to begin? Okay! Let’s start our inspiration board with this beautiful Madeline Weinrib handwoven Samosa area rug seen in the image below. Gorgeous right?
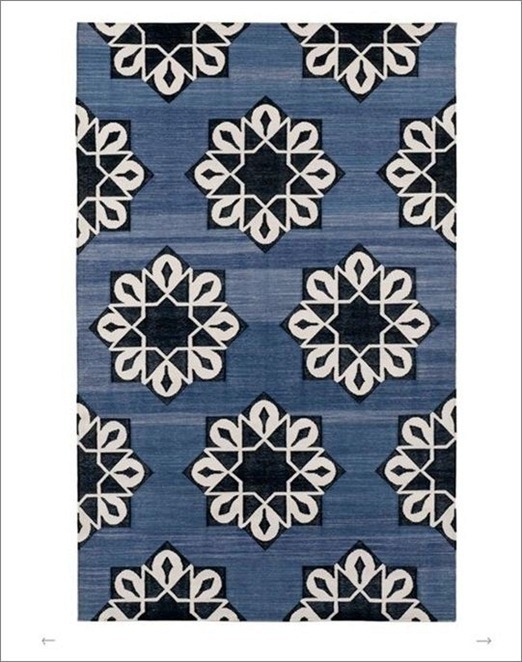
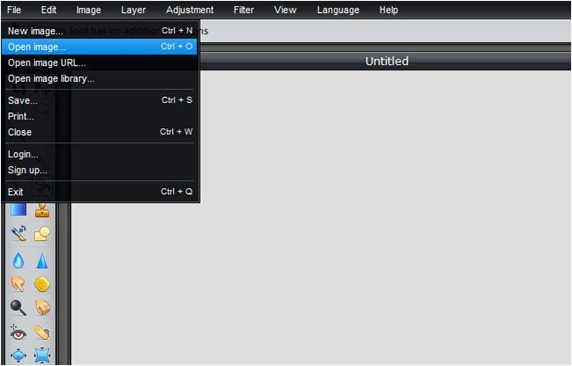
Open that first image (the rug) you have saved on your computer by selecting File>>Open Image and you’ll see it appear in a new window.
There are several ways to isolate the object in Photoshop, but for our purposes in Pixlr we will use the simple Polygonal Lasso tool. You’ll find it in the upper left toolbar – select the tool in the vertical column then select the Polygonal Lasso tool up above left corner of the toolbar.
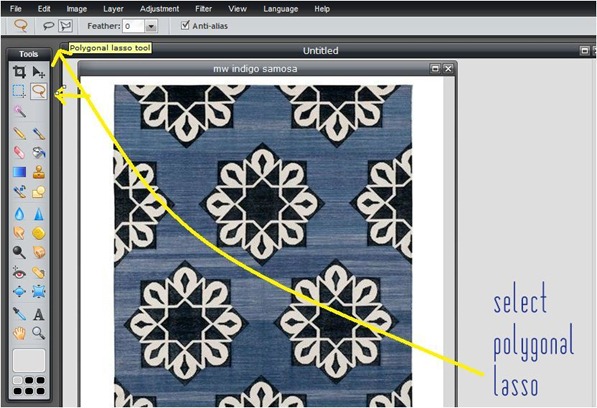
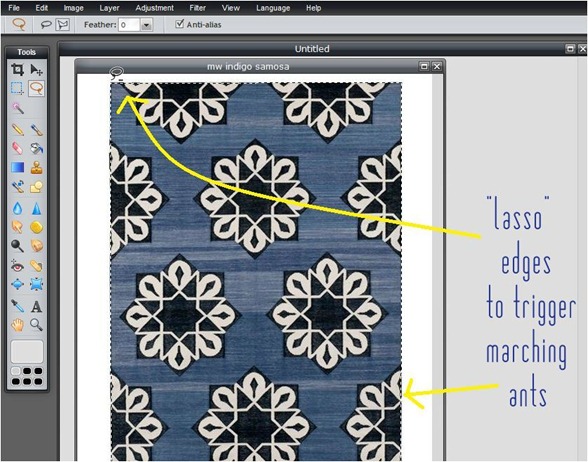
Step One: Use the Polygonal Lasso tool to left click with your mouse on the four corners of the rug to “lasso” the edges and trigger what’s referred to as the “marching ants” which are those animated dashes that show you your selected object.
Using the Polygonal Lasso tool is the first step for cutting out any object and then layering it in your space. (There are several other ways to do it in Photoshop but we will focus on the Lasso tool for now). You must connect your starting point and your ending point with your Polygonal Lasso tool to trigger the marching ants like the rectangle shaped rug seen below.
Steps Two and Three: When you see the marching ants, go to Edit>> Copy which is the second step. Next, select your Untitled Image that’s open in another window, and your third step is to select Edit>> Paste.
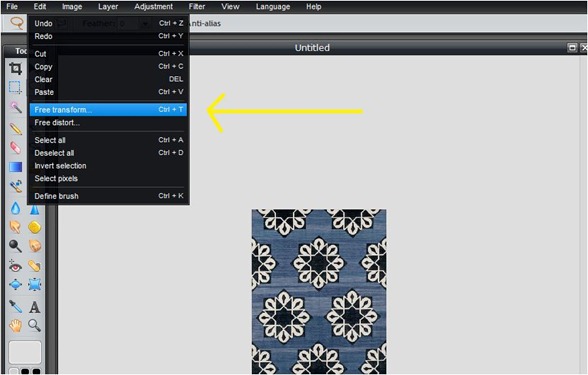
Step Four: Your rug will appear on the Untitled Image but without the marching ants. To select the rug again so that you can move it around in your room that your designing, here is the fourth step: select the Free Transform tool seen below and it will highlight only the rug.
Using the arrow and rotate tools (run mouse arrow along edges of rug to trigger those options) you can move the rug and place it anywhere in your room that you want.
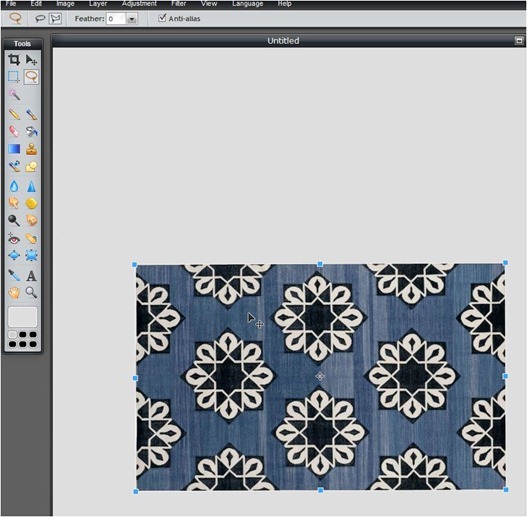
Cool right? But wait, check this out.
You can leave your rug in that first position but there’s one additional trick that let’s you change the perspective. After you’ve used the Free Transform tool to position your object (the rug) click on the Free Distort tool below the Free Transform tool, and now you can “lay” the rug down at an angle which makes it appear slightly more realistic.
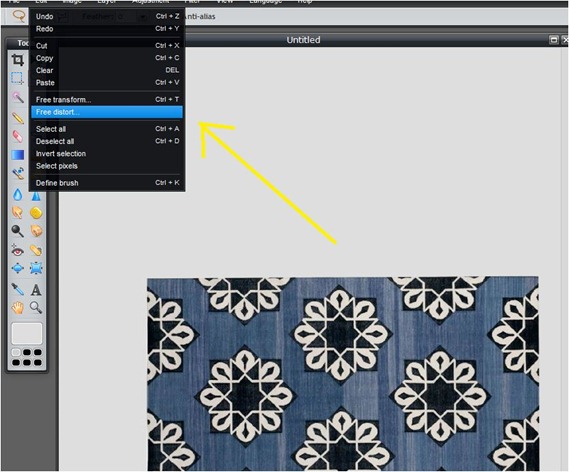
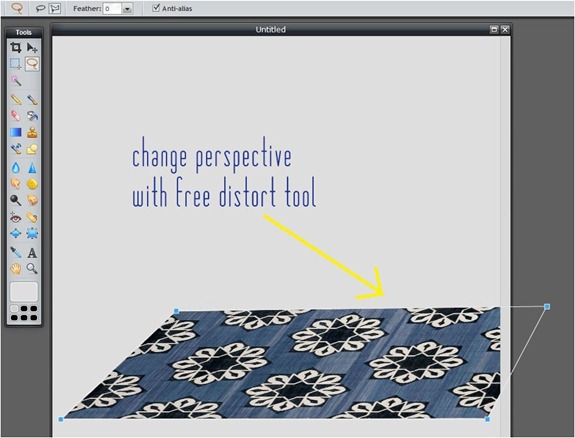
Now it’s time to add a chair on top using the very same four steps. I chose the Eton Club Chair from Ballard Designs and again we will apply the same concept of using the Polygonal Lasso Tool to isolate the chair in order to “cut it out” and layer it on top of the rug.
Open your second image (the chair) and follow the same steps you did with the rug. (Note, I turned the chair so that it faces left with the Image>>Rotate tool)
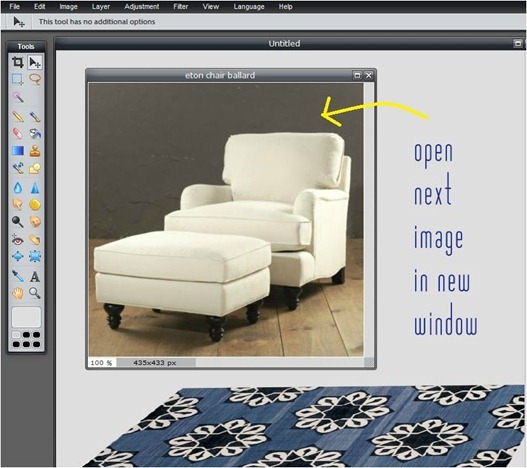
Select the image, and follow the four steps again. Select the Polygonal Lasso tool and left click at every turning point with the tool to cut out the outline of the chair. See how the marching ants below grab only the chair when you’ve come all the way around.
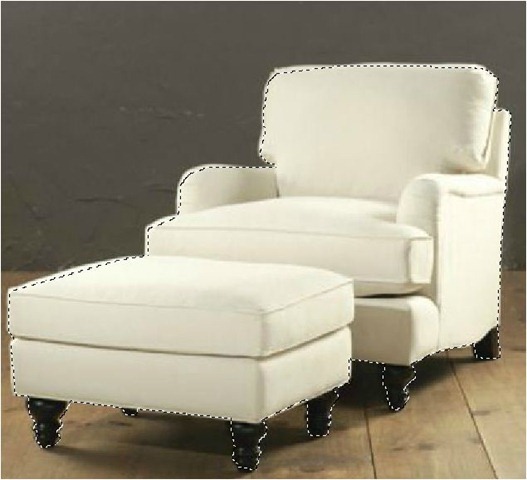
Again the four steps are: 1. Cut out your object with the Polygonal Lasso tool, 2. When you see marching ants, select Edit>>Copy, 3. Select the Untitled image, then Edit>>Paste that second object into the room, and 4. Use Free Transform to reposition and/or enlarge your selected object (the chair).
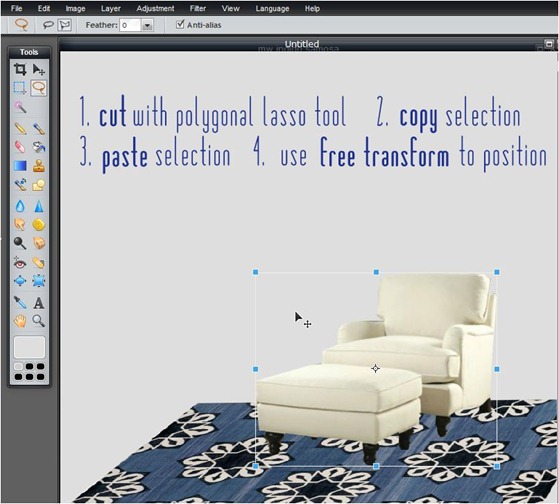
Check it out, you’re now layering furnishings!
Next, let’s add the Navy Spade pillow from Serena & Lily. Open the image in a new window, and again lasso the pillow’s edges, yeehaw!
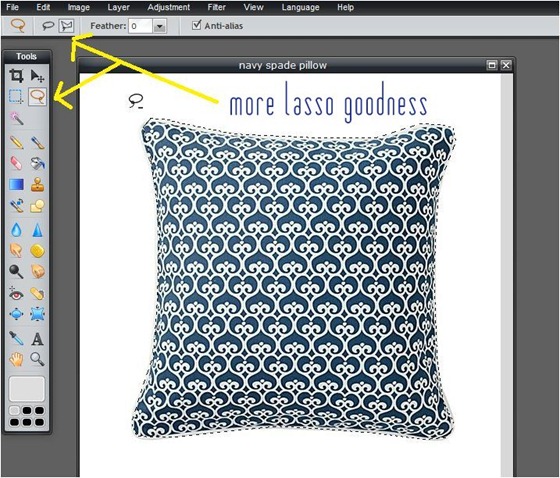
Follow that four step process you did before, 1. Lasso the object, 2. Copy it, 3. Paste it on the room image, then 4. Free Transform (and even Free Distort) to position the pillow on the chair.
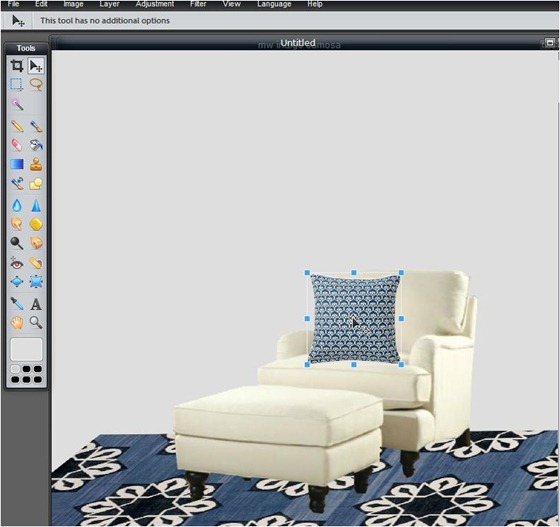
Continue repeating the four steps with each object until you create the room you want!
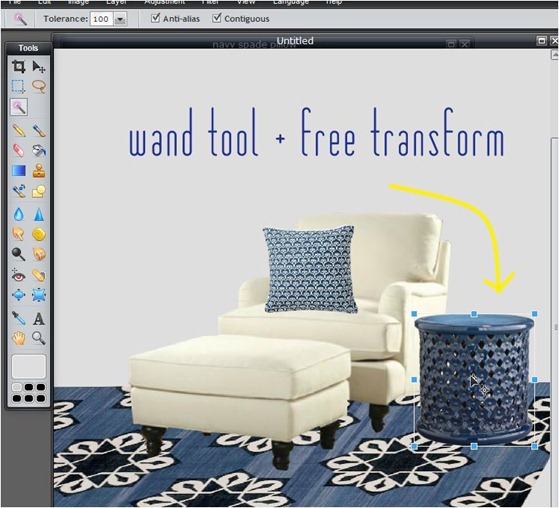
You can use the Polygonal Lasso tool to do this over and over, but here’s a quick glance at one more tool in the toolbar that is also helpful, it’s the Wand tool (or Magic Wand in Photoshop). If you have and medium to darker colored object and a white background, if you select the Wand tool and set its Tolerance to 100, clicking on the dark color it the image will automatically grab it with one click rather than having to cut it out with the Lasso tool. I’m using the wand tool to set this Diamond Pattern Stool from Wisteria next to the chair.

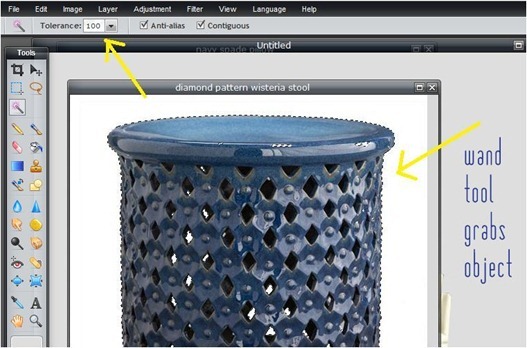
It’s finicky in Pixlr, and much more precise in Photoshop, but it’s one more tool you can use to grab select an object to copy and paste it into your room.
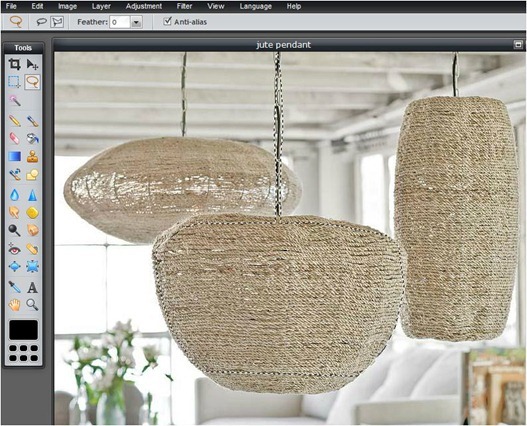
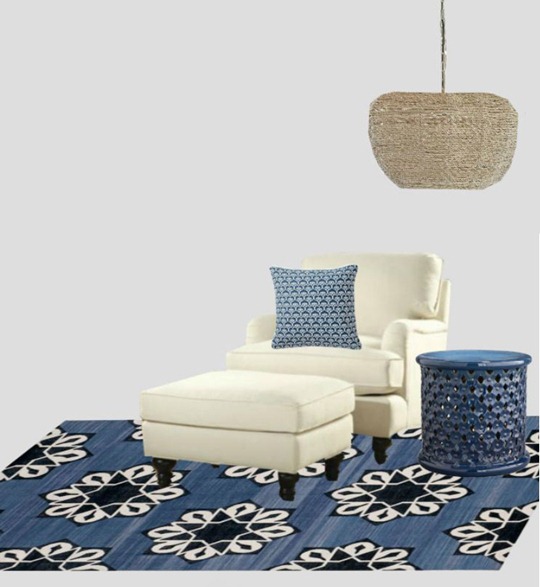
For one final layer of texture to this reading chair corner, I added this Jute Pendant – again I used the Polygonal Tool to isolate that pendant in the front, then Copy and Paste it into the room.
There you have it, the four basic steps for layering furnishings on an inspiration board and all of it created without Photoshop! You can save your new layered space in JPG, PNG, BMP or a PXL document (layered Pixlr doc which allows you to make corrections later). It’s a fun way to design spaces for your home and visualize them too.
Use Pixlr to play around and if you like what you see, you may want to take the plunge and purchase Photoshop Elements (it’s about $80 or so) for the fancier tools and the ability to do Actions, etc. I love Photoshop Elements so much and highly recommend it, but if you want to skip the cost for now and just familiarize yourself with a few of the tools, Pixlr is a great program to do it.
Oh, pssst, this is not a paid promo, Pixlr doesn’t know me at all, I just dig it a lot and wanted to share the tools with you!
Now go create some amazing spaces with the four steps in Pixlr!
..

Omg! That is awesom! Thanks for sharing. But this isn’t the Program you mentiOned before that’s being bought out or something? I don’t remember the name of the post :0/ sorry. Thanks for sharing hope it’s Mac friendly
Very cool, great information!
So awesome! Your posts are always so informative and inspirational. Thanks!
There is also open source software called “Gimp” that is a photoshop alternative. It is free as well. Rather complex but it is great for those of you who really want to get technical about your layering. :) It lets you do nearly everything that photoshop does.
Hi Shannon, I like GIMP a lot too! It’s a free editor that has so many of the same tools and once you download it, you don’t need an internet connection. The layout is a lot different though, so even though I play around in GIMP sometimes I like the similarities between PE and Pixlr! But you do need to have an internet connection to use it. Great reminder about GIMP!
What a tutorial! I could never do that without you. I really Have to try, thank you and have a wonderfull day!
What a great info! I’m off to install Pixlr! Thank you!!
Oh how I love Pixlr! Thank you for this tutorial: I had no idea how to do that trick. Can’t wait to try it out!
Laura
Very helpful! Thanks!!
THanks for this! I use Powerpoint but have never figured out how to lay things on an angle like you did with the rug! I have played with Pixlr a bit but this is fabulous! THANKS!
Great step-by-step, Kate! I know how long it takes to do those tutorials and edit the screen shots…two thumbs up to you. I’ll be adding this link to my Blogging Resources page. I haven’t worked up the nerve to try Photoshop yet, but Pixlr sounds like maybe a nice place to start. ;)
This is such a fabulous tutorial, thank you!!! I just started using Pixlr and love it!
The only thing I haven’t been able to figure out is how to add an arrow shape. Do you know if it’s possible???
Oh, my goodness, I love you! Thank you so much! I’ve been trying to create these using Polyvore and such, but this is such a better and more personal way of creating.
The step by step is great! But, I have a question about copyright on the images (of each object/item). Aren’t the vendor’s web images of their products copyright protected? How can I be sure that I can legitimately use the images I’d like to, without violating anyone’s copyright? And, do you suggest any particular format for labeling/marking up these composites, so you can easily remember where to buy/find each product?
So cool! I just got Elements over the weekend for $50 at Frys Electronics. I’m really excited about it and being able to do things like this in the program! Thanks for the tutorial!
Thanks! I always say I’m going to learn to better use Photoshop but I never do. One problem is that I HATE trying to “trace” a shape with the lasso. Maybe my hand just isn’t steady enough!
Thank you soooo much for breaking it down. I’ve been asking interior design bloggers for their “secrets” to making an inspiration board, but no one has ever written me back. I’ve been using Pixl, but didn’t know how to work with layers. Thanks again. You Rock!!!
THANK YOU, THANK YOU, THANK YOU! This is going to be an amazing tool for me!
This is great for people who don’t own Photoshop.
You could also use other free software programs like GIMP (complex though great for free) or Paint.net (reasonably basic though great for simple layering).
Thanks so much for the amazing tutorial! I’ve been planning on taking the plunge to photoshop, but will definitely try this out first!
Gosh! This would take me hours. Are we better off to jute bite the bullet and use Photoshop?
I’ve had this on my list for a while and would love your advice!
Thanks!,
Barbara
I actually just bought Photoshop Elements and a “dummies” book so I can figure out how to use it. Would love to figure out how to do this in my paid-for software someday soon! :)
Hi Lisa, the steps are the same in PE, just use the Lasso tool in the very same way, also try out the Magic Wand tool, very cool.
Kate
Thanks for the information! I have always wondered how to put something like that together. I do own Photoshop Elements. Under what category in PE would I start putting something like this together?
Thanks!
Wendy
Hi Wendy, you follow the very same steps in PE – the tools work exactly the same.
Kate
I can’t seem to open a saved image. What am I doing wrong? I must be an idiot!
Hi Jenny if you have an image saved on your computer, simply selecting “open image” should bring it up in Pixlr!
Kate
OH this is sooo cool. Gonna have to give this a try! Thanks for sharing Kate!!