Greetings! I hope you all had a good weekend. We had a great party despite the huge storm that is pounding California, and a splendid time was had by all. Today I thought I’d address a question I keep getting via email and in comments: “How do I take better, brighter photos for my blog?” I do not consider myself an expert in photography by any means so I wonder sometimes why that question is even directed at me. However, I have taught myself a few tricks for achieving higher quality images in the past year, and every now and then I take a pretty good shot.
The most important thing I have learned to make for a better brighter photo has everything to do with light. And a good camera. When taking photographs, either for your personal use or for your blog, good natural light and a kick booty camera are your two very best friends.
Most photographs taken outside on a sunny day with a point-and-shoot turn out pretty well, all because of the natural light present. Yet with interior shots, it’s tough to be as blessed with natural light unless you’re shooting a room with walls of windows on a sunny day. When shooting pictures indoors in less than ideal conditions, here are a five tips I shoot by.
My Five Tips for Better Brighter Blog Photos
1) Use a Good Camera
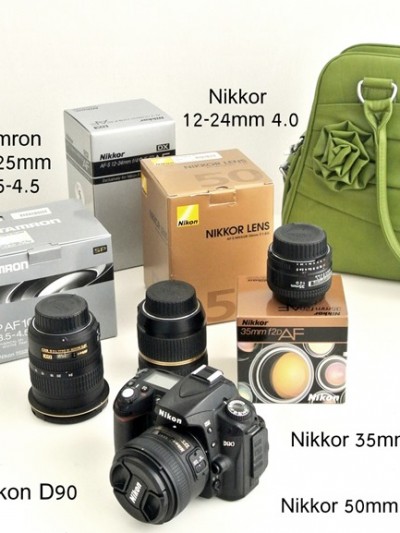
I think it’s essential to invest in a good SLR digital camera with variable settings (F-stop, shutter speed, ISO sensitivity, white balance, etc.) if you want to have high quality interior photos. I know there are a lot of comparatively inexpensive point and shoot digital cameras out there, and they are perfectly fine for so many everyday uses, but for high quality blog photography, invest in a good camera. I use my Nikon D60 that allows for changeable lenses, and I use two kinds of lenses that I mention in my FAQ page.
2) Know Your Manual
When my hub bought me my Nikon D60 three years ago, I always used the auto setting just because it was so darn easy and I was, at first, intimidated by the manual settings. 80% of the time, the ‘Auto’ setting worked fine and produced adequate images.
However, the ability to manipulate your camera’s light settings makes all the difference in the world in less than perfect light conditions, and when shooting interiors or detail shots. Here is just one half of one page in my Nikon’s manual but look how much information can be gathered from this quick camera tour.

Manipulating your camera’s settings to allow for more light requires that you read and know your manual. Once you do, you will learn that you can manipulate your exposures, and you will gain confidence to stray away from the ‘Auto’ setting. Once you start experimenting, you will have that ‘Aha!’ moment, I promise!
Three Simple Ways to Move Beyond ‘Auto’ and Pull More Light into Your Lens:
1) widen (lower) your aperture; 2) slow your shutter speed; and 3) increase your ISO sensitivity.
Quick definitions:
Aperture: the aperture is the width of the ‘hole’ or opening in your lens and it is measured in what are called F-stops (f/4, f/5.6, f/8, etc).
A lower F-stop translates to a bigger ‘hole’ or a wider aperture which means more light enters your lens. You’d think a smaller F-stop would mean a smaller opening, but it works in reverse. A lower F-stop allows for more light, so make that mental note. Lowering your F-stop also decreases depth of field (blurring the background) but it will definitely brighten your image.
Shutter Speed: the amount of time your lens is open to take your picture.
In low light settings, if you slow your shutter speed (ex: from 1/100th of a second to 1/20th of a second) then you allow more light to enter your lens. A slower (lower) shutter speed (especially below 1/10) can make your shot blurry because your lens is open longer, so it’s best to stabilize your camera with a tripod, or on a still surface.
ISO Sensitivity: your camera’s sensitivity to light which varies from 100, 200, 400, 800, to 1600 and sometimes higher.
The higher the ISO sensitivity, the more sensitive your camera is to light, and the brighter your image will be. However, higher ISO Sensitivity leads to grainier pictures, so I try to avoid going above 400 if possible. Most of the time, I shoot in auto ISO sensitivity, but in lower light situations, I often up the ISO sensitivity to 800.
3) Shoot Interiors in the Best Light Conditions
I never wait until 8 p.m. to shoot any ‘final’ project pictures. If you want to show off your project or space in the very best way you must shoot it in the very best light. Ideally, that’s a sunny day with all your blinds open allowing for the most natural light, but in winter or late afternoon, your light is often compromised. Knowing your best light conditions is key. In my home in California, I shoot north and east facing rooms in the morning, and I shoot west and south facing rooms in the early afternoon.
 And for the love of all that is good in this world, please, I beg you, never shoot any interior shots with a flash. The flash is not your friend.
Quite frankly, the flash should always always always be off. Interior shots taken with a flash are awful.
4) Manipulate Your Camera Settings
You can make up for mediocre lighting by changing your camera’s settings. This is where Tip #2 becomes crucial. Once you get to know your camera by reading the manual, you’ll see that you can brighten your photos by allowing more light into your lens.
Take a peek at these three pictures of my holiday mantel taken in the same place on a cloudy day at 3 p.m. in my living room. The first is shot with a flash, the second is shot on ‘Auto, No Flash’.

I made four changes to make this interior shot better. I switched my setting to ‘M’ (Manual) mode, slowed the shutter speed to 1/5, changed the F-stop to f/5, then increased the ISO Sensitivity to 400.

Result from changes to settings:

All from simply changing the aperture, shutter speed and ISO sensitivity!
I encourage you to experiment with your camera and different lenses. Start by simply changing the aperture in your ‘A’ mode, then switch over to ‘S’ mode and play with shutter speed. In ‘M’ mode, you can change both. Experimenting with your camera can only lead to better interior shots, so go for it!
5) Simple Photo Editing
You can always boost your pictures with photo editing programs like Picnik, Picasa, and Photoshop (among other countless software programs available). Most of the time I attempt to significantly brighten a photo with editing software, I end up compromising the resolution. I lose depth and detail, and my pictures get grainy.
My latest theory is to simply try as best as I can to get the proper exposure in the original shot to both save time editing, and keep my pictures crisp and clear. I still use Picasa 95% of the time to edit my photos, and you can read all about my affection for this free software here.
![]()
I’m no expert, and often you’ll see far less than perfect pictures around here, but I do keep experimenting every day. My philosophy with photography is the same as in life. When you open yourself up to learning new things, and take the time to do the research, when you don’t expect instant gratification, but rather seek to develop your skills over time, you can teach yourself just about anything. I encourage you to do the same!
Soon I’ll share more photography tips from some of my favorite bloggers and some favorite photography sites I love that may help you improve along with me! Until then, happy shooting!
.


Thanks so much for these great tips. I have a Nikon D40 and am always using auto and don’t even know how to actually change the settings. I’m off to look for my manual right now!
Abby
Thank you for these tips! I recently got a new camera with all the different settings. My sister, who is a photographer, has been trying to show me how to manipulate everything, but I just needed to write it all down! You have done this! Thank you again! I hope you have a wonderful Christmas!
Good tips! A Nikon is on my Christmas list, though I imagine it will also end up on my birthday list as well. ;) I should add that sometimes poor planning (ie. waiting to write a post until 8 pm) leads to use of the dreaded flash, which does lead to bad pictures. :( I am guilty!! I need to start leaving notes for myself to get those pictures taken earlier!!
Thank you so much for the info! I have a tendency to rely on the auto settings and am often frustrated with the results. Thanks for including those three shots (with flash, no flash and custom setting) – being a visual person, I now really understand the difference knowing your camera settings can make!
Very informative post. Thank you! Interiors are so tricky, I appreciate your tips.
Thanks so much for these tips. I am guilty of having a fancy camera and not using the settings. You’ve made some things make sense to me.
Wonderful tips!! I love learning new things about photography :)
I agree wholeheartedly about the flash! Its the worst.
Thanks so much for these great tips! I have a Nikon D60 as well and absolutely love it. Do you shoot in RAW? That seems to help with the graininess when editing.
Love the photography on your blog!
WoW you are awesome to go to all this trouble. I have no idea what some of the icons on my camera and manual even mean. But already just reading once through your post I now know what ISO is for! Thank you so much I am going to print this out!
Great tips. Maybe over the holidays I will actually read my camera’s manual. Ugh!
Thank you so much for the wonderful tips! I am so guilty of keeping the camera on auto because the manual intimidates me! guess it’s time to dust it off and figure it out! :) Merry Christmas!
What a wonderful tutorial! I have a D60 and have been frustrated with it lately because I just can’t figure out the 456 settings! ha! So, your tutorial was wonderful! Thank you for taking the time to help others out!!!!! Merry Christmas!
Thank you so much for taking the time to write this post!! It is exactly what I needed! My husband bought me a Nikon DSLR camera on Mother’s Day and I still feel like I am not using it like I should for my blog pictures. I have recently found how to enlarge pictures by using Photoshop and not just using the Blogger upload feature anymore which has really helped my blog picture size. Your post is exactly what I needed to take the next step now with the picture quality.
Have a Merry Christmas!
Karen
Thanks for this post… I got my DSLR in July and I’ve been playing with it, but usually only have luck with manual when my subject is sitting still. That blur is enough to make a woman crazy!
Thank you so much for sharing! I have a dreary house and almost all interior shots are dark and fuzzy. I tried reading my camera manual, but get lost in all the unfamiliar vocab. I appreciate your explanation and tips.
Fabulous tips! A “nice” camera is on my wish list for now, but I will be saving this page to refer to once I am able to save enough to purchase it. Thanks for posting!
Thank you for the tips!!
Sometimes it can be a bit intimidating figuring out my slr. Appreciate the nudge to experiment with my camera settings. : )
This is a great post, thanks so much for all this info. It’s amazing the kind of quality you can get out of your camera just by taking it off auto!
Thanks so much for this. I am just now starting to learn how to manipulate my point and shoot. But I would love a more professional camera too. Thanks again for sharing!
Do you use a tripod? I’m thinking I’d like to get one for those slower shutter speeds (especially after baby No.2 makes her debut). I must be an idiot – in manual, I can’t figure out how to move back and forth between changing the shutter speed and aperature! I did print out the full manual for my new Nikon D3100, but have yet to find time to wade through it. I knw that I need to.
Hi Kate.
I think that these are all wonderful tips. I do have to say though that a dslr is Not an absolute necessity for great photos, for personal or blog use. Not everyone can afford a dslr. Many of the point and shoots on the market these days offer many manual setting options at a point and shoot pricetag.
I have a dslr and I love it. In fact, I rarely pick up a point and shoot. However, I know that a person reading your beautiful blog and seeing your lovely home could become quite discouraged when they realize that in order to have a popular blog, or beautiful photos, they Must own a dslr. A good camera does not a photographer make. A good photographer can make beautiful pictures with any camera, because beautiful photos are just like anything else. They are achieved through practice, study, having and training a good eye, and learning to recognize what works and what does not. Unfortunately, as new bloggers, or even semi-seasoned bloggers, it is a sad reality that people tend to compare themselves to others to decide their value. I would just hate for a new blogger to be discouraged about their blogging efforts simply because they don’t have a dslr when “everyone else” has one.
Thank you for the tips, Kate. I believe that there is soooo much great information here, and that people will certainly be encouraged to grow their photography skills because of your suggestions.
Merry Christmas to you and yours,
xo*tricia
Great tips and the pictures sure speak volumes! It’s amazing what these simple adjustments can do and the proof will surely encourage others to get brave and switch their settings. :) I have gotten a Canon Rebel T1i this year and although I cut my teeth on SLR some 40 years ago… DSLR is a new creature and I am having fun getting familiar with it.
I enjoy reading your blog – always lots of good stuff here!
Merry Christmas!
Lynn
Thanks for the advice. I can use all the help I can get with photography. I definitely learned a few things!
I can’t thank you enough…I got a Nikon D40 in the spring and still know nothing..until now! I always thought that all of those beautiful bright photos were from fantastic special lighting and photoshop. I can hardly wait to give it a try.
Merry Christmas!
great tips! i just have a point and shoot for now, so picasa is my friend!
thankyouthankyouthankyou!!!!!!!!!!!!!!!!!!!!!!!!!!!!!!!!1
GREAT post! I have a point and shoot and drool over SLR quality pics, but don’t really want to spend the money (or lug the thing around!). Thank you for these!
My camera’s user manual has been sitting on my desk for over a month now because I’ve had every intention on reading it in order to maximize the settings and my picture quality. I’ll be the first to tell you that I KNOW I’m not taking the best quality pics that I know I can.
I’m flying to Florida on Thurs. so now the plan is take the manual with me to read it on the plane :) As for now, Picnik and Picasa have become my best friend. But, the one thing I’ve noticed with using these editing softwares (as you noted) is that the pictures do become very grainy.
Great info. Thankyou for pulling this together.
I overexpose all my shots for the blog to make them brighter, and then edit to balance them and bump the contrast a bit. It’s hard though, as any photographer will tell you, because every single monitor (unless it’s color calibrated) shows very different colors, brightness, etc. For example – my monitors at home are calibrated because I do some professional photography. And when I look at those same images on my work computer they look dark and underexposed. Whereas on my screen at home they are bright and perfectly exposed. So no matter how hard you try, technology isn’t always on your side. ;) But that doesn’t mean it’s not worth trying!
This post couldn’t have come at a better time, as I just posted a question about photography on my blog this morning. I am definitely going to bookmark this post so I can refer to it later!
Thanks so much for the information!
You are so right about the flash…or not using one. It wrecks indoor photos. Thanks for all of the other tips. I’m going to try Picasa.
Thanks for the tips, I really did take notes, really. I hate reading instructions {I know I need to}, so this was perfect.
Really great tips, Kate. I don’t have a fancy camera yet but when I do this will be very helpful to refer to. I haven’t started my blog yet thinking my pictures wouldn’t be up to par with all of the rest of you. Lots of gorgeous photography out there including you! Happy Monday and the count down to Christmas now.
I have been patiently waiting for someone in the blog world to share some (free) tips on shooting interiors. I purchased a new camera a few months ago and am still clueless and can use some tutorials! Thanks soooo much Kate!!!
i need to upgrade to a dslr- great tips, especially about the flash. personally, i think a grainy photoshop boosted photo is better then a flash photo any day!
ohhhh great quick tutorial!!!!!
Super tips! I just got a new camera for my birthday and I’m learing how to use it properly! Can be so daunting! Thanks!
Your photos are wonderful and this looks like a great tutorial! I do not have a fancy camera. It is funny to me that back when I started my blog (many of us started awhile back!) very few people had fancy cameras so I fit right in! Ha! I do have a better camera than when I first started, but still it is nothing fancy. Someday I guess I’ll have to upgrade! Thanks for sharing your great tips!
*love* this tutorial, Kate! I am experimenting with my settings on my camera and your explanations are perfect. I’m going to print it off and keep it near by. Have a wonderful Christmas, and good luck with your big party!! xo
I’d like to know, also, if you used a tripod. I can’t imagine you could keep it so steady at a shutter speed of 1/5.
Also I remember reading before that flash is especialy helpful outside on a sunny day, when your subject is dappled in light (say, under a tree). I hadn’t considered it for that before, but it is true!
Aha ! I just got out the manual and learned how to adjust the ISO, that was the missing piece for me. Thank you so much, I really needed that.
Hi Kate-
I could not agree with you more about taking the time to learn and experiment. It could be photography, html knowledge, whatever. If you put your mind to learning and stick with it – you will become proficient at anything you try to do.
I have an old point and shoot that I never even read the manual. Once I started blogging I read it cover to cover to learn how to get all I could out of it. I learned a lot from The Pioneer Woman’s blog, her friend does some tutes about maximizing point and shoots and I now know EVERYTHING about my little camera. I am truly amazed at some of the shots I can get with it when I take the time to get all the settings correct. I have to take most of my photos at night as I work during the day. Sometimes they come out great, sometimes , not. I am still learning. Thanks for the tips.
My best- Diane
Kate, you are a life saver. This is the first time I’ve read about f stops and actually understood what it meant. Thank you. I’m still with a point and shoot but hoping to make the move soon. Peggy from PA
very timely and great advice! great info in the comments as well.
Awesome tips! Thanks! I have a Canon EOS 40 D SLR camera that I don’t know how to use. I just need to experiment. I have a Canon Powershot point and shoot that I can change the settings on as well. Sometimes it can take better photos than the SLR because of the type of lens I have. But I can’t wait to try your tips!
great tips – I especially need to consider tip #4 – I am amazed at the difference – I have a great DSLR and I had gotten to not using flash as much indoors, but I am mostly still in auto – guess it is time to bust out manual and READ about the options! I can’t believe the difference in the three pictures!
GREAT information. I am taking better pictures already and making my New Year’s resolution to learn my camera. Beats the heck out of promising to exercise! Thank you!
Eleanor
Hi SJ, I do use a tripod, sort of, with a lower shutter speed. I actually set my camera on my step ladder to stabilize, it works great!!
Kate
What great information! Thanks so much, Kate! Santa is bringing me a Canon T2i for Christmas and I literally know NOTHING about aperture, ISO, etc etc. I have a good friend who has promised to help me out, but I love how your tips will actually help me with my blogging. I’m just starting out in the blogworld, but I am having lots of fun so far…. You were definitely one of the bloggers that inspired me to get started, so thanks! Merry Christmas, Kate!
Great advice. Also, read your manual! That helps a great deal as well. I have a canon, love it!
Heather
I was wondering about your living room photos, actually. I figured that room must get an amazing amount of light. I so appreciate you posting the different shots of that room! I just got a fancy pants camera that I’m really intimidated by, so this post is a tremendous help! Thanks Kate! I know that when I visit your blog, I’m going to see beautiful magazine quality photos:)
This is exactly what I needed today! I started a new blog and I know this is where I needed some help. Thanks so much for your post! I will take it to heart. :)
This is a great tutorial! I actually have all those different settings on my camera, and never really acknowedged it! I’ve been ‘tweeking’ my poor photography in picnik. Now I’m googling for my manual and learning to do it right the first time! Your photos take your blog to a higher level, for sure!
and hopefully people will read about the flash! drives me crazy!!
Thank you for sharing all your tips. I really really appreciate it. I’m trying to learn how to use my DSLR right now. Your tips are great! You have such a lovely blog. :) Happy Holidays!
Thanks so much for this!!!
I have a CanonEOS 400D and have been a bit in the dark about how to use it correctly, even after reading the manual. Unfortunately, sometimes people who write manuals forget that those of us reading them are clueless about terminology and technical information and they write them as if we understand what they’re talking about
Thanks again, it’s much appreciated
Thanks for sharing these fantastic tips!!
Wonderful post, Kate! We have almost the exact camera…mine’s the D50. Anyway, I hop this will improve blog photos everywhere!
hope, that is…
Who knew there would be such dramatic changes based on camera settings. Great tips, Kate!
What invaluable information. I’m printing out the article as I write. I just started a blog and had the same questions as your readers. I totally agree about natural light. I’ll let you know how this works. Thanks.
If you have a minute, check out my blog and my novice images in which I used a flash. Oh no.
Have a wonderful holiday
FANTASTIC blog today, thank you!!!!!!!!!!!!!
Thanks for the tips! Can you share how you round your corners on your photos? Thanks!
I know I have horrible photos on my blog simply because I use my basic P&S. Simply put, I cannot find the charger for my my Nikon D40, therefore I haven’t used it in a couple of year. Gonna need to rectify that immediately.
Awesome! Thanks so much for the comparative shots and explinations on the settings you changed.
Great tips, Kate. I have a Canon Rebel, but the same rules apply! I just got the fancy camera in November, so I’m still learning, but I can already see a huge difference in my pictures! I’m definitely shooting on Manual and without a flash indoors…I agree- flash is a no-no inside! Your pictures are always so beautiful (:
Thank you again! I was excited to try these tips out, and while I’m not nearly as good as you I got some great shots.
I linked a post over to your blog about these great tips!
http://houseofficek.blogspot.com/2010/12/anthropology-style-knobs.html
These are some wonderful tips. I’m bookmarking this for future reference. Thank you so much!
This information has come at the perfect time for me. I have only just started my blog and to be honest am not at all happy with the pictures I have taken with my point and shoot. I am now practising with my husbands Pentax K10D to get the more professional shot!
Thanks so much for all the tips!
Merry Christmas!
I just printed this out to keep with me. I’m going to memorize this! Also, I just discovered your little “Printer friendly” button and immediately turned around and installed it on my WP blog. Awesome plugin! Thanks for putting together such a great tutorial!
~Allison @ House of Hepworths
You are my new hero! I’ve always been intimidated by the manual mode but now I’m excited to try it. Thank you! xoxo
So, SO interesting and helpful. Thanks.
Mary Ann
Yes, my thanks as well…you are the first person who has made sense to me in helping me understand…I just have a point and shoot camera, but I finally figured out shoot without flash using your definitions.
These are great tips. I have a very elementary camera that I manage to take good photos with as long as I don’t use the flash. I couldn’t figure out why everything went downhill once the flash was turned on. Very helpful!!!!
Thank you so much for this easy to understand information on taking photos. My blog photos have always needed a lot of work to make them bright enough – even though I have a pretty good camera. It was driving me bonkers. But I was always shooting on manual. Now that I know how to manipulate the settings to let in more light the pics are great! I guess I don’t have as dark a house as I thought!
Thanks again,
Sarah
I took a photography class in college and have a Digital canon rebel but typically use auto mode. I just can’t get the hang of the manual settings. I’m bookmarking this.
I agree about using a flash indoors, with one exception: using a bounce flash. The little pop up flash on my Nikon D40 is evil, so I invested in a bounce flash and I love it. Having light bounce off the ceiling floods the room perfectly.
This is a great tutorial… I am planning on getting a DSLR soon and this is a good starting reference. Thanks!
I just made a little e-book all about this…check it out on my site!
What great info! I found you through the #crafterminds site. I need to explore my camera’s manual mode!
Bookmarked! Photography for idiots (me).
Thanks for breaking it down in layman terms. Great for half-assed sloths like myself :)
Thanks! I am one that is scared to get out of auto mode… and yes I use the dreaded flash indoors. I even took a class several years ago. I have to take the time to work with it and get it straight in my head how to adjust the settings.
Thanks for the encouragement.
Kate, I’ve finally made the decision to graduate from my cheap Kodak Easy Share point and shoot camera to a nicer Nikon SLR camera. I came over here to your blog specifically to see what camera you use (was excited to see that you also use a Nikon), what lenses you use, and have now found my way to this post. The more I read about your camera, your camera, your photography, your photography tips, the more excited I get about it. So glad you shared all of this info on your blog!! My camera manual will be my best friend for a while. My mom is a (retired) professional photographer, but somehow, I never learned a single thing about photography, so this is all new to me. I’m starting at the very beginning. Excited to learn!!!
I am about to invest in such a camera as my blog is severely compromised with my point and shoot. But, I’ve been intimidated with all of the settings and stuff there is to learn just to make the investment worthwhile. This helped tremendously!
Hi, I just spent the last 45 min. reading your posts about photography :) I found them via Miss Mustard Seeds post she wrote in the beginning of August! Holy smokes, lots to learn :) I recently invested in a new Nikon so I’m trying to learn how to use it! I seriously never new the flash was bad. You are the 3rd one now who says it’s bad….so I guess it’s bad :) Thank you for sharing !