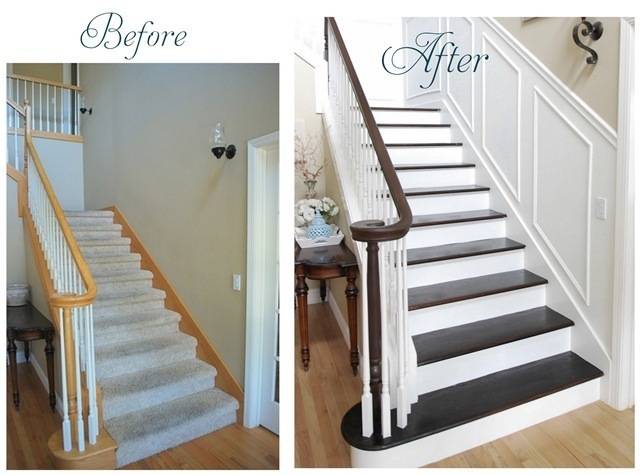
This isn’t one of those ‘ooooh pretty pictures’ posts. Nope. This is one of those ‘get down and dirty by starting a big DIY project’ post. It’s been years that I’ve been wanting, no needing, to do this, and the time has finally come. Over the weekend we said bye bye to the carpet on the stairs in the foyer. Good riddance awful dirty carpet!
The carpet was there mostly for the safety of our little tykes, but I’ve never been a fan. For a long time, I have yearned for the gorgeousness that is a hardwood staircase, especially since it’s the first thing you see when you enter our home. You’ll recall our staircase came halfway last year with the darkening of the banister: 
Well since the kids are finally old enough to get the whole ‘no running down the stairs’ idea, we’re finally adding those wood steps I’ve been dreaming of all this time.
So long carpet!

Yeeeeee haaaaaw.
Underneath is a solid plywood staircase, but we were left with plenty of these to remove . . . 
. . . and a zillion of these staples too.

And a heck of a lot of vacuuming with a Shop Vac.
I spent several hours on Sunday in this cramped position. I recommend when popping tack strips and industrial size staples out of plywood you wear safety goggles and gloves. I should have worn knee pads too, like the hardwood installers do. Wish I would have remembered that, but at least I still have my eyeballs and no blisters.

Here’s our biggest problem spot ~ the first step:
 We can’t just sit a new 1” thick tread on this first step, we have to accommodate for the corner piece ~ there’s a thick nose but a thin tread, and I’ve got to match this edge and have an even step. Plus we’ve got to stay within code as far as height of the steps. I agonized over this, and decided to bring in professional help for installing just this step, and for the wood flooring on the landing too. I also have to strip the paint off the top so the entire length of the step under the balusters will be dark and not just the new wood.
So here’s what we were left with on Sunday, particle board and plywood = better than dingy carpet.

You’ll notice the wallpaper is gone! Yes, it was time. It was lovely while it lasted, but it was slightly torn in one section, which remains an unsolved mystery, but I have my usual suspects. The real purpose of the wallpaper was to distract from the yucko carpet. And when I say ‘yucko’ I mean a carpet with the residue of a billion grimy kid footsteps and a dingy gray stripe running right up the center.
Now that the carpet is gone, I’m thinking the crisp white wainscot look on the walls will be better, especially with the contrast on the steps. You can see I’ve already primed the walls to cover the darker paint, but I still have yet to coat it with two coats of white paint ~ that’s the very last step in this ongoing saga. We still have to cut and install all the risers with precision. Then stain, cut, install, putty and poly every tread. Whew, I’m tired already! But in the end, it will all be worth it.
I so love the look of white risers with a dark handrail and dark treads.

Fingers crossed we can get our staircase to look just as beautiful.
***** Update! See this post from Oct 2010 about the process of how we refinished our staircase to get the look I love!
.
.


This is going to be awesome Kate! I can’t wait to see the end result. I’ve been wanting to do this with my staircase for some time now, but it’s been at the bottom of my to-do-list. After seeing these pictures, I’m feeling so much more motivation!
Rachel
xoxo
What a great project, it will make such a difference, and I’m very glad to hear other people decide to undo previous projects when it makes sense! Janell
I love your stairs. It already looks a TON better without the carpet. I think it will look really good with the wainscoting white, contrasting with the darker banister and treads.
Wow! I give you so much credit for taking this on. The starwell will be stunning when you’re done! abby
Just remember to finish every other stair first, then the rest, so you can still go up and down them! Can’t wait to see your finished project!
You have such a great home. Those stairs will be grand – entrance style in no time!
Love it. You’re killing me that I’m in a rental house now. I can’t wait to get going on something fun like that!!
i can’t wait to see it when your done!!
Oooh, that’s a great tip from Dana! Good luck with that HUGE project!!! I’m always amazed when I see new construction in our neighborhood putting plywood stairs in for carpet – most of the houses here have wood, and I can’t imagine why anyone would want carpet on steps – what a pain to vacuum :)
it will look beautiful when you are done withit!
Oh but I loved the wall treatment! I’m sure the end result will be just beautiful in your hands – can’t wait to see the “after”. I thought it looked pretty fabulous “before”! You are so ambitious to take this on! Impressive!
Wow! What a lot of work but I can already envision how beautiful and classic it will look when you are done!
not worried at all about it turning out as absolutely beautiful as those pretty pictures!!!
Looks great so far. We took out all our carpet when we moved in to our home. We ran out of money on the stairs but last year finally got around to putting in the new banister and railing. You will need those railings in the beginning. Those steps can be mighty slippery for the first few months. Once they get a little “worn” they are perfect! Good luck trying to match it all up. I was not up for that task so we hired out for it. You are much more daring then I. Can’t wait to see the finished product. Check out http://colonialcottage.blogspot.com/2009/11/stare-at-my-staircase-party.html if you want to see my before and after!
Looks wonderful! I can’t wait to see the “after”!!
OOOH… we did this 4 years ago… what a mess. When we had the carpet pulled up we were amazed at how our home was built. None of the stairs width was the same… AGHHHH. My dad is a contractor and in order to do this without going crazy we bought this tool: http://www.amazon.com/Wheaton-Tools-PL200-Stair-Wizard/dp/B0000224Q2
It was the best thing ever. Rather then having to make a template for each stair.. this bad boy did it for us. Not sure how your stairs are measuring out.. but if needed… I highly recommend this tool. Good Luck Lady! Hope it goes well. its soooo worth it!
I bet your arms got a good workout from pulling all those nails and staples out! You are like a machine, girl…a DIY machine. ;) You have the best projects!
Awesome! I can’t wait to see the finished product!
I have been waiting on this project! It is going to look AMAZING, Kate! I can not wait to follow the progress!
I’m soooo jealous! I dream of new stairs like other girls dream of being flown to Paris :0) When we first moved in, we ripped out the old neighbor’s 80’s vomit-inducing carpet on our stairs…and yes, pulling out staples was like water torture. So I feel your pain! But then my mom “knew a guy, who knew a guy” who worked at a carpet place and promised to install new carpet on our stairs for an unbelievable price. Big Mistake. He ran out of carpet staples at the last step and then after we gave him only $100 that day…HE NEVER CAME BACK! Oh well, I’m saving your post to drool over.
You NEVER cease to amaze me…but I’m pretty blown away that you will be attempting this project. I, too, have the exact same 3-kids-gray-stripe-up-the-carpeted-stairs look you refer to and would LOVE to rip it out and have wood stairs. I’ll be holding my breath for updates on this!!! GOOD LUCK!!! Go Girl!!
Good Luck! I’m sure your cases will be just as beautiful if not better! ;)
We had a new cream coloured carpet put on our stairs 5 years ago and it is awful with 3 kids and pets going up and down and it’s a pain to vaccumm and keep clean! I’ve been ‘talking’ about removing it too. But I’ve been ‘talking’ more than ususal, so I have a feeling it will get done soon! I’ll be checking in for updates! Good luck! What colour of stain is that on your balister?
OOOH! I can’t wait to see the end result! You are inspiring me to take the plunge and redo our stairs — I was still nervous to do them until I saw you with your gloves and glasses on getting it done! :)
Look at you go, it looks like a lot of work, but it will be worth it in the end.
Is that your main entryway? Gorgeous area! The staircase looks like it’s really coming together. We have a wood staircase in our home, and it’s wonderful! Easy to clean (we have two cats, so fuzzies seem to abound no matter what), too.
A ton of work, but I know it will look fabulous. Can’t wait to see the finished project. Hugs, Marty
Now if I could look as cute as you do when I do DIY projects I would never stop! This post was perfect timing for me. My daughter and her husband just bought a short sale home and it is drowning in that same oak banister. This gives me inspiration to stain it dark like you did. I am glad you are hiring out that step, some times you just have to pick your battles. Can’t wait to see the progress.
I finished my staircase to our basement last month. I haven’t posted the finish, finished pics on my blog but I had so much trouble anywhere that we used putty getting it to stain evenly. It drove me insane. I eventually ended up painting them a dark brown next to the similiar wall treatment that I did similiar to yours. I also added an anti-grip agent to the latex paint then added poly to the top. Check on the putty and make sure it stains evenly, if I can give you any advice :)
I think you can, I think you can, I think you can. Just a little variation on the Little Engine that Could.
Can’t wait to see the beautiful result! You go, girl!!
awesome! side question: how did you get your hair to look so fabo when ripping up carpet? I obviously need some help in that department. You’re all glam with your bumpit ponytail. ;) rock on with your awesome DIY self.
Kate,
If anyone can do this job and make it turn our beautifully, it’s you!
Meghann ~ fabulous tool, will definitely show that to the hub since he’ll be doing the cutting, looks like a worthy investment and I could probably sell it when we’re done on Diggers List. Thank you.
Bette ~ The color of the banister is a stain/glaze combo. I wrote about in in our original staircase post, see link in article. We may use a different stain for the stairs, I have some investigating to do.
Angie, thanks for the offer, I’ll pop over for a few tips.
Ashley ~ Can’t explain the extra fluffy bumpit. Do you love my favorite paint covered sweats leftover from the 90s? I will never part with them. :-)
Of course you can get it just as gorgeous…I’m pretty sure there isn’t anything you can’t do! Good Luck! Can’t wait to see it!
I know you are just so excited. All your hardwork will be worth it for many years! You always do such a great job on all your projects. Can’t wait to see the “after”.
I love your go-get-em attitude! I also love the look like you. However, I have honey colored hardwoods like in your first pretty picture (one day maybe we’ll be able to stain them all dark). In that picture it looks as if the stairs are stained dark and the floors are honey colored. Is that what you see or are my eyes decieving me?
Absolutely CANNOT WAIT to tackle this project in our house and am 99.99% sure that our stairs are plywood underneath that grody carpet as well! Can’t wait to see how you tackle this one!!! Waiting with bated breath…
Ugh. It’s a huge undertaking, but it is going to look GORGEOUS when it’s done. Keep your eye on the prize. Can’t wait to see the completed project.
Please show us how you did this! We’re tackling ours next month!
Exhausted just reading this! But I know it will look gorgeous when you’re done.
And yes, I don’t tackle much around the house now without pampering my knees. At the ripe old age of 38, they’re my creakiest body-part. But I really, really want them to play nicely and carry me 26 miles from Calistoga to Napa next March!!
I have to admit, I was not a fan of the wall paper on the stairs; I think it looks better already. I can’t wait to see the end result. We have wooden steps and I’ve been tempted to pain the baseboards and rails white, but I’m lazy. Maybe after seeing yours it will motivate me.
Struggler ~ Bravo girlfriend, we will have to meet up when you visit !
Sara ~ yes, our floors are a natural oak (not so honey), but I’m not one who believes the floors, treads, and handrail should match. I think the floors will look just fine against the dark stain, and I also have that dark highboy dresser in the foyer, so that pulls the wood tones together.
hi there. i think its looking great.
i have a totally unrelated question. i am looking for a warm clean white (not greyish) for my walls. can you recommend a color?
Good luck with the project, the look you are going for is a classic so all your hard work will be worth it in the end.
BTW, all those DIY projects are giving you some awesome arms girl!
the leftover sweats are the best kind! I’m wearing some now! haha.
From experience, I STRONGLY encourage you to paint the risers before the wood is installed and then come back and touch up as needed. I had my hardwood stairs installed before doing any painting, and it is such a regret. No matter HOW careful you are, and as you know from pulling out all those staples, it’s such a tight space and a painstaking process.
I can’t wait to see the finish product and I have no doubt that your stairs will be more beautiful than those in the pictures you shared.
Wow good luck… I know you’ll make it fantastic… I have some unfinished stairs too…not sure how to conquer them, they have been waiting 3 years for a make over… yikes that’s a long time, I almost feel bad for them.
I can’t wait to see the progress on your new staircase!
Good luck with this project! I am sure it will look terrific and I can’t wait to see the after pictures!
I am in the process of having the same thing done to my stairs…however, I am lazy and am paying someone to do the job for me! But, I have to stain it……so please be sure to let us know how/what you stained it with…..I am also doing dark stairs…..looking forward to seeing how you do yours!
Of course it will be just as fabulous…if not better!
And look at your ‘gun’…go Kate! ;)
xo, cass
I really love the loo,k too. I was wondering if I have dark stain trim in my whole if I could do the white riser and dark tread and still have the dark trim or would that look wrong. Everywhere I see this the trim is painted white.
It’s gonna look great, Kate! I am hoping to do this to our stairs the first of next year, so I will be watching your tutorial! :)
I know it will be worth the hard work.
I’m sure it’s going to turn out fabulous!
It’s worth every bit of effort — my husband just did our’s and I’m about to wallpaper just as you had done — I had to laugh when I saw your’s gone and mine just going up! I am so jealous of the dark stain with the white — my husband is a natural wood fanatic, and I’m so not, but I have to give it to him — he let’s me do whatever I want otherwise. Good luck!
Good luck! It’s looking great so far. I wish I had a gorgeous staircase to re-do!! :)
The makeover gets a makeover:) I remember when you redid the stairway the first time and I was floored. Now this will be even better- so pretty when you walk in the front door. Love the action shot too!
OoOo…those are pretty pictures. I believe you’re going to have something just as stunning when all is said and done. We did this too and while it’s an improvement, our staircase in this farmhouse isn’t quite grand. Those gazillions of little staples were a pain (we removed carpet from the entire first floor so I feel your pain. Glad to see you still have your eyeballs! :)
It is going to be so gorgeous! Can’t wait to see all of the photos of the transformation!!
I love it!!! It is going to be so fantastic when you get it done!!
I did that to my parent’s staircase. And I’m halfway through one at my house. All the work is so worth it! Great job so far!
The stained dark handle looks fantastic. Seeing you at work I know this will be a stunner when done!! You’re inspiring me to go out and buy some tools!!! So impressed.
wow…what a project to tackle. I want to paint my handrail black just like yours! Been wanting to do it for a while now….looks like I am going to have to bit the bullet and just do it so I can have a wonderful looking staircase like yours. I can’t wait to see the finished product!
Kate – Great post and inspirational, too! Here is a staple-removing tip – get a staple remover that’s used for upholstery work. (The post shows using a screwdriver.) It’s a dreamy tool to have in your toolkit whenever you need to remove staples because it’s got a “forked” and tapered tip (making it easy to get under staples) and the working end of the tool is curved (making it easier to get a good fulcrum to lift the staples).
Oh my gosh that is ALOT of work. It will all be worth it in the end. I love the dark wood with crisp white. I have a bit more to go before I can tackle this project. My 20 month old is still a little unsteady on the steps and fell down the stairs last week. Luckily she landed on the landing. I am anxious to see how yours turn out. It will be amazing I am sure. Keep persevering friend.
Yeeeee haww!!! I am so stoked. ♥ !
I am jealous over your plywood. Our stairs are 100% craptastic particle board. I copied your banister (I get compliments on it all the time) and would love to get the same look on the stairs but just don’t know that it’s possible with particle board. *sigh* Major plywood envy.
I have the same stairs and have thought about making the handrail and treads dark wood but we have oak on the first floor. What are your thoughts? Upstairs is carpet and our bedroom (upstairs) is also dark wood.
You inspired/motivated us to tackle our banister (semi-opaque paint and all!) and we talk about taking this next plunge… but I need to finish painting the house and figure out where things are going =) Good luck with this major project! Can’t wait to see the process and, of course, the final pics.
Found your blog just the other day….just wandering around….You will love the white risers with the dark handrail and steps. We lived in a house built in 1901 and we did the same thing….painted the risers white, the steps were already dark and we painted the rails white leaving the handrails dark….loved, loved, loved it. Did I already say I loved it? It looked fantastic! Would do it all over again. Good luck with your project!
@Sue – All the trim in our home is stained Early American Walnut.. there is no white anything, except the risers of the stairs. I had to stain the treads in the Early American to match everything else and left the stringer (the piece of trim that goes on the wall along the stairs) the original stain. I thought it would look weird painted white when the baseboard attached to it is stained, so I left it. I don’t think it looks weird at all. I have thought about painting the balisters white, but I think my husband would pass out. He literally gasped when he saw somebody doing that on HGTV. lol
I’m so inspired! I love your stairs and they are going to look amazing. I totally feel you on the popping out staples. I’m still working on the little buggars on the stairs.
Where do you get the poly risers? And if I am removing hunter green carpet would you go lighter with the stain?
I saw you on Nate today for the first time and have so many questions!!
But first had to say that I have been in a rut with my home projects and YOU have inspired me and given me a new motivation. Thank you!! How do you do all that you are doing? Seems amazing to me!
I am 48, married 23 yrs. 2 amazing sons, and have a 70’s home that we have gradually redecorated and love…and the projects are down to a few now. I have to ask about your beautiful map on your wall, not to mention your sweet son!, and need input from you on a project my husband says cannot be done! I want to cover our red brick fireplace with a wood overlay of some kind. To brighten and update a very awkward living room we have. I may have to tackle it on all myself….HELP!!
hi! i just found this post! i keep threatening my husband that he will come home one day and i will have ripped all the carpet off the stairs. he said, “please dont!” the reasons i haven’t yet are 1. we have a carpeted loft at the top of the stairs and i’m not sure where to stop the carpet ripping at the top. & 2. what do i use as replacement boards on the stairs? do i need to invest in stair boards that have the wrapped edge or can i simply use a nice sturdy board cut to fit?
thanks for your help.
shelli
Hi Shelli, you can read how we added risers and treads here: http://www.centsationalgirl.com/2010/10/the-risers-and-the-treads/ and finished the staircase here: http://www.centsationalgirl.com/2010/10/finished-staircase/