Did you know I’ve had my little heart set on wainscoting in my living room for like ever ? Have I mentioned this before ? Perhaps I have.
So this past weekend was Mother’s Day. My husband asked the obligatory question, “Dear, love of my life, mother of my children and wife extraordinaire, what is it that you want for Mother’s Day?”
It took approximately 1.2 seconds for me to shout “Wainscoting!”
Wish you could have seen him wince.
I think he was hoping for “Spa Day” or “Chocolate” instead of “Wainscoting” since he had his heart set on a relaxing weekend watching the San Jose Sharks win the playoffs, woot woot ! No, my idea of relaxation is a home improvement project – call me crazy.
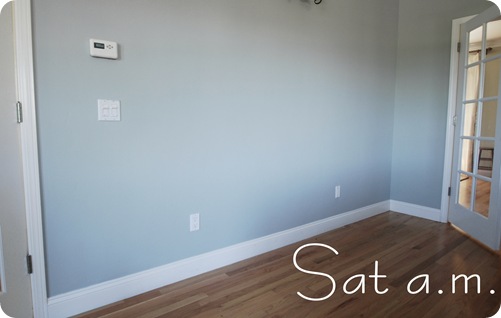
I started my Saturday morning with some coffee and research. I learned the following.
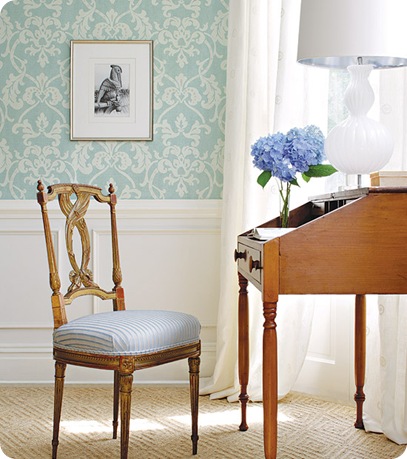 Wainscot (paneling on the lower part of a wall) comes in many different styles.
You’ve got your tongue and groove beadboard, board and batten, inverted panel, flat panel, and raised panel wainscoting. Researching the ‘how to’ is enough to make your head spin. This Old House has a great article describing all the different kinds of wainscoting.
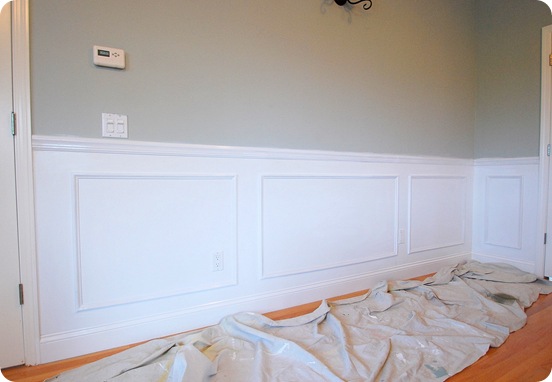
I had my little heart set on picture frames sitting on top of smooth panels with a chair rail above, or really something that looks a whole lot like this photo to the left.
Plenty of websites want to sell you prefabricated kits. Some online articles recommend hiring a carpenter. For what I had in mind, I was pretty sure we could do it ourselves in a weekend with some simple supplies.
And so we did !
Sort of. We’re not finished, but we made great progress.
Here’s the step by step on our version of this picture frame wainscoting.
Get your second cup of coffee, you’ll need it. Boring pictures ahead.
Supplies: 4” x 8” x 1/8” panelboard cut to height; construction adhesive; chair rail; trim molding; spacers; spackle; caulk. Tools: jig saw; nail gun with brads (or hammer & finish nails); compound miter saw; level; measuring tape.
We chose to use some smooth 4 x 8 panelboards available at Lowes for $12 dollars each. They are made by this company, and they are only 1/8 inch thick, so we knew we could place them right on top of our existing 5 inch baseboard and not have to remove the baseboard at all. Whew, big time saver there.
We wanted our wainscoting to be 41” high, so we had the panelboards cut to 33” at Lowes – they do it for free. 5” baseboard + 33” panel + 3” chair rail = 41” in height.
We brought it home and had the panels acclimate to the room temperature and environment for 24 hours.
Well, it’s official.
That has to be the most boring picture ever posted on the internet.
I think it deserves a gold star.
Yay, that’s much better.
Next, we used a jigsaw to cut out the square around the electrical socket. 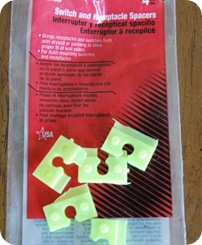 Then we realized we had to extend the electrical socket to accommodate for the extra 1/8 inch smooth panel we were adding to the wall.
We used spacers on the mounting screws to extend the outlets so they would be flush with the new paneling.
When working with electrical outlets, be sure to turn off your power ! Also, check with an electrician and your local codes to make sure you are following the proper procedure. Safety first !
Once our electrical sockets were extended, we dry tested our panels on the wall to make sure they fit and the seams were straight.
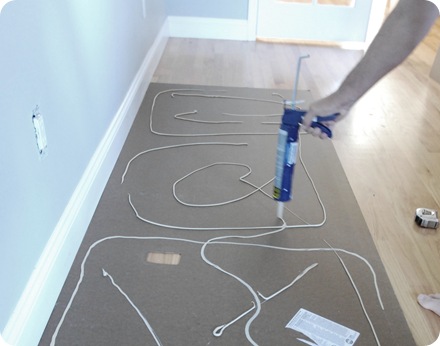
Next, we added some construction adhesive designed for wood paneling to the backs of the smooth panelboards.
** Update ** Several people have asked why not just paint the wall and skip the paneling ? We have troweled walls that are not smooth so it would look obvious, at least to my eyes, that I had painted instead of paneled. You can still achieve the same look with just paint, but I wanted to add the paneling for the textural difference and since the panels are only $12 each and Lowes cuts them for free, we went for it.
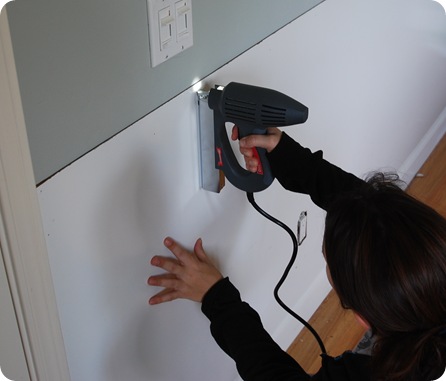
Then we secured the panels up on the wall with a brad nail gun. You could also use finish nails and a good old fashioned hammer, it works just as well.
One other problem you face when tacking up panels and chair rails is gaps between the boards and your door trim, and also gaps in the seams between the boards. So I used some caulk to fill in those gaps.
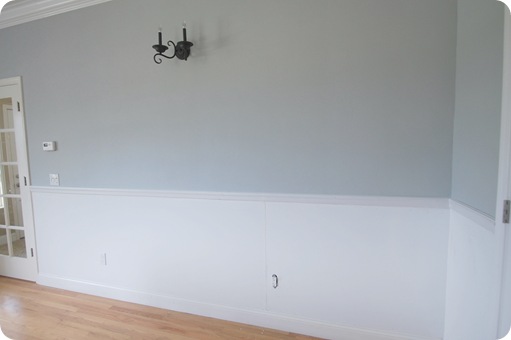
Once the chair rail was up, the panels looked like this:
Next, we measured out where we wanted the picture frame boxes to go, then trimmed our molding with the compound miter saw and tacked it to the wall.
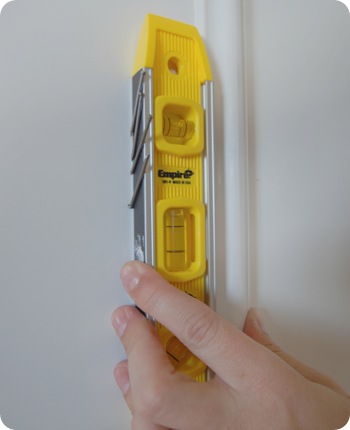
I like to use this little level that Santa brought me in my stocking.
See how it holds your finish nails with a magnetic strip on the side? Mr. CG called it a “chick tool” but secretly I think he’s jealous.
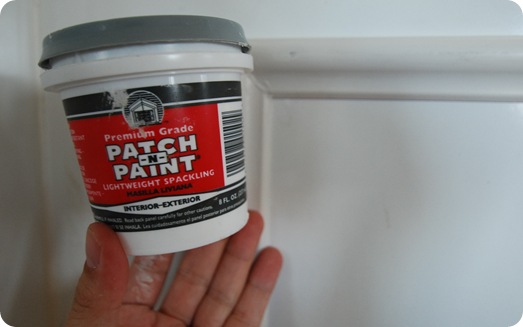
After my picture frames were attached to my smooth panels, I used a little spackling to fill in the holes.
I hope you’re paying attention, there will be a quiz at the end.
Once the spackling was dry, I gave my new wainscoting a coat of white paint.
Class, are you with me ?
Who can tell me the difference between spackle, caulk and wood filler ?
** crickets chirping **
Bueller ?

Have I put you to sleep ?
If so, feel free to bookmark this page for your future bouts of insomnia.
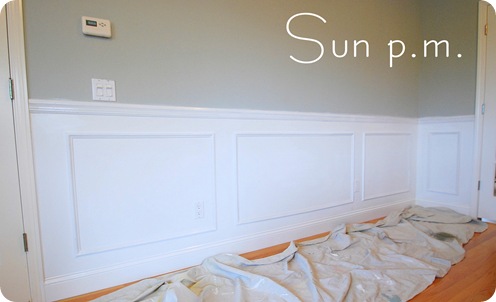
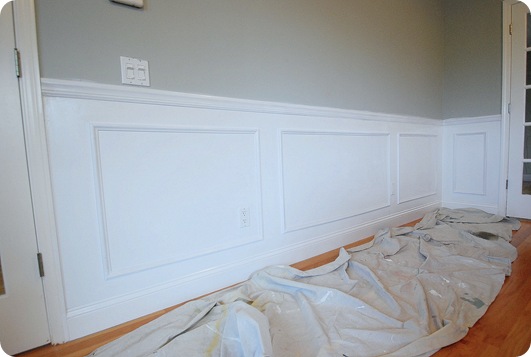
So by Sunday night at 5:00 p.m. I had one wall looking like this:
1.25 walls complete.
2.75 walls to go.
So much for this being a one weekend project.
Next weekend is my husband’s birthday.
Do you think he’ll ask me for more adventures in wainscoting ?
My fingers are totally crossed.



That looks absolutely amazing! I love wainscoting and you did such a fab job! I’m drooling with envy right now! :)
Oh, this looks so fabtabulous! I’ve been planning on board-and-battening my living/dining rooms for ages. Your’s looks so great I’m gonna have to do it sooner rather than later!
Kristine
xx
Fantastic and you made it look so easy and fun!
Thanks for the tutorial. Planning this in my dining room in the (hopefully) near future.
wow! i had no idea it was so easy…well you make everything look so easy! happy mother’s day to you doll…glad you got what you wished for!!
It looks amazing so far. Congrats on your gift and also on the Gold Star. I also asked for a very unconventional Mother’s Day gift this year, but I have to wait until later this morning to see if it will come through. :) Oh, the suspense!
Can’t wait to see the completed room. I think if there was any house in Blogland I’d want to visit, it would be yours. :)
I LOVE IT. That sounds like the best Mother’s Day Gift ever!! ) Can’t wait to see the finished product. It’s amazing what a difference wainscoting makes.
Wow that looks great, your husband is the best!
Gorgeous!!! It looks so much brighter and more airy already!
“We used spacers on the mounting screws to extend the outlets so they would be flush with the new paneling.”
We have this exact issue in our bathroom, we installed new drywall, but failed to account for the added thickness and our electrical outlet and light switch are sunk in the wall. We haven’t had light switch covers for almost a year!
Where did you buy the spacers and is that the actual term for them???
Thanks!
oooooh how i love wainscoting! i’ve wanted it too! mother’s day 2011??? maybe, we’ll see if the hubs is up for the job! thanks for the post!
I love this! I prefer this type of wainscoating over beadboard, it looks more elegant! Have a great week! ~Andrea
Look great!
It looks great! I’ve been wanting to spice our walls up with some wainscoting and I just love the picture frame boxes.
That is exactly what we are doing in our dining room. Great Mother’s Day gift – long lasting, and not too expensive. :D
this is stunning… i really have to get brave and learn how to use power tools
You are so cute. :) We just put board and batten on our walls in our family room and I love it so much. It is amazing what a difference it makes! Hope your hubby wants to finish the wainscoting for his birthday!
Can you tell me the name and color of the paint of your living room? Thanks!
Looks great , but I am curious why add the panels to the wall , textured walls? I can’t tell , to me it seems just like an added expense , I just painted the wall white and added the chair rail and square mouldings , this is a great idea for those with textured walls .
You always make it look so easy :) I love that you asked for this vs spa day, can I have both :) Happy Monday!
You must be the only Mother who worked, excuse me, relaxed doing wainscoting on Mother’s Day. It looks absolutely perfect. And the tutorial is really fantastic. I’m bookmarking it – as if I thought I could do that too! Thanks for sharing.
Not boring at all for those of us who want to know, step-by-step how to do it! I love the finished 1.25 wall :-) I’d love to do the same in my living room. Since it’s a rental, there’s not a chance. LOL But one of these days we’ll have a place of our own. Thanks for the great tutorial!
it looks awesome!! i know that wood filler can be sanded, i think spackle can, and i know that caulk cannot – is that right?
Looking great! I love wainscotting!Most boring image included!
Karena
Art by Karena
Amazing!!! Love the look, and the paint above compliments perfectly. BTW, can beat your request for a gift. One year for my birthday I asked to have a mole removed. Guess what? He bought me jewelry instead…..was soooo disappointed!
It looks amazing!! I’ want to do it all over…my living, dining, entry, and breakfast nook are all open to each other, so it’s all or nothing! Thanks for the inspiration! -shaunna :)
You’re a girl after my own heart! I would ask for just those kinds of gifts, too, but my hubby, great as he is, is not the “handy” type. Question for you: I, too, was wondering why the need for the panel? Thanks so much for the tutorial, and looking forward to your answer.
It looks awesome!! You truly are amazing. Thanks for sharing.
I love you, I love you, I love you! I’ve been planning this for AGES and now I don’t have to do any thinking when the time is right. I’m printing this now and and putting it in my notebook of ideas for the new house! Thanks. :)
Beautiful!!!!! I so wish we could put up board and batten, but all of our trim is stained dark. I don’t event want to think about starting to paint it all!
Hi Chris and Michigan home ! Great question about the necessity of adding the panels. Yes you can simply paint the bottom part of your wall below the chair rail to achieve the same look.
However if you have textured or troweled walls like we do, then adding the smooth panels makes a difference in textures. It was an extra step, but not too much of an extra expense since the panels are only $12 each.
You’re funny! It wasn’t a boring post and didn’t have boring pictures:) You class was paying attention the whole time. We could have all passed the quiz.
It looks great. I can’t wait to see the finished product.
I’ve been wanting to try this, you make it seem too easy!! It is looking fabulous! Janell
so….
did you have to remove the baseboards?
great job and great mother’s day gift!!!! maybe i will add this to my list :)
Great project! It will so lovely when it is completed. You may find yourself in the room gazing at that wall all day today!!
I love this!!!!!!! Hey what’s the wall paint color you have in there? I love it
ok…never mind…i just re-read your post…
this project looks even more tempting if i don’t have to remove baseboards :)
I love wainscoting and you did a fabulous job. You make it look easy enough that I may get brave enough to give it a try myself. :-)
Looks gorgeous! And I love your “Most Boring Picture on the Internet Ever” star! Maybe you should make it a bloggy award that can passed on??? :0) hehehe
Could u provide us a cost estimate pls??Would this look good regardless of the ceiling height???
GORGEOUS! I cant wait to see the rest of it. We have been wanting to do something similar since we moved in. Our house has a chair rail, and we have been wanting to give it a more complete look. Maybe I should have asked for that for Mother’s day also. :-)
wow! kudos to you for doing this yourself! looks fantastic. you’re a gem for posting the tutorial, even if a bit boring, makes it easier to see that you can really diy.
Your blog never dissapoints! What a beautiful job, and EXACTLY what we’re planning to do in our entry in the coming weeks. Perfect timing! Thank you for sharing!
You’re hilarious. Big gold star for you!!!
You did a great job! Don’t feel guilty…my husband’s birthday is Friday and Father’s Day next month.
He will be able to ask for what he wants! When we did our hallway wainscoting we just put up chair rail and made the picture frames below on the existing drywall, and then painted it all white. We did not use the panel boards.
I love your Mother’s Day present! Wainscotting in our dining room is a project we have planned for this summer to escape the Hotlanta heat. Since we had a cool day DH and I pulled vines down from our front woods for much of the afternoon. That was how I wanted to spend my day, getting things done! Dh also went to the stone yard and bought 2 tons of Tennessee Crab Orchard thick flagstone and all the fixings (crush and run gravel (1 ton) sand, etc.) to do a DIY stone walkway. Much better than a mani/pedi spa treatment – but I think I will need one after laying that much stone! I look forward to seeing your full “after” pictures. Question: do you have AC registers in the walls that impinge on your ‘boxes’? If so, how do you plan to work around it?
What an absolutely perfect Mother’s Day gift! Enjoy!
Love the tutorial! You guys are knocking it out!!
We were just comntemplating a chair rail in the new baby’s room . . . not as ambitious as your paneling, but it was great to see your fabulous end result! Post pics of the whole room when you are done!
Kate, a quick question for you:
Would you mind sharing what color you painted your living room walls? I have actually been working on a similar look in my home and CANNOT find the right shade of blue! They all end up so… baby boy’s nursery, ya know? I finally resorted to mixing all the various WRONG shades of blue to get something close to what I am after, but yours looks perfect! Thanks!
I started a Board & Batten project this weekend! It turned into much more of an adventure than I planned…but they seem to always do that! I haven’t gotten any of the bottom portion done but did finish the railing (chair rail) on the whole project. Oh did I mention…its in my stairwell? Yeah, I didn’t factor in the much more complicated aspect angles & climbing stairs would add. Especially when there is a landing between the two staircases and I of course wanted it the whole way. You’re project looks much more complete! Nice work!
I love it! I have been looking for a way to cover up my textured walls for a fancy wood paneling look. Thanks for sharing! My only question is: can you paint it?
INCREDIBLE you two! I love the color on your walls also! You both get gold stars!
Hi Chrissy – that wall color is my own custom color. I originally chose BM’s Affinity series ‘Tranquility’ and put a sample up on my wall. It was gorgeous but a hint too ‘baby blue boy’s nursery’ if you know what I mean. So I had the guys down at BM pull two drops of blue out of the formula, and then I named it ‘Tranquility Tweaked’. It should be in their system at any BM paint distributor. Here’s the formula: S1 Ox: 3.000 Y2 1x: 1.500 B1 0x 20.000 O1 0x: 19.000
It’s gorgeous – not too blue, not to gray, just right !!
xoxo
Kate
Marjorie – we have registers on our ceilings and floors so we don’t have that issue. I imagine it’s similar to the electrical outlet – you need to get some spacers to extend the registers. Ask at your local home improvement store, they may something specially designed, but it may be just as simple as a few spacers behind the mounting screws.
Brilliant. Total “atta girl” coming from Phoenix.
I too had evil masterminded plans. Cleaning out the closets. Getting rid of stuff. That is my idea of the perfect gift.
My captive audience post will make its debut on Wednesday.
Now cue wicked laughter.
Well, it looks beautiful, but doesn’t it just show how nothing in DIY land is ever done in the amount of time you think it should take?
But you’ve got me thinking about what to ask for, for Christmas ;)
Holy smokes that looks fantastic! You guys did a great job!
I have the same in my dining room. It’s so elegant and sophisticated. It’s been about a year and I still love it just as much as the day my dad and I put it up!
Looks beautiful! I can’t wait to see the finished room!
Health and happiness,
Angela
http://angelawalkerjewelry.blogspot.com/
It’s totally gorg! It’s just the right amount of ‘bling’ for your walls. I definitely like the style you picked. Thanks for sharing!
Looking great, girl! I love it! Great Mother’s Day gift idea. :)
This is amazing though – well worth all the work you’re putting into it :D
I can’t imagine that he’d want anything more than additional adventures in wainscoting. Who would?
This is looking wonderful. You were wise to make this choice. A spa day would have been easier, perhaps, but you’ve got yourself some lasting beauty here. . . and the chance to use what must surely be one of the most sophisticated word in the language. (I’m such an Anglophile. . . I just love words like “wainscoting.” Kind of like “waistcoat,” but pronounced “weskit.” LOVE.)
Okay, you’ve won the gold star for most boring photo; this is quickly heading to most boring comment. I’ll stop here and simply say WELL DONE.
Thank you, Kate! I will have my BM guys try your ‘Tranquility Tweaked’ formula! It’s a good thing they like me – I am one of their best customers afterall! :)
This very easy how-to will make my husband happy (and me sane). We’re buying our first home this summer and he’s mentioned several times that he’d like to try and “put that wood work stuff on the bottom of the wall.” I translated that into a DIY wainscoting project similar to yours.
I am going to do this in my new dining room. You have so added to your homes value and believe me, I’m wide-awake! Thanks for a tutorial I will bookmark and I will be standing by to see the finished-project post. Thanks again and have a good one!
That looks so great! I would love to do this in my dining room someday.
It looks wonderful, not that I’m surprised. I’m glad to know that I’m not the only one that springs a huge project out of the blue on my husband.
It looks amazing! I just love the way wainscotting looks in a room, so elegant. Your husband is a lucky guy! (c;
At least you had help :) It is a painstaking project, but it’s sooooo worth it in the end. I did the same thing in my dining room a few weeks ago. I did make my husband buy me a miter saw and I kissed the little yellow miter box goodbye. Your choice of color is so lovely and your home is beautiful. I look forward to your posts every day!
Stunning. Seriously stunning eye candy. Love the wainscotting and paint color together. :)
This looks absolutely wonderful! I do not find your photos boring at all. I think this is a great tutorial on how to do wainscoting. I had no clue how it was all put together before. I think I want to try this in my living room and now I know just where to send my husband to look at the how to…Thanks for another interesting and helpful post.
SZ
That is gorgeous!! I so want that in my house.
LOVE it! Very classy – and personally I appreciate the long detailed post so that I know how to do it now! :)
I am in LOVE LOVE LOVE with your paint color above your wainscotting… I have searched and searched for a color that speaks to me and THAT IS IT! We are moving into our first house and I want our dining room that color. Please oh please will you share?
I can’t believe you did that in that amount of time. It looks gorgeous! And I am definitely bookmarking this, not for it’s boring pictures (because I didn’t find them boring at all!), but for the possibility of me and my husband doing this down the road in our place! Thanks and good luck doing the rest!
Welcome to the wonderful world of wainscoting! I have to admit that I cheated when I installed mine in the dining room last year by using the pre-made ones from Lowes. But they look fab and I couldn’t be happier.
Great job!
Judy
Wow! It’s looking great. It is so funny how much alike we are. I’ve been asking for built-ins for my birthday, mother’s day and Christmas! Hubby’s still trying to work it into his schedule. I’ll get the some day. I did get hardwood floors for my birthday a couple of years ago, though. :)
So funny!
I love it, what a fantastic job. I love the explanation, great job and makes me feel like I can jump right in there and do the same thing. You put it in words anyone can understand. I totally love it. Thanks so much for sharing, keep us posted on other projects, I may finally get my house done. THANKS!!!!
That looks absolutely fabulous ! I am so impressed. Maybe someday ….
Can’t wait to see the completed room. Thanks for sharing the process.
I LOVE IT! Looks so elegant. I got earrings for Mother’s Day. I’m hoping for Boxwood shrubs for my birthday! : )
Thank you for posting the step by step instructions. I would never have thought about the issue with the electrical outlets. It’s helpful to know that such a product is made as the spacers.
Very well done!
I love your website and I also “heart” wainscotting and detailed moldings. Several years ago, we added wainscotting to my dining room. However, there is a slightly easier way to do it. Skip the step of using the backboard on the wall and instead put the picture frame moldings directly on the wall. Then, paint the everything below the chair rail white or whatever color you want. My dining room is red above the chair rail, then white below and then I have black toile curtains that I made from Waverly fabric. I have picture I can send but not sure how to post.
There is also a way to lengthen/widen your crown molding with minimal effort. The builder installed crown molding throughout most of our house. We then used a piece of molding, similar to the width used for the picture frame molding, and just dropped it down from the crown molding 3 1/2 iches or so. You then paint the molding and the 3 1/2 gap all the same color and it makes it look like your molding is 8 inches or so as oppposed just the crown molding.
Couldn’t you have put the picture frame box trim directly on the wall and not used the panel sheets? Just saved a step!
It looks beautiful! Just one question, why not just put up the chair rail and frame and paint the wall white?
Love this! It will look so pretty when done. :)
You make it look easy. Loving the look of the white and blue together. We have the same type of wainscoting in our dining room-glad it was the builder’s job and not mine.
Your walls look AH MAZE ING!!!!! great job!!!!
I was wondering why you chose to hang the board on the wall and just not do the trim and then paint. Were you looking for a flat surface or something? Inquiring minds want to know. I am sure you have a great reason. I love the wall color. It is going to be deeevine.
Wonderful, bright and lovely look all around. Way to go Kate…love of his life, father of his children, wife extraordinaire, denier of his day of watching a game on T.V.!
Looks fantastic! And I love all the photos you post-really helps me get my head around the projects.
WOW i’m amazed you did that by yourself, but to be honest not really. 1. because it’s you and 2. i love DIY home things
i too love the wall color you chose. i almost had to go custom but am going to paint palladian blue. but may still go 75% lighter for all i know! i wouldn’t even know how to tweak it.. how did you know to pull two things of blue out?/????? i wouldnt know what to change to make the palladian lighter other than white!! LOL
This looks so good. I just love the look of this and you guys are doing a fantastic job. It gives it such an elegant look.
Hi-
Love the tutorial. Just wondering what “white” you paint with for the wainscoting? I’m assuming it wasn’t spray heirloom!?! =) Will you share?
I LOVE IT!!!!! OH man is my husband lucky we don’t own our house!!! IT looks fan-friggen-tastic! *sound of gears turning…faint odor of smoke* I’m sure I can use this somewhere…..
Looks great! I just loved the wall color and thought it would be great for my master bedroom remodel. So I stopped in BM for your “specail formula” paint. Well I just have to tell you I love it, it’s exactly the color I was looking for! I have two other sample colors up. One was too white and one was too blue. Tranquility Tweaked is just right! Thank you for sharing!
Great job! I really want to try this myself and because of your great instructions, I will give it a try.
I just looked at the smooth panels I think you used. They come prefinished – glossy white. It sounds as though you painted over them, right? if so did you prime first? I have a 7 ft length to do. Would you recommend only painting the picture frame pieces?
Also, how much spacing did you give at the top and bottom for the picture frames?
Thanks.
I have been lusting after this look for a while now, even went so far as to “tape” off the wall to motivate my dear hubby (needless to say that didn’t work.) So now I am on my own, but you’ve made it sound relatively manageable….one question….how did you measure off how big your window panes were going to be?
I am about to tackle this same project in my daughter’s room! I know what panels you used because I looked at them for my project, but wasn’t sure how the glossy look would work out. So, my question for you, after you painted it, did it tone down the glossy-ness?
Looks fabulous! We are doing a similar project in our little dining nook. Quick question – what width trim did you use to make the window panes? 1″?
Thanks!
My dining room has been missing quarter round for years and after reading this post, I decided to finally tackle that problem plus, at the shadow box wainscoting as you did here. Thankfully, my walls did not require the panelboards and I completed the job on my own in just two days. Thanks for the inspiration!!
I love this! You are so funny! I kind of want to try this while the hubs is out of town…..do you know if they sell picture frames pieces already assembled?? I think that would be the most annoying part.
Thanks!
I love the look. What a difference it makes. You did a good job explaining the steps. I’ve wanted this look in my house for quite awhile. I’m hoping this gives me the courage to do so.
Hi! I love the gray blue color of the wall! What color is that? The wainscoating looks amazing, nice job!!
Hi Jennifer, it’s a color by Benjamin Moore Affinity that I tweaked, the formula is here:
http://www.centsationalgirl.com/2010/09/the-paint-on-my-walls/
Did this several years ago in my dining room & up my stairs but I didn’t put up panel I just painted the wall to match all my molding saved loads of money by not doing the panel yours looks great!!!!
Hi! I have a question that I really hope you can answer. You have used some unconventional techniques that Ive loved (craft paint on your stair rail:)) so I think I’ve come to the right place! I have walls in my basement that are brick halfway up the wall. I HATE them….. How would you suggest I tackle attaching wainscoting to them? I am determined to make it work but would appreciate any advice you could give me. Thank you.
Hi Jill, I’m not sure how to attach wainscotting to brick without some sort of wood frame around it to adhere the wainscoting and ensure it’s applied smooth and evenly – that’s what I’d do, frame around it, but you could also paint the brick the same color as the wall, that always helps to minimize!
Kate
OMG, that’s GORGEOUS! I am SO doing that someday! You made it look so easy, too! :)
The panels I found are pre finished with a high gloss and I have read you can’t paint them. Did you paint them and if so did you do a high gloss or something else?
Hi Katie, you can paint them if you use the right primer, I used the Bullseye 123 by Zinsser, worked great!
Did you Pre-assemble the picture frames and then attach as a whole or assemble on wall one by one?
One by one and piece by piece Dave!
Kate