Greetings all, how was your weekend ? It was rainy and wet here in Northern California, but I say that’s perfect weather for watching football and a good DIY project.
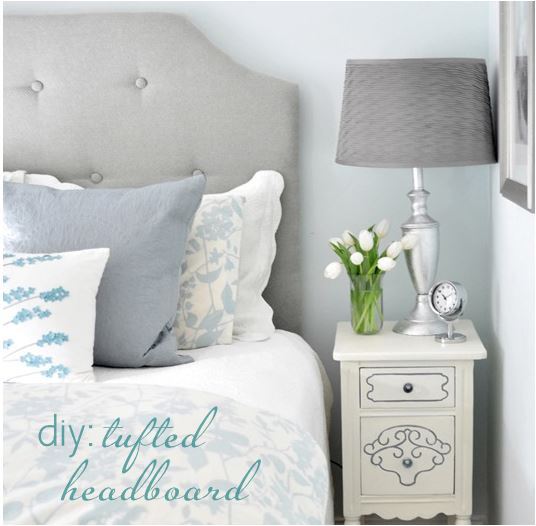
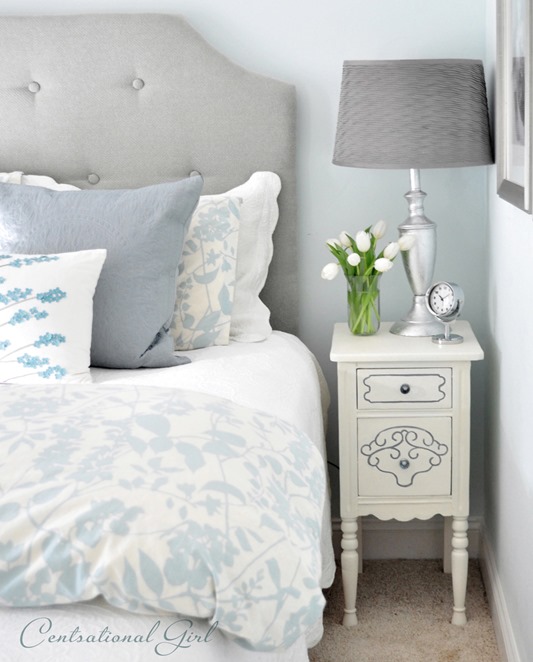
You’ve seen tufted headboards in boutique hotels, everywhere in interior decor and in designer bedrooms. Fabric covered headboards are a great way to add an elegant touch to a bedroom with all kinds of different fabrics. Last weekend I decided to tackle a simple tufted headboard for my teenage daughter’s bedroom. We didn’t want anything too fancy or formal, just some soft curves, a few buttons, and a little tufting for some sophistication. It took about five hours from start to finish, with the tufting taking up most of the time, but I’m really liking the final headboard in her room.
There are plenty of tutorials to be found online for fabric covered headboards, and for tufting, including my own how-to from this bench project, but here’s the step by step on how I created this this casual look for a fabric covered headboard.
How to Make a Simple Tufted Headboard
Supplies: 1/2 inch plywood, cut at the home improvement store to your bed’s specifications for width and height; 2 inch foam to cover plywood; batting; 1.5 inch finish nails; ‘D’ ring hooks; button cover kits; embroidery or upholstery thread; decorator needles.
Tools: Jigsaw (if your design is not square); drill and drill bit; staple gun and staples; sawhorses (if available, for convenience).
Step One (optional): If you want to add curvature to your headboard, create a template and mark it on your plywood. I used simple paper, then marked it with a pen.


Cut out your design with a jig saw.

Step Two: Mark your holes where you want your buttons to go. I spaced mine ten inches apart. For more drama, mark for buttons spaced closer together.

Use a drill and drill bit (between 7/32 to 5/16) to drill holes where indicated. Make sure you have a clean hole all the way through on both sides.

Step Three: Cut your foam to the size of your plywood. I chose to use 2” foam squares since it was more cost effective than paying for 2” foam by the yard. You can use 1” foam too, but I wanted a really thick headboard so I went with 2” thickness.

Result using 2 inch thick foam instead of 1 inch:

Here are my new sawhorses that hub bought me for Christmas. Isn’t that romantic ? How did I ever ever ever live without them ?

If using squares like I did, I think it helps to turn your foam flat side out to guarantee a smoother edge around the sides.

Thicker foam and the flat side out gave me a very smooth edge.

Step Four: Use your batting to secure your foam to your plywood with a staple gun. I didn’t use any spray adhesive to secure the foam to the wood. In my opinion, it’s not necessary if you use good batting.

Step Five: Attach your fabric to your headboard using a staple gun. For this smaller degree of curvature, I was able to get away without sewing a slipcover with seams. For these specific cutouts, start in the middle of the curve, secure with single staple, then slowly work your way out. Then secure your fabric on all four sides.

Use the natural corners to pinch fabric and create and attractive edge by overlapping the fabric. Secure with staples.

The gray/blue fabric I used is an upholstery grade fabric called ‘Bedouin’ in Blue Smoke from Calico Corners.
Step Six – Tufting: Use button cover kits to create fabric covered buttons. Thread your decorator needle with embroidery or upholstery thread.

I do not recommend these metal ones for thick fabric – they just don’t work. I found that out too late. I’ve used the plastic ones from Joann’s before, and they work much better.
These ones are better:
![tufting supplies_thumb[5]](http://centsationalgirl.com/wp-content/uploads/2009/05/tufting-supplies_thumb5.jpg "tufting supplies_thumb[5]")
Because the metal button cover kits were too flimsy for my upholstery fabric, I had to hand stitch my fabric to each of the buttons – bummer. That little setback added an entire hour to this project.

Push your threaded needle up through the pre-drilled hole, leaving plenty of thread underneath. Then attach your button to your thread. I recommend running your thread through the button twice to get a really secure button.


Push your needle back down through your fabric and foam and pull needle out on other side of pre-drilled hole. Pull your thread taught, then twist it around a finish nail to hold it in place against the plywood. Staple thread to plywood, and criss cross across several times and staple again. Sorry no photo, I forgot !
Repeat for all buttons and holes in headboard.

Locate the wall studs on your wall, then determine placement of ‘D’ ring hooks. Drive nails into studs, secure ‘D’ ring hooks to back of headboard, then hang on wall.

Enjoy your headboard in your bedroom space !
.


Great job. Beautiful fabric.
Thanks for the tip on plastic vs. metal button kits; I’m about to tuft my headboard, so this will come in handy.
That is fantastic! I was just thinking about headboards like this and wondering how you would get the buttons make the little indentations. Of course you would drill holes! Love it!!! Great tutorial!
This came out beautiful, Kate! I have been researching DIY headboards for the past few weeks and yours just jumped to the top of the list. Fab.
xo,
Erin
Gorgeous headboard! Thanks for the tutorial – so thorough. Just what both of my guest bedrooms need =) I’ll be putting your help to good use in just a couple weeks!!!
Fabulous result!! I have an antique rocker I am going to restore using your tutorials. It will be my first DIY project!
I am itching to do my first upholstery project. Perhaps once we get to the decorating part of the basement, and I can make some fun stuff. :-) Love the headboard, and that fabric is beautiful. Looking forward to the full reveal!
WOW! I am impressed with anyone who can make something this beautiful. Tufted headboards are my absolute favorite. I actually bought one on line at Target and I love it. It adds so much to the bedroom. Beautiful job!!
I think a starburst mirror would be lovely! This is such a pretty, sophisticated look. I bet she’ll be happy with this for some time. Two thumbs up, Kate! :)
That looks great!! You did a fantastic job! Thanks for the tutorial!
That looks amazing. You did a great job and thanks for the wonderful tutorial. Might have to do something like this in the guest bedroom.
Wow!! Gorgeous and you make it sound so simple.
I say yes… and stunning!
You did a wonderful job! I really like the bedding you used. Very attractive.
It looks just beautiful. I made one for our bed but didn’t do the tufting, I think the tufting adds so much. Maybe I will take ours down and do that. Thanks for the tutorial. Hugs, marty
As someone who doesn’t even have a headboard at the moment this was very inspirational. Can I ask if you did much research when buying foam? I seem to remember it being rather expensive. What store do you think has the best price for foam? I can’t wait to have a proper bed again.
headboard looks fabulous. the fabric is exactly what i want! i still haven’t made my headboard yet…
Can you do a bit of a cost breakdown? Just curious, if you don’t mind… I have no idea how something like this costs. Thanks :)
The headboard is great! Thanks for the tip of using d rings to hang. Fantastic idea!
Oh, an absolutely stunning job! I’ve love to see the whole room…looking forward to your posting pictures! Janell
It looks great! Thanks for the tutorial!
Girl, you are SO good with these projects! I love how this turned out. I wish I had another bedroom with no bed to try this on.
OMG I would love to try this project, it turned out beautifully!You make it appear to be very easy!
Karena
How fab! Love that fabric and the project – it turned out beautifully!
fabulous work – it turned out so beautifully!
That headboard is gorgeous! And what a well written, simple tutorial! Thanks so much :). I’ll be adding this to my tumblr files!
Blessings,
Stacey
I’ve been wondering how to shape the top part duh, thanks for sharing
This is stunning! You really make everything look so easy :)
This is beautiful. How much does a project like this cost?
Also, where do you nail the finish nails into the backside of the headboard or do you?
Insanely beautiful!
Gorgeous! You did it again!!! I was thinking last night about moving our headboard-less bed from under a window to the only plain wall in our bedroom and now I have to do it. I’ve been needing :) a headboard and one like this would be perfect. Thank you so much for inspiring me yet again!
I made one of these but a) forgot to predrill holes, so it did not get tufted and b) didn’t hang it with D rings, but attached to frame. The D rings would have been easier.
OK OK – it’s been on my list for almost a year – you make it look so easy. I’m having a hard time picking the perfect fabric! Yours is gorgeous!
Beautiful! Any chance you could give a rough cost breakdown?
That turned out so beautiful. My daughter just has the standard metal bed frame on her twin bed. I have the bed pushed up against the wall with pillows to to make it look like a daybed but something like this will really make it look really nice. Thanks for the tutorial! Now just to find the perfect material!
Wow, Kate!!!! That is sooooo lovely!!! You keep amazing me day by day. I would love to try this someday soon! Your stepdaughter is sooooo lucky!
Gorgeous!! You are a pro at the upholstered headboard and make it look so easy!
Yea! Thanks for this-I am planning ontaking on this task soon!
You did a fantastic job on the headboard. I could definitely see a starburst mirror about it, or anything else round/oval, like plates and platters, or a large monogram. I’m looking forward to seeing the rest of the room.
The headboard is absolutely lovely! Thank you for the great tutorial.
Simply FAB!
I love, love, love it and can’t wait to see the finished room! You are definitely not an evil step-mother!
I am so impressed. I bounce back and forth between inspired and feeling like a complete failure when I see a post like this. It would take about a month for me to do one button!
Congrats on jobs well done! The head board is lovely.
MORE SO…. being a GREAT Step-Mom, and Mom. Good job. Pictures do say a thousand words.
Hugs your way,
Brenda
I LOVE the height! It looks so grand. Plus, I’m a big reader and I love to have something soft to lean up against when I’m reading in bed. It’s perfection! Great job.
I would like to make this and a lot of other stuff you’ve made. Thanks for sharing and being an inspiration.
Great project. Well done!
Paula Grace ~
I love your tutorial. I can’t wait to make one. You are such an inspiration.
you did a great job!!!
Are you kidding me? Kate, you blow my mind. I am looking forward to coffee with you on Thursday. My bags will be packed, because I’m going home with you and moving in. That’s that.
(Will you make my headboard like that? Or I’ll just take that one, your daughter can sleep on the couch.)
Beautiful! So well done…question: If you were looking at the headboard from the side, where does hang in relation to the mattress? Does it hit just below the mattress, below the box spring, just above the mattress? Just wondering how it looks from the side view? Thanks so much for all your awesome tutorials and inspiration!
This is beautiful!! Your daughter is very lucky to have such a great room.
I just informed my husband as he walked through the room that he will probably be making one of these for our bedroom soon! He’s my DIYer. The day I stumbled on your blog, you had made the guest bedroom headboard, and I loved it. Seeing your latest creation has added to my desire for one. I move much slower than you, but your blog has definitely had an impact on me and therefore on my home. Instead of being just clean and uncluttered, I have been adding little touches of personality and beauty here and there. I hope to improve and do more as time goes on. Thanks for your tutorials and inspiration, as well as your fun, interesting, and witty writing!
Looks beautiful!
Wow that’s great! I told hubby that I wanted an upholstered bed and headboard. He said we could upholster the waterbed frame that we have now and add an upholstered headboard. What do you think? Have you ever upholstered a bed??
Yay! When I made one of these I think I read 867,000 tutorials. I love reading all that I can before I start a project. Seeing the different ways people make the headboard gave me so many great ideas and kept me from making mistakes. Thanks so much for this, I’ll be linking.
Great tut. This can be such an overwhelming task for any DIY’er. Definitely on the “to do” list.
thank you so much for all your great posts! Thanks to you I can actually create a look without spending all my money!! Love this post and have linked it to my blog, go check out what I made!! Thanks again Centsational Girl! ;)
This is great! I’ve been looking for an affordable upholstered head board and have so far been unsuccessful. Thank You for this post – I’ll be trying it out as soon as the weather warms!!
Oops ! I don’t have a staple gun and jig saw but I have a good option to bookmark this post, when I will have all these DIY hand tools , I will reopen the post to do this project by myself, a great do it yourself project , love it.
I can’t wait to try this. I have been wanting one of these for my master for so long. Lots of ideas just not much dough! I am going to do it!
I was searching around the net for do-it-yourself headboard tutorials and yours is by far the best finished product I have seen. You spent a little more on materials than most of the others, but it paid off. Well done!
This is just so great! It is exactly what I was searching for the last few hours….something with clear and specific pictures. Thank you!
So nice! Look forward to trying this out. thank you!
I LOVE this!! We’re redoing my SIL’s bedroom for her 16th birthday and I will be making her one of these next time I’m in town :)
Thank you so much for this tutorial!!! After a few months of wanting to try a DIY project, I finally tried this and it came out perfect! Your step by step pictures helped greatly! Check out my finished product: http://jennygilson.blogspot.com/2010/11/my-first-diy-project.html. I love my new headboard!
I love the moulding on this. I have been wanting to make an upholstered headboard, but none of them seemed like my style until I found this one. I can’t wait to make it. Thanks for the tutorial!
Amazing! Of course, I don’t have any tools. I’d love to find someone to make one for me. The ones I’ve seen for sale that I just adore seem to cost between $1,000 – $2000!
LOVE your blog and I just made this headboard two weeks ago. I’m so in love with it so thank you for sharing!
Okay, I think I’m finally going to do it. I’ve been wanting to make one of these for awhile now but keep chickening out. But after I read this post, I feel like I can actually do it. Thank you!
Wow, you did a really great job. It looks really luxurious. I’ve been wanting to buy a jig saw for a while. I tried to do the tufting on a headboard that had canvas stretchers as the frame but it just doesn’t have the same effect.
http://typearamblings.blogspot.com/2011/05/diy-headboard.html
I am very interested in making this. Is there anyway you can give me the dimensions for a double bed? Thank you!
Yes! I agree with Lauren. Dimensions would be great for a double bed! Also, where do you buy the foam? and how many yards of fabric do you need for the double bed?
Thank you!
Can you post how many yards of fabric you used for the headboard?
Hi, I love your tutorial! I was wondering about the height of this headboard, because it looks like the exact same size I want for mine. Thanks!!
If I can’t hang the headboard how would you recommend using this headboard tutorial. I love the look of the tufted headboard and I can totally make it, but I’m not sure I’m able to hang anything that big/heavy in my apartment. Should I just make it big enough to sit on the floor?
Hello Dear!
Just wanted to drop a line and let you know that I used this tutorial to make my own headboard!!! It took me 7 hours but I did it for less than $100. I call that a win. Plus it’s gorgeous! Thanks a bunch for posting this! Here’s a link if you want to see the finished product! :)
https://www.facebook.com/photo.php?fbid=628766816139&l=7cbd2a0143
Wow, I love this!! My husband and I are trying to make a headboard. I’ll definitely show him this. Thanks for sharing!!
P.S.Where did you get that bed spread??!!! I LOVE it!!
I’ll try different fabric for that.. Thanks for the tutorial!
love it really!
Thank you so much for the tutorial. We got so brave this week that my son and I created two headboards! now just finishing off accessories. So tremendously helpful. If you need help with that Nikon, please give me a shout…I would be happy to help. {Giovanna}
How many yards of fabric did you need? What are the dimensions of the headboard?
What can you do if the fabric you want is not wide enough? The fabric I want to use is 55″ wide but for a double bed the width of the headboard should be 57″ plus you need overhang.
Hey Moriah, I chose fabric that I could stretch across the headboard instead of top to bottom and that’s how you can make one bigger than a twin since most fabric we have acces to on the bolt is no wider than 54″. Cut your plywood first then allow 4-5 inches extra on all sides to play with. My headboard is about 1/2 inch wider than the mattress as I recall.
Kate
Thanks! I realized after I woke up this morning “Well, duh! stretch it across the headboard!”
I’m going to (attempt) making this once I finally decide on fabric and design.
Love your blog!
Thanks for the great tutorial. This is the first time I’ve seen one where it was mentioned about the different covered button kits for heavy fabric. And I LOVE the look of the 2-inch padding. Again, first time reading that and it makes it look so much more professional. I’m bookmarking this. :)
What was the brand name of the plastic button covers you used? Tried to find it on the Joann’s website but nothing came up. Love the result!
Hi Beth, I forget the brand but they have a blue package and they’re the button cover kids sold at Joanns.
Kate
I’m in the final stages of making this, following your instructions pretty much to a T (but a different shape. My problem: I bought the longest needle I could find & I still can’t figure out how to push it through to the other side???
Also, how did you ensure you spaced them correctly once you started sewing? I have the holes perfectly measured and drilled on my wood, but I’m worried that they will not be as precise after i haphazardly push a needle through 2 inches of foam (somehow)
Help! I’m trying to finish this by my party on Friday!
Hi Melissa, all I can say is go slow and take your time, and when you push the needle up through the fabric push it straight so it doesn’t come up at an angle. If you’ve measured and drilled the button holes precisely you can’t go wrong.
Kate
Thanks for the quick response! My problem now is that I can’t feed the needle back through into the little wood hole… should I make the wood hole much bigger to make it easier? I’m so close! haha
okay, this is a diy project that I really want and need to do. And I think I can actually do it too! yippee. I love that you lowered your headboard and re-posted a photo. I had the same thought about it needing to be lower. So great. Thanks for the DIY project help!
Help! I’m so confused. What happens to the excess fabric after you sew it on the button? it just says sew it on the button, then sew it on the board. What’s the step between? I’m new to this stuff. Thanks in advance!
Hi Amy, you simply trim away the excess, probably should have said that!
Kate
Bought my material yesterday, and will be starting soon! I’m excited and nervous!
I did this project in one day , with the help from my husband . The headboard turned out great! Thanks for the great instructions . It looks very pretty in the room.
You are crazy talented!!Your directions are so clear cut also. Thank you!
Stacey
What is best way to add curves at top of head board made out of thrift store hollow core door for king size bed? I have door and chocolate paisley velvet material but want a curve – help.
Hi Gale, the best tool I can think of is perhaps a jig saw but the blade might be too short, so you may need a Sawzall instead.
Kate
Made this headboard myself with these instructions! It looks great! Thanks for the tutorial. :)
How much did this cost? Any ways of making it cheaper?
Thank you for this tutorial! I made it today and I am absolutely thrilled! I’ve always wanted one and making it was so much more economical!
Awesome tutorial!! I was wondering where the white duvet cover and pillow cases are from – they are so cute and exactly what I’ve been looking for. Thanks!! And thanks for sharing – I am dying to make a tufted headboard :)
The shams and bedspread look like the matelasse available at JC Penney–I have a similar set–love them–get the larger size coverlet–it shrinks.
I love this headboard! I did one a few years ago, but it is really bulky and awkward. I am ready to redo it and will follow your tutorial this time. Thanks for sharing!
I just finished my headboard following your instructions. The buttons were the biggest pain in the butt, but I think it turned out really great. Thank you for posting this!
Still confused on how to secure the thread for the buttons, finishing nail?????
Hi Tiffini, wrap the thread around a 2″ nail and lay it flat against the plywood to hold the “tuft” in place!
Hi! I was curious what size button covers you used. Thanks!
Hi Elizabeth, I’m pretty sure mine were 1 inch… maybe 1 1/4″ ? They were not the 3/4″ I can tell you that!
Hi! I just found this tutorial and am going to attempt to do it in the next few weeks. One question I have is, does the headboard go all the way to the floor?
Hi Meike, the headboard is hanging on the wall, it doesn’t go down to the floor, just past the top of the mattress.
Great tutorial. We are going to try it this weekend. I was wondering how much fabric it takes.
Depends on the height and width of your board Christy, I’d add an extra 4 inches on all sides to that plywood measurement.
Kate
Does it mater what type of fabric that you use on the headboard? It’s for my 4 year old bed and I don’t see any upholstery grade that works ( I don’t want white). I found a pink duck cloth that would match her room. Is that okay do you think?
Hi Katie, any solid fabric will do, that pink duck cloth will work!
Kate
Great tutorial! Your headboard looks fantastic. I had similar problems with making fabric covered buttons. The buttons not only took forever but they started to come apart after I attached them to my headboard. I decided to call a local upholsterer and ask how much they’d charge for making fabric covered buttons for me. It was under $1 per button and so worth the few dollars it cost to have them made by a professional! (It only cost about $9 for 10 plus he made 2 extra for me in case they ever came apart – which they haven’t!) Then I attached them to my headboard again and have had no more problems! Also, when I attached them the second time around I found it much easier to thread the button first, put both ends of the thread through the needle and then pushed the needle in through the front of the headboard. I then had the two ends of the tread in the back and was able to staple it to the plywood. Another tip – when I was pricing out foam it was much cheaper for me to buy the foam through an upholsterer than at the fabric store. I called a few different upholstery places to find the best price and was able to purchase it all in one piece.
Great tips Heather, thanks for sharing!
Kate
Gorgeous! And you make it look SO easy! Very good tutorial. Thanks for sharing!
How much (about) dose this project cost, planning on making it this weekend and would like to know.
Hi Katilyn, it really depends on your fabric but plywood is typically about $20, batting varies from $10 to $15 and the button covers are about $3 a package, so I’ll estimate $45 to $50 before fabric.
Kate
Hallo from Italy!
Following your instructions I realized my masterpiece, (but I’m not able to upload here…)
Thanks a lot
Great job! Thank you for sharing! I am going to use your instructions to make my own headboard. Love what you did!
Love the tutorial, but I have 1 helpful tip for those of us with out drills. Use peg board! It already has holes drilled with perfect spacing. All you have to do is use the same amount of holes between each tuft. Thanks for the tutorial. I hope to get creative and apply it towards other things.
Amateur DIY-er here. Do you see any reason why I couldn’t use 2″ memory foam for this project? I’m looking to make a full bed headboard here, and it looks like a twin size will perfectly cover the dimensions.
Sure Emily that should work fine!
That is a great tip Avi, thanks so much!
ooh! my husband says he will try to make this! i’m so happy because we have a weird size bed (olympic queen by beautyrest which they don’t make anymore and i don’t think they ever made beds to fit them. if they did, they don’t anymore!). kings are way too wide and queens too narrow. so i think we have to make our own. so excited. thanks for the tutorial. just wondering how you secured the fabric to the buttons so smoothly?
thanks,
carol
Thank you so much for this! I followed it and with a few hiccups, I got a great result! Mine was quite a bit more money than I anticipated however. I went to Hancock Fabrics and my bill there for Fabric (I went with a $24 a yard choice that was 50% off (so $12), Foam, Batting, Thread, Needle, Staples and Button Cover kit cost me $112. My plywood was 70% off at Home Depot, but I bought a Flush Mounting Kit so it would hang snug against the wall and not move, so my total there was $26. So at the end of the day I spent $138 + tax.
If I had known I could pay a professional $1 a button to make them for me, I would have!! Also, I bought upholstery thread the first time and had to go back, you definitely need embroidery thread. And you are right, the metal button kit does NOT work! I had to make a separate trip to JoAnnes Fabric and get the plastic kind.
For me, it worked better to use a plain button the back side, to secure the embroidery thread and tighten the tuft. The hardest part for me was finding the darn hole coming back through with the needle, that took several minutes and choice words for each tuft. All in all, it looks great. Thanks so much for your help and inspiration!! :)