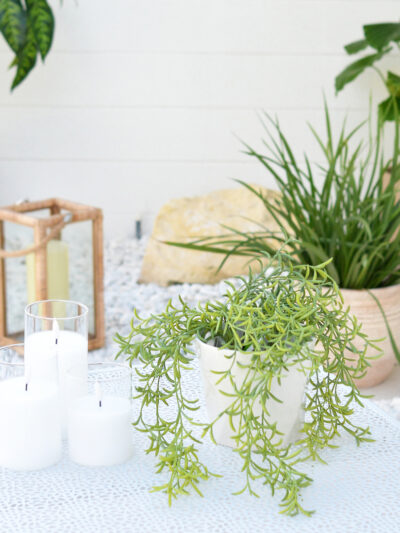
An idea came to me in the middle of the night. What if I could create my own candleholders and planters with plastic items purchased from the local market ? I knew that cement wouldn’t stick to plastic, so why not use plastic forms from my kitchen as molds for candleholders ? I started testing this invention last weekend to see if I could create something wonderful out of something mundane. After a few rounds of trial and error, my creation took form. You’d never guess that these lovelies were created out of yogurt cups and plastic storage containers!
How perfect are these for lighting a twilight path to your door ?

Do you need some candlelight in your garden ?

Perhaps a romantic table for two outdoors?

Believe it or not, these cement candleholders were made with molds from plastics available at your local grocery store!
Supplies to recreate:
- Plastics in various sizes for outside mold. They can be storage containers, deli containers, or juice jugs
- Yogurt cups for inside mold
- Non-stick cooking spray
- Plastic sheeting
- Rapid set cement mix from home improvement store (I recommend the 55 lb. bag over the 10 lb. box if you want to do more than just a few small tea light candleholders.)
- Plastic bucket for mixing
- Stir stick (pick up a free one in the paint department)
- Measuring cup
- Sanding pad
- Latex gloves
- Outdoor ‘Patio Paint’ in colors of choice


Step One: Clean and dry your plastic molds and yogurt cups. Spray the inside of your plastic mold with a thin coat of cooking spray. The cooking spray isn’t absolutely essential, but it does help ease your plastic away from the cement when you pop it out of the molds.
Step Two: Lay down plastic sheeting on your workspace, and put on your latex gloves – cement is irritating and very drying to your hands.
Step Three: Mix your cement with 4 parts cement powder and 1 part water as directed on the bag. It should be similar to the consistency of cake mix.

Step Four: Working quickly, pour your cement into your plastic mold, and set your yogurt cups inside. Use some pebbles or small rocks to weigh your yogurt cups down, because they tend to want to rise up out of the cement.


Make sure your plastic mold is on a level surface. Gently tap your candle mold about a dozen times to bring any bubbles to the surface.
Step Five: If your rapid set mix will solidify in 15 minutes, then let your mold sit for approximately 10 minutes, and gently twist your yogurt cups inside the mold to ease in their removal. After the full 15 minutes, remove the yogurt cups. When you can feel the outside cement is very warm inside its plastic mold, and when it starts to form some condensation, pop it out of the mold. Do this just before it is permanently set. It’s about a 2 minute window, so stay by your project.
Note: Your plastic storage containers are completely reusable after this project – be sure to rinse any cement residue out of your mold right away. But don’t rinse it down your indoor plumbing – after all, it is cement.
Step Six: Take your sanding pad and gently rub away any rough edges on the surface and sides.

Step Seven: Allow cement candleholders to fully set approximately 12 to 24 hours.

Step Eight: If you want a painted surface, then apply several coats of outdoor ‘Patio Paint’ to your candleholders. Allow to dry between coats.
I added some decorative rocks between Step Four and Step Five to create a more rugged looking candleholder for my younger brother’s bachelor pad. You could also use shells, mosaics, whatever you like.

I painted the inside and outside a mushroom color that I made from a mixture of brown, gray, and green patio paint. Nestled among succulents, this version is very zen and organic.


Just look what you can create out of ordinary grocery store plastics and some quick drying cement!


My favorite part about these cement candleholders is how useful they will be through the fall and through the holidays. Unlike glass votives, there is no worrying about shattered glass. Unlike metal luminaries, there is no need to bring them indoors for fear of rust. These homemade versions should weather outside beautifully, just like any other cement object.
Next post, I’ll share some more tips and tricks about working with cement. And I’ll also show you how to made a few cement planters out of more plastic containers and a lemonade jug.
.


Wow these are awesome. And feels like a project even I could take on. Love the one with rocks. Would love to see one weathered and covered with moss.
Absolutely brilliant!
That is soooo cute and cool! Love the pumpkin too! :)
Over the top, crazy cool, and totally DO-able. Thanks so much for sharing. Love the polished rock topped one especially!
Ohhhh my word, I LOVE these!! I will absolutely be making some!
Absolutely stunning! I would have never thought of that, you're so brilliantly creative!
Oh your cement candles have given me some great ideas!!
How about some sea shells tucked around the edges? This will be perfect for my new beach area at the store.
or, since i kind of like the natural cement rough look, some little tiny gravely pebbles mixed in, or sand, to roughen it up a bit. And I'm going to look for more square containers!
thanks for inspiring me.
barbara jean
I think you are seriously out of control and I hope to see you on some design show soon! Love them. Such a brilliant idea.
A wonderful idea that isnt going to "blow" over!!
You can also use concrete colour powder to add right into the mix instead of painting afterward.
Good if your interested in one shade or planning to make quite a few and want to spend for a couple of shades. Not too expensive, but not the variety of shades as paint.
I love these and am going to make some.
Cheers!!
Both your idea and the photos are great!
This is absolutely genius!! I definitely want to make some of these for my back yard! Have I ever mentioned how much I love, love, love your blog? :0)
It's official. You have the most creative ideas in blogland. This is great! Thank you for sharing your many tutorials too.
Beautiful!
These are wonderful. There is a man 'down the road' who has fabricated all sorts of molds to create large urns and garden statues.
How much fun- especially when these things are so expensive.
Laura
(picking jaw off the floor) Can't believe how creative you are! You did a fabulous job (on pictures too). I don't mind the white pumpkin one bit…I'm ready for Fall. We have one tree in our yard that loses all it's leaves early. It's already started dropping them on the lawn! It makes me wish for cooler Fall temps. :) Great tutorial today!!!
I love these! I recently spent $150 for a custom bird bath that was made out of cement, but the artist made it look exactly like a tree stump! The very bottom of the base has two planters. Love it so much.
I'm going to be trying this project. I like the idea of adding the paint in when mixing.
Love your blog,
Kristen
Ok, those are totally awesome!! I especially love the huge one with the 3 votives – fabulous idea!
Very creative and useful! Love the fact that they will weather well!
Thanks for sharing your ideas with us.
gail
great diy project cg! man i have way too many projects in mind now… i just wish i had more time!
Kate, I love you for pulling out the pumpkin!! I was thisclose to buying it the other day! These are awesome!!
You are an absolute genius!! Love it. And am TOTALLY jealous of your hydrangeas…I cannot get mine to cooperate for the life of me!
I love these ideas and will definately be saving these instuctions for future use. I love the personality that I am creating in my home with great ideas from reading all of you ladies wonderful blogs.
Thanks, Amy
Such and excellent idea. Something new for me to try and play around with. Thanks for the idea!
Pam
Seriously, how cool! That look rather easy to make too. I'm gonna have to try this one!
Wow, what a great idea…very creative! Thanks for sharing!
Enjoy a wonderful week!
~Michelle :)
fabulous! & you made it look & sound so easy to do. maybe even i can do it.
you have such a generous heart to share all of this with us. thank you.
blessings & peace –
That is so neat looking! I love how rustic and simple it is.
Those are great. I like how easily you can customize them for your design taste.
Your creativity is impressive! They are very attractive and a great project.
such a great idea!! can you share how much they cost to make?
Sure Luke and Pamela.
A 55 lb bag of quick dry cement is $18 dollars and goes a long way. A 10 lb box is $10 dollars and goes fast. The small paints cost about $1 to $2 each depending on the craft store, the large bottles of patio paint are $4. The other supplies are whatever they cost at your grocery store.
Kate
What a great idea! Not only that it's a project that people living in multiple-family housing can do.
I recently moved to an apartment while searching for a new home and there are restrictions on things like spray paint (I do it anyway, shhhh) and such but without a garage or backyard some projects just can't be done or done well.
This is one that anyone can tackle.
Thanks for posting this!
what a fabulous idea!!!
CONCRETE (as cement is an ingredient in concrete and pretty worthless without water and aggregate) doesn't stick to anything that you spray down with Pam. this is how they form things in the field — spray the plywood with a little bit o' Pam. So, technically you could use anything. Plastic is nice because you can cut the form off when you are done.
i LOVE the big one with the 3 holders!! i know we have some cement leftover from a project, so i think i may just try it sometime!
Thanks for the inspiration!
I think this is my favorite project of yours yet. I *LOVE* these! So simple and gorgeous, just perfect. Thanks so much, you're such a creative rockstar. I'll be linking.
Love, love, love it :) Great idea!!
*GASP
NO WAYYY!!!! Can you make them for me? I don't have a "work area" that I can use to make them… seriously. I'll pay. Sell them in your Etsy!! I'm SO loving this idea!!
Those look so great! I'm gonna try that!
BRILL-IANT! Who needs Eddie Ross when we have Centsational Girl?
Odette
These are so cool. I especially love the one with the rocks – wouldn't they look awesome with some colored glass also? I'm sure you've started something that everyone will be trying to do at some point this coming weekend!
can't wait to try this! thanks!
You've done it again! Wonderful idea. I'm thinking Christmas presents…really lovely, simple idea. Stunning.
Forget candles…. I'm making awesome planters out of these!!! Thanks so much for the great idea!!!
WOW Those are sooooo incredible and classy! These would look GREAT at an outdoor wedding! Or a romantic dinner for two! ;0)
Your hydrangeas are that lovely dusty-rose shade because your soil is alkaline; if it were acid, they'd be blue. Hydrangeas are actually a living "litmus paper." (Tomorrow's science fun: how a white cat can shed black hair on white clothing!)
What a fabulous project! So cheap and easy, and it's great that you can customize them however you want. Thanks for sharing!
Those candle holders are awesome! I can't wait to try them. BTW- who won the vinyl?
These are great… adorable!! And they look fun to make! ;) I just love Design Star… I do a post about it every week… I would love to have you join the conversation. (tomorrow's post) They have such great ideas on that show!
you are so resourceful! amazing
Love these!
Wow, these are awesome!! I can't wait to add this to the million other things I have to do. I'm off now to spray some wicker hampers my daughter is taking to college and also some chairs for her kitchen. Love & blessings from NC!
How cool are those!!!
m ^..^
These are awesome! What a brilliant idea! :)
Kate, thanks for joining my blog party, I know my readers are going to go crazy over these votives!
These are amazing! I can't wait to give this a try. It would be perfect for a dinner party on my deck!
Oh the possibilities with this one. This how-to is really inspiring!!
How clever! I think your creativity knows no bounds. I'm impressed, as usual! :-)
i love, love, love these, really great idea!!
Love it!!
Very creative! Great photos too.
I think I dearly love them!
I saw a similar idea years ago to make a cement centerpiece bowl though it was daunting enough that I never did it. This looks more realistic for my life and I can't wait to try it!!
Great diy Kate! Love it! YOu know you need a permanent spot in my link luv roundup…haha.
http://www.luvinthemommyhood.com/2009/08/link-luv-roundup_19.html
Fabulous!
I have a poll up on my blog about my BIGGEST decor dilemma. Come on over and vote, I need all the help I can get!
http://imnomartha.blogspot.com/2009/08/first-poll-ever-to-paint-or-not-to.html
Great blog, what a good i dea these diy cement candle holders
I’ve had the same idea brewing in the back of my head for a while now but just hadn’t put the effort into finding out if it would work. Thank you so much for posting this!! I love the look of your candleholders (and everything else I’ve seen here so far!) and will be borrowing this idea soon!!
This is brilliant! My husband has been making concrete flower pots. I’ll have to tell him about this.
What a great and oh so simple project! Kudos!
I have never see before that these Cement Candle holders…its really very good idea…love it.
Thanks for Good work… I really like it.
This was one of the first things I saw when I discovered your blog last month. I finally finished 3 candle holders for my m-i-l for Mother’s Day. Now I’m going to work on some for myself. It’s real damp here in the Willamette Valley so it took them several days to totally dry out so that I could paint them. After painting them I glued glass pebbles along the rim, using E-6000.
Great idea. Thanks for sharing.
Thank you for this perfectly clear tutorial. It is so easy to make these cement candle holders! I had seen some cement candle holders and I was trying to figure out in my head what the best way to go about making them would be and my process was not this simple lol.
I’m so excited. Can’t wait to make them :)
On the picture showing the sanding block, it looks like you left the yogurt container in the cement. Are you supposed to leave in or take out?
I took them all out Barb.
You can grow moss on them. It looks pretty for the garden.
Take yoghurt and rinsed moss and put it in a blender.
Paint the cement with the blend. You dont have to wait until the cement is dry. The moss needs watwr to grow.
Also, if you make containers for plants you can add some perlite to the cement, to make it less heavy.
Saying that I dont know the produkt you use. I use a recepie for ordinary cement (very cheap) and replace the sand with spagnum and the pebles with perlite, to make it less heavy.
I like the way you use the stones on top of the big candleholder.